Introduction
There is nothing quite as frustrating as pressing your garage door remote after a long day, only to be met with silence and a closed door. If you are wondering how to change the battery on Chamberlain garage door opener remotes or backup systems, you are not alone; this is one of the most common maintenance tasks for homeowners. In this comprehensive guide, we will walk you through the exact steps to restore access quickly, safely, and without the need for an expensive service call.
Identifying Your Chamberlain Model and Battery Type
Before grabbing a screwdriver, it is critical to understand that “Chamberlain garage door opener” refers to a system with multiple battery-dependent components. According to product specifications and user manuals, there are three distinct areas where batteries require replacement:
- Handheld Remote Controls: The most frequent failure point.
- Wireless Keypads: Mounted outside the garage.
- Battery Backup Units: Internal units attached to the motor head (for models like the B4505T or B6705T).
Common Battery Types by Component
| Component | Typical Battery Type | Estimated Lifespan | Difficulty Level |
|---|---|---|---|
| Standard Remote | CR2032 Coin Cell | 3–5 Years | Easy |
| Visor Remote | 3V Lithium (CR2016) | 3–4 Years | Easy |
| Wireless Keypad | 9V Alkaline | 1–2 Years | Easy |
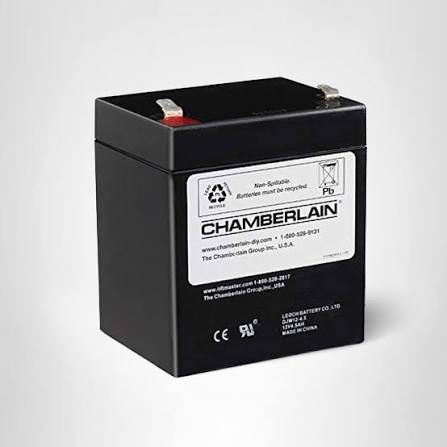
| Backup System | 4.5Ah 12V Sealed Lead-Acid | 2–3 Years | Moderate |
Note: Always verify the specific voltage and size printed on the old battery or inside the compartment before purchasing replacements.
Step-by-Step: Changing Batteries in Chamberlain Remotes
This is the solution for 90% of users searching for how to change the battery on Chamberlain garage door opener devices. Most modern Chamberlain remotes use a coin-cell design that requires no tools.
1. Open the Battery Compartment
Locate the small tab or slot on the bottom or side of the remote. For newer “slim” remotes, press the release latch and slide the cover down. For older visor clips, you may need to gently pry the case apart using a flathead screwdriver inserted into the seam notch.
2. Remove the Old Battery
Carefully pop out the depleted battery. Take note of the polarity orientation (+/-). It is helpful to take a quick photo with your phone before removal to ensure correct reinstallation.
3. Clean the Contacts (Expert Tip)
Corrosion is a silent killer of remote functionality. Use a cotton swab lightly dampened with isopropyl alcohol to wipe the metal contacts. Allow them to dry completely for 30 seconds. This step resolves intermittent connection issues even when a new battery is installed.
4. Insert the New Battery
Place the fresh CR2032 or CR2016 battery with the positive (+) side facing up (unless your manual specifies otherwise). Press down firmly until it clicks into place.
5. Test and Reprogram if Necessary
Press the button to check the LED indicator. If the light flashes but the door does not respond, the remote may have lost its programming during the battery swap. Hold the “Learn” button on the motor unit until the LED lights up, then press your remote button once to resync.
Replacing the Wireless Keypad Battery
The exterior keypad is exposed to temperature extremes, which drains batteries faster than indoor remotes.
- Flip Up the Cover: Slide the battery cover downward or flip it open depending on the model year.
- Disconnect the Old 9V: Pull the connector straight off. Do not yank by the wires.
- Install Fresh 9V Alkaline: Connect the new battery and tuck excess wire neatly into the housing. Avoid forcing the cover shut, as pinched wires cause premature failure.
- Reset the Code: Unlike remotes, keypads rarely lose memory during battery changes. However, if the unit was dead for over 24 hours, consult your manual for the reset sequence.
Changing the Battery Backup Unit (Motor Head)
For homes with smart openers featuring integrated battery backup, this maintenance task is vital for safety during power outages. According to Wikipedia, modern residential openers must meet UL 325 safety standards, making functional backups a compliance issue, not just a convenience.
Safety First
- Disconnect the opener from AC power.
- Wear insulated gloves when handling lead-acid batteries.
- Work on a stable ladder with a spotter.
Replacement Procedure
- Access the Housing: Remove the plastic lens cover and the backup battery compartment door (usually secured by two Phillips screws).
- Disconnect Wires: Unplug the red (+) and black (-) spade connectors. Remember: Red to Positive, Black to Negative.
- Swap the Unit: Slide out the old 4.5Ah sealed lead-acid battery. Insert the identical replacement. Never substitute with a different amperage or chemistry.
- Reconnect and Test: Reattach wires securely. Restore AC power. The unit should emit a confirmation beep. Run a full cycle to verify the backup engages correctly when unplugged.
Troubleshooting: When New Batteries Don’t Work
If you have successfully learned how to change the battery on Chamberlain garage door opener components but the system still fails, consider these diagnostic steps:
- Check the Safety Sensors: Misaligned photo-eye sensors at the floor level will prevent operation regardless of battery health. Ensure both LEDs are solid green/amber.
- Inspect for Signal Interference: New LED bulbs in garage fixtures can emit RF noise that blocks remote signals. Try operating the door with the garage lights off to test.
- Verify Battery Freshness: Even new batteries can be defective. Test with a multimeter; a CR2032 should read ≥3.0V under load.
- Assess Motor Unit Age: If the opener is over 15 years old, internal capacitor failure may mimic battery symptoms. Professional evaluation is recommended at this stage.
FAQ: Common Questions About Chamberlain Batteries
How often should I change my Chamberlain remote battery?
Under normal usage (2–4 cycles daily), expect 3–5 years of life. High-frequency use or extreme temperatures may reduce this to 18–24 months. Replace proactively when response becomes inconsistent.
Can I use rechargeable batteries in my Chamberlain remote?
Generally, no. Rechargeable coin cells typically output 1.2V instead of the required 3V, resulting in insufficient signal strength. Always use manufacturer-specified lithium primary cells.
Why does my keypad battery drain so quickly?
Frequent code entries, stuck buttons, moisture ingress, or extreme cold accelerate drain. Ensure the weather seal is intact and consider installing a protective silicone cover if exposed to direct rain.
Does changing the battery erase my programmed codes?
For remotes and keypads, no. Memory is non-volatile. However, the battery backup unit replacement requires no reprogramming either. Only complete power loss combined with capacitor failure risks code loss.
Where can I buy genuine Chamberlain replacement batteries?
Authorized dealers, major home improvement retailers, and Chamberlain’s official website carry OEM-spec batteries. Avoid unbranded alternatives, as voltage inconsistencies damage sensitive circuit boards.
What do I do with old garage door batteries?
Lithium coin cells and lead-acid batteries are hazardous waste. Recycle at designated e-waste facilities or retailer drop-off points. Never dispose of them in household trash due to fire and environmental risks.
Conclusion
Mastering how to change the battery on Chamberlain garage door opener systems empowers you to maintain home security and convenience independently. Whether swapping a simple remote cell or replacing a critical backup unit, following these precise steps ensures reliable performance and extends your equipment’s lifespan. Regular battery maintenance prevents emergency lockouts and keeps your smart home ecosystem functioning seamlessly.
Found this guide helpful? Share it with friends and family on Facebook, X (Twitter), or Pinterest so they never get stranded outside their garage again! Tag us with your successful repair stories—we love seeing our community thrive. Safe lifting and happy opening!
Leave a Reply