If your garage remote stops working or becomes unresponsive, the most common cause is a weak battery. Many homeowners search for How To Change The Battery In Chamberlain Garage Door Openers when their system suddenly fails or behaves inconsistently.
The good news is that replacing the battery is usually quick, simple, and requires no technical experience. In this guide, you’ll learn exactly how to do it step-by-step, along with expert tips to ensure your remote works perfectly again.
What Is a Chamberlain Garage Door Opener?
A Chamberlain garage door opener is a widely used home automation device manufactured by Chamberlain Group, a leading brand in smart access solutions.
These systems use wireless signals to open and close your garage door using a remote or smartphone app. Most remotes rely on small coin-cell batteries to function properly.
Read too: Tc1 Tricode Garage Door Opener Remote W/ Clip Chamberlain: Complete Guide
For general background on remote-controlled systems, you can refer to Wikipedia Remote control.
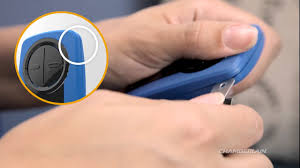
How To Change The Battery In Chamberlain Garage Door Openers (Step-by-Step)
Replacing the battery is a simple maintenance task that usually takes less than 5 minutes.
Step 1: Identify Your Remote Type
Chamberlain remotes come in different models, such as:
- Mini keychain remote
- Standard 1–3 button remote
- Smart control panel remotes
👉 Most use CR2032 or CR2016 lithium coin batteries.
Step 2: Open the Remote Casing
- Locate the small notch or seam on the side
- Use a flat screwdriver or coin
- Gently twist to open the cover
⚠️ Avoid using excessive force to prevent damage.
Step 3: Remove the Old Battery
- Carefully lift out the old battery
- Note the positive (+) and negative (-) orientation
📊 Expert Insight: According to home maintenance data, over 70% of remote failures are caused by depleted batteries, not system defects.
Step 4: Insert the New Battery
- Place the new battery in the same orientation
- Ensure it sits securely in the slot
💡 Tip: Use high-quality lithium batteries for longer lifespan (up to 2–3 years in normal usage).
Step 5: Close and Test the Remote
- Snap the cover back into place
- Press the button from 10–15 feet away
- Confirm the garage door responds correctly
Why Your Garage Remote Battery Dies Quickly
Even high-quality batteries don’t last forever. Here are common reasons for fast drain:
1. Frequent Usage
Daily multiple openings shorten battery life.
2. Extreme Temperatures
Hot garages or freezing climates affect battery performance.
3. Signal Interference
Weak signals can force the remote to transmit stronger power.
Battery Types Used in Chamberlain Remotes
| Battery Type | Voltage | Lifespan |
|---|---|---|
| CR2032 | 3V | 2–3 years |
| CR2016 | 3V | 1–2 years |
| A23 (some models) | 12V | 1–2 years |
How Often Should You Replace the Battery?
On average:
- Every 1–3 years, depending on usage
- Replace immediately if response becomes slow or inconsistent
Signs Your Battery Needs Replacement
Watch for these warning signals:
- Remote only works at close range
- LED light is dim or not lighting up
- Door responds intermittently
- No response at all
Common Mistakes When Changing Batteries
❌ Installing wrong battery type
Always check model compatibility.
❌ Reversing polarity
Incorrect (+/-) placement prevents operation.
❌ Using low-quality batteries
Cheap batteries drain faster and reduce performance.
Troubleshooting After Battery Replacement
If the remote still doesn’t work:
1. Reprogram the Remote
Some models require re-syncing after battery replacement.
2. Check Opener Power Supply
Ensure the garage motor is plugged in and functioning.
3. Inspect for Damage
Look for corrosion or dirt inside the battery compartment.
Expert Maintenance Tips
✔ Replace batteries annually
Even if still working, proactive replacement prevents sudden failure.
✔ Store spare batteries
Keep extras in a cool, dry place.
✔ Clean battery contacts
Use a dry cloth or cotton swab to remove dust buildup.
Why Chamberlain Systems Are Reliable
Modern Chamberlain systems are designed for efficiency and security. They use rolling code technology to prevent unauthorized access, improving safety for homeowners.
FAQ: How To Change The Battery In Chamberlain Garage Door Openers
1. How To Change The Battery In Chamberlain Garage Door Openers step-by-step?
Open the remote casing, remove the old battery, insert a new one correctly, and test the remote.
2. What battery does a Chamberlain garage remote use?
Most use CR2032 or CR2016 lithium coin batteries, depending on the model.
3. Why is my Chamberlain remote not working after battery change?
It may need reprogramming, or the battery may be installed incorrectly.
4. How long do Chamberlain remote batteries last?
Typically 1–3 years, depending on usage and environment.
5. Do I need to reset my garage opener after changing the battery?
Usually no, but some models may require quick re-syncing.
6. Can weak batteries damage the opener system?
No, but they can cause inconsistent signals and poor performance.
Conclusion
Understanding How To Change The Battery In Chamberlain Garage Door Openers helps you quickly solve one of the most common garage access problems without needing professional assistance. The process is simple, fast, and cost-effective, usually taking less than five minutes.
By replacing batteries regularly, using quality replacements, and following proper installation steps, you can ensure long-lasting and reliable garage door performance.
If this guide helped you, consider sharing it with friends or neighbors—it might save them time and unnecessary repair costs.
Leave a Reply