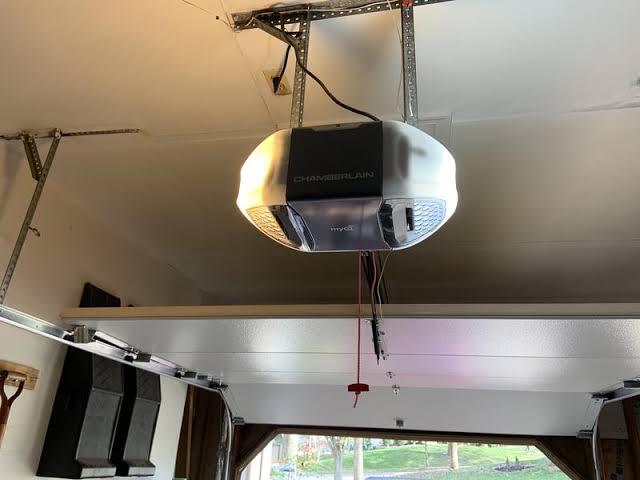
Introduction
A dark garage is more than just an inconvenience; it can be a genuine safety hazard when you are navigating around tools, vehicles, or storage boxes at night. If your overhead light has burned out, knowing how to change light bulb on Chamberlain garage door opener models is a quick DIY fix that restores visibility and security in minutes. This guide walks you through the safe removal process, helps you select the correct vibration-resistant bulb, and ensures your opener’s warranty remains intact.
Why Your Chamberlain Garage Door Light Matters for Safety
Before grabbing a ladder, it is important to understand why this specific maintenance task differs from changing a standard household lamp. Garage door openers are subject to constant vibration and temperature fluctuations that destroy standard incandescent filaments rapidly. According to product engineering standards, using the wrong bulb type is the leading cause of repeated failures and potential damage to the opener’s logic board.
Furthermore, proper lighting is a critical component of home security. A well-lit garage deters intruders and prevents accidents. When you master how to change light bulb on Chamberlain garage door opener units correctly, you are not just fixing a light; you are maintaining the integrity of your home’s primary entry point. Always prioritize safety by disconnecting power before beginning any electrical work on your opener system.
What Type of Bulb Does a Chamberlain Opener Use?
Selecting the correct replacement is the most critical step in this process. Using an incompatible bulb can void your warranty or damage the unit’s internal circuitry. Chamberlain Group explicitly recommends specific bulb types depending on your model’s manufacturing year.
Compatible Bulb Specifications
| Bulb Type | Wattage/Equivalent | Vibration Resistant | Best For | Notes |
|---|---|---|---|---|
| LED (Recommended) | 60W Equivalent | Yes | All Models | Energy-efficient, long-lasting, cool operation |
| Rough Service Incandescent | Max 60W | Yes | Older Models | Must be labeled “Rough Service” or “Garage Door” |
| Standard Incandescent | Max 60W | No | Not Recommended | Will fail quickly due to vibration |
| CFL | N/A | No | Not Recommended | Can interfere with remote signals & slow startup |
⚠️ Critical Warning: Never exceed the maximum wattage printed on the light lens cover. Exceeding 60 watts (or the specified LED equivalent) can melt the plastic housing and create a fire hazard. Always refer to your specific model’s manual for exact specifications.
For detailed technical background on how these lighting systems integrate with motor mechanisms, you can reference general information on garage door opener technology on Wikipedia. Understanding the mechanical stress placed on the light socket during operation reinforces why vibration resistance is non-negotiable.
Step-by-Step: How To Change Light Bulb On Chamberlain Garage Door Opener
Follow this precise tutorial to replace your bulb safely and efficiently. Gather a sturdy stepladder, a clean microfiber cloth, and your verified replacement bulb before starting.
1. Disconnect Power Completely
Safety is paramount. Do not rely solely on the wall switch or remote. Locate the emergency release cord or unplug the opener unit directly from the ceiling outlet. If your unit is hardwired, turn off the corresponding circuit breaker at your main electrical panel. Wait 30 seconds for any residual capacitor charge to dissipate.
2. Allow the Old Bulb to Cool
If the light was recently on, the bulb and surrounding metal socket may be extremely hot. Allow at least 5–10 minutes of cooling time to prevent burns. Touch the lens cover gently with the back of your hand to verify it is safe to handle.
3. Remove the Light Lens Cover
Most Chamberlain models feature a hinged or snap-off lens cover. Gently squeeze the sides of the cover or unscrew the retaining screw (depending on your model) to release it. Set the cover aside on a stable surface where it won’t crack or get lost. Keep any small screws in a magnetic tray or pocket.
4. Extract the Burned-Out Bulb
Using the microfiber cloth for grip and protection, grasp the old bulb firmly but gently. Turn it counter-clockwise until it releases from the socket. If the bulb is broken in the socket, use needle-nose pliers with insulated handles to carefully extract the base—never use bare hands. Dispose of the old bulb according to local recycling regulations.
5. Install the New Vibration-Resistant Bulb
Insert the new bulb into the socket and turn it clockwise until snug. Do not overtighten. Overtightening can crack the bulb base or strip the socket contacts. The bulb should feel secure with gentle resistance. Wipe the new LED or rough-service bulb with the cloth to remove skin oils, which can create hot spots and shorten bulb life.
6. Reattach the Lens and Restore Power
Snap or screw the lens cover back into place, ensuring all tabs are fully seated. Restore power by plugging the unit back in or resetting the circuit breaker. Test the light using both the wall control panel and the remote/light button on your visor clip. Verify the bulb illuminates instantly without flickering or buzzing.
Troubleshooting: Light Still Not Working After Replacement?
If you have correctly followed the steps above and the light remains dark, the issue likely extends beyond the bulb itself. Here are common culprits:
- Faulty Socket Contacts: Over time, the metal tab inside the socket can flatten and lose contact with the bulb base. With power disconnected, gently pry the center tab upward with a small flathead screwdriver to restore tension.
- Logic Board Failure: If the socket tests live with a multimeter but the bulb won’t light, the opener’s internal relay or logic board may have failed. This typically requires professional service or board replacement.
- Wiring Issues: Check for loose wire nuts or damaged wiring between the socket and the main board. Vibrations can loosen connections over years of operation.
- Incompatible LED Driver: Some older Chamberlain units struggle with certain LED brands. Try a different brand of garage-door-specific LED or temporarily test with a known-working rough-service incandescent to isolate the problem.
Frequently Asked Questions (FAQ)
Q1: Can I use any LED bulb in my Chamberlain garage door opener?
No. You must use LEDs specifically rated for garage door openers or enclosed fixtures. Standard household LEDs may flicker, buzz, or fail prematurely due to vibration and heat buildup. Look for packaging that explicitly states “Garage Door Opener Compatible” or “Vibration Resistant.”
Q2: How often should I replace the garage door opener light bulb?
With a proper vibration-resistant LED, you should expect 3–5 years of reliable service. Standard incandescent bulbs in this application typically last only 3–6 months. If you find yourself replacing bulbs frequently, verify you are using the correct type and check for excessive vibration or voltage issues.
Q3: Will changing the light bulb void my Chamberlain warranty?
No, replacing the light bulb is considered routine user maintenance and does not void the warranty. However, using an incorrect bulb type that damages the logic board or socket will void coverage. Always follow the manufacturer’s specifications outlined in your owner’s manual.
Q4: Why does my new LED bulb flicker or hum in the opener?
Flickering usually indicates an incompatible LED driver or a failing socket contact. Humming suggests electrical arcing or a poor connection. First, ensure the bulb is garage-door-rated. If the problem persists, inspect the socket tab for proper tension and consider consulting a certified technician.
Q5: Is it safe to change the bulb without unplugging the opener?
Absolutely not. Even with the wall switch off, the socket may remain energized. Always unplug the unit or shut off the circuit breaker before touching the bulb or socket. Electrical shock risk is real, and capacitors can hold dangerous charges even after power is disconnected.
Q6: Can I upgrade to a brighter bulb than the original?
You must never exceed the maximum wattage rating printed on the lens cover or housing. However, because LEDs produce more lumens per watt, a 60W-equivalent LED (which draws only ~8W) provides significantly brighter illumination than a 60W incandescent while staying within safe thermal limits. Always verify lumen output and wattage draw separately.
Conclusion
Mastering how to change light bulb on Chamberlain garage door opener models empowers you to maintain a safer, more functional home entryway without costly service calls. By selecting the correct vibration-resistant bulb, following proper safety protocols, and troubleshooting methodically, you ensure reliable illumination for years to come. Remember: the right bulb isn’t just about brightness—it’s about protecting your investment and your family’s safety.
Found this guide helpful? Share it with fellow homeowners on Facebook, Pinterest, or Nextdoor who might be struggling with a dark garage! Tag a friend who needs this quick fix, and help your community stay safe and well-lit. 💡🔧
Leave a Reply