Introduction
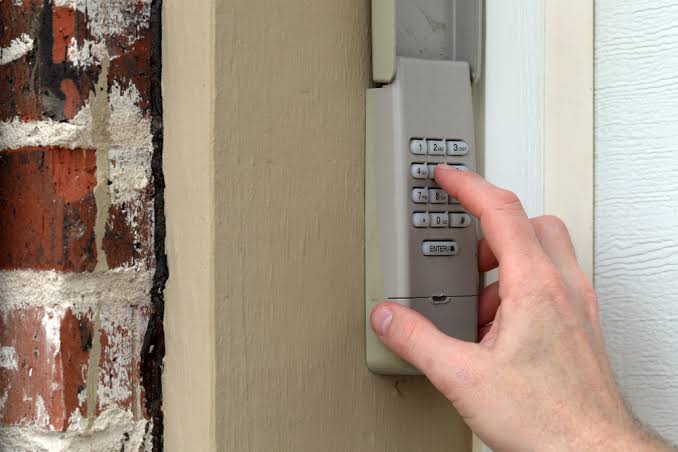
There’s nothing more frustrating than standing in your driveway, punching numbers into your Precision garage door opener keypad, and getting absolutely zero response. If you’re wondering how to change battery in Precision garage door opener keypad, you’ve come to the right place — and chances are, a dead battery is the only thing standing between you and a smoothly functioning garage entry system. The good news? This is one of the simplest home maintenance tasks you can tackle in under ten minutes, with no special tools required. Let’s walk through it together, step by step.
Why Your Precision Keypad Stops Working (And Why It’s Usually the Battery)
Before we dive into the replacement process, it helps to understand why your keypad went silent in the first place.
Most Precision wireless keypads run on a single 9-volt alkaline battery. Over time — typically every 12 to 18 months depending on usage frequency and climate conditions — that battery drains to a point where the keypad can no longer transmit a strong enough signal to your garage door opener’s motor unit.
Here are the most common signs that your keypad battery is dying:
- No LED response when you press any button
- Intermittent operation — the door opens sometimes but not others
- Delayed response after entering your PIN code
- Faint or flickering backlight on the keypad display
- The keypad works fine in warm weather but fails during cold snaps
According to data from the International Door Association, garage door openers and their accessories represent one of the most frequently serviced categories in residential automation, with battery-related failures accounting for roughly 60–70% of all keypad service calls. That means the vast majority of “broken” keypads aren’t broken at all — they just need a fresh battery.
What You’ll Need Before You Start
Gathering your supplies ahead of time will make this a smooth, frustration-free process. Here’s your quick checklist:
| Item | Details |
|---|---|
| Replacement Battery | 9V alkaline (Duracell, Energizer, or equivalent) |
| Small Flathead Screwdriver | Only if your model has a screw-secured compartment |
| Clean Cloth or Tissue | For wiping battery contacts |
| Step Ladder (optional) | If your keypad is mounted higher than comfortable reach |
Pro Tip: Avoid using rechargeable 9V batteries in your Precision keypad. They typically output around 7.2–8.4 volts instead of the full 9 volts, which may not provide enough power for reliable signal transmission. Stick with standard alkaline cells for best results.
Step-by-Step Guide: How to Change Battery in Precision Garage Door Opener Keypad
Follow these five straightforward steps, and you’ll have your keypad up and running again in minutes.
Step 1: Locate the Battery Compartment
Walk up to your Precision keypad mounted on the exterior wall near your garage door. Flip the keypad face down or look at the back panel. On most Precision models — including the popular Precision 382 and Precision 387 series — the battery compartment is located on the rear side of the unit, secured by either a sliding cover or a single Phillips-head screw.
If your keypad has a sliding cover, simply push the tab downward (or upward, depending on the model) and slide the panel off. If it’s screw-secured, use your small screwdriver to remove the screw and set it aside somewhere safe — you don’t want to lose it in the grass!
Step 2: Remove the Old Battery
Once the compartment is open, you’ll see the 9V battery clipped into place. Gently pull the battery away from the connector terminals. You may need to apply a slight rocking motion to release the snap connector — don’t yank it straight out, as this can bend the metal contact prongs.
Take a moment to inspect the old battery. If you notice any white or greenish corrosion around the terminals, that’s a sign the battery leaked slightly before dying. Don’t worry — this is common and easily cleaned.
Step 3: Clean the Battery Contacts
This is the step most people skip, and it’s the number one reason a “new battery” still doesn’t fix the problem. Using your clean cloth or tissue, gently wipe the metal contact points inside the battery compartment. If there’s visible corrosion, dampen a cotton swab with a tiny amount of white vinegar or rubbing alcohol and scrub the contacts until they shine.
Allow the contacts to dry completely before proceeding — this usually takes about 30–60 seconds.
Step 4: Insert the New 9V Battery
Take your fresh 9V alkaline battery and align the positive (+) and negative (−) terminals with the corresponding markings inside the compartment. Press the battery firmly onto the snap connector until you feel (and hear) a satisfying click. Give it a gentle tug to confirm it’s seated securely.
Important: Double-check the polarity. Reversing the battery won’t damage most modern Precision keypads, but it will prevent the unit from functioning until corrected.
Step 5: Reassemble and Test the Keypad
Slide the battery compartment cover back into place (or reinsert the screw and tighten it snugly). Now, enter your 4-digit PIN code followed by the Enter/Start button. The keypad LED should light up brightly, and your garage door should begin opening within 1–3 seconds.
Test the keypad at least three times to confirm consistent performance. Walk to various distances — try it from 5 feet, 10 feet, and 15 feet away — to ensure the signal strength is strong across the full operating range.
Troubleshooting: What If the Keypad Still Doesn’t Work?
You’ve replaced the battery, cleaned the contacts, and confirmed proper polarity — but the keypad is still unresponsive. Don’t panic. Here are the next things to check:
- Reprogram the keypad. Sometimes a dead battery causes the keypad to lose its pairing with the garage door opener motor. Consult your Precision owner’s manual for the specific reprogramming sequence (usually involving pressing the “Learn” button on the motor unit).
- Check the motor unit’s antenna. Make sure the hanging wire antenna on your garage door opener isn’t coiled up or tucked behind the unit. It should hang freely for optimal signal reception.
- Inspect for water damage. If your keypad is exposed to heavy rain or sprinkler spray, moisture may have infiltrated the circuit board. Look for discoloration or mineral deposits inside the housing.
- Consider keypad age. Most wireless keypads have a functional lifespan of 5–7 years. If yours is older and continues to malfunction after a battery swap, it may be time for a full replacement.
How Often Should You Replace the Keypad Battery?
As a general rule, plan to replace your Precision keypad battery once every 12 months as part of your routine home maintenance schedule. However, several factors can shorten or extend this timeline:
- High-usage households (4+ vehicles, frequent comings and goings): Replace every 8–10 months
- Extreme climates (very hot summers or freezing winters): Replace every 9–12 months
- Low-usage situations (single vehicle, rarely used keypad): Every 15–18 months may suffice
Seasonal Reminder: Many homeowners find it helpful to swap their keypad battery at the same time they change their smoke detector batteries — typically during Daylight Saving Time transitions in spring and fall.
Frequently Asked Questions (FAQ)
Q1: What type of battery does a Precision garage door keypad use?
Most Precision wireless keypads use a standard 9-volt alkaline battery (the rectangular kind with snap connectors on top). Always check your specific model’s owner’s manual to confirm, as a small number of newer compact models may use CR2032 coin-cell batteries instead.
Q2: Do I need to reprogram my Precision keypad after changing the battery?
In most cases, no. Modern Precision keypads retain their programming even after a complete battery drain. However, if the battery was dead for an extended period (several weeks or more), the keypad’s memory may have reset, and you’ll need to re-sync it with your garage door opener using the “Learn” button on the motor unit.
Q3: Can I use a lithium 9V battery instead of alkaline?
Yes, and it’s actually a great idea. Lithium 9V batteries (such as the Energizer Ultimate Lithium) last significantly longer than alkaline — often 3–5 years in low-drain devices like keypads. They also perform much better in extreme temperatures, making them ideal for outdoor-mounted keypads in cold climates.
Q4: Why does my Precision keypad work intermittently even with a new battery?
Intermittent operation with a fresh battery usually points to one of three issues: (a) corroded or loose battery contacts that weren’t fully cleaned, (b) radio frequency interference from nearby LED bulbs, Wi-Fi routers, or other wireless devices, or (c) a failing keypad circuit board. Try cleaning the contacts thoroughly first, then relocate potential sources of interference.
Q5: How do I know if my keypad needs to be replaced entirely?
If you’ve tried a new battery, cleaned the contacts, reprogrammed the unit, and verified the motor unit is functioning correctly — yet the keypad still fails — it’s likely reached the end of its usable life. Physical signs like cracked housing, stuck buttons, or persistent water damage also indicate it’s time for a replacement. Precision keypads are relatively affordable, typically ranging from $25 to $45 at major home improvement retailers.
Q6: Is it safe to change the keypad battery myself, or should I call a professional?
Changing the battery is completely safe and well within the capabilities of any homeowner. There are no high-voltage components involved — the keypad operates on a low-voltage DC circuit powered solely by the 9V battery. No electrician or garage door technician is needed for this task. Save the professionals for spring replacements, track realignments, or motor repairs.
Conclusion
Learning how to change battery in Precision garage door opener keypad is one of those small-but-mighty home skills that saves you time, money, and the annoyance of being locked out of your own garage. With just a fresh 9V battery and about five minutes of your Saturday morning, you can restore full functionality to your keypad and get back to the convenience of keyless entry.
Remember the key takeaways:
- Replace your battery annually as preventive maintenance
- Always clean the contacts before inserting a new cell
- Use quality alkaline or lithium 9V batteries for the longest lifespan
- Reprogram only if necessary — most keypads remember their settings
If this guide helped you solve your keypad problem, we’d love for you to share it! Hit that share button on Facebook, Twitter/X, or Pinterest so your friends and neighbors can stop wrestling with dead keypads too. A quick share could save someone else a very cold evening standing outside their garage. 🔋🏠
Got questions we didn’t cover? Drop a comment below — we read every single one!
Leave a Reply