Introduction
Is your garage door refusing to open just when you need it most? There is nothing more frustrating than standing in the rain or the cold, pressing your remote button repeatedly, only to hear silence. In most cases, the culprit isn’t a broken motor or a complex electrical issue; it is simply a dead battery. Knowing how to change battery in Linear garage door opener remote is a essential skill for every homeowner that can save you time and money. This guide will walk you through the process with clear, easy-to-follow steps, ensuring your access is restored in minutes.
Identifying Your Linear Remote Model
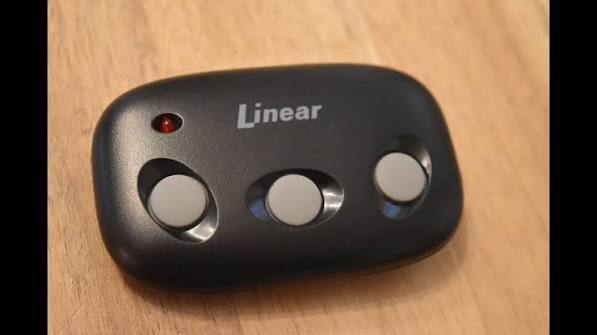
Before you rush to the hardware store, it is crucial to identify which specific Linear remote you own. Linear (now part of Nice Group) produces several models, and while the battery replacement process is similar, the physical mechanism to open the case can vary slightly. The most common models found in US households include the WDX3R, LDX1R, and the older MegaCode series.
Check the back of your remote. You will usually find the model number printed in small text. If the text is worn off, look at the shape:
- Rectangular with a visor clip: Likely a WDX or LDX series.
- Smaller, square-ish design: Often an older MegaCode model.
Identifying the model helps ensure you buy the correct battery type immediately, avoiding unnecessary trips to the store. Most modern Linear remotes use standard coin-cell batteries, which are widely available at grocery stores, pharmacies, and big-box retailers across the United States.
Tools and Materials Needed
You do not need a professional toolkit to perform this maintenance. In fact, you likely have everything you need in your kitchen drawer. Here is what you should gather before starting:
- The Correct Battery: Typically a CR2032 or CR2016 3V Lithium Coin Cell. (Check your old battery to confirm).
- A Small Flathead Screwdriver: Or a sturdy butter knife if you don’t have a tool kit.
- A Clean Cloth: To wipe away any dust or debris from the battery contacts.
- Patience: A gentle hand is better than force when dealing with plastic clips.
Pro Tip: Always buy high-quality brand-name batteries (such as Energizer, Duracell, or Panasonic). Cheap generic batteries often have a shorter lifespan and may leak, damaging the internal circuitry of your remote.
Step-by-Step Guide: How To Change Battery In Linear Garage Door Opener Remote
Follow these precise steps to replace the battery safely and effectively.
Step 1: Open the Remote Casing
Locate the seam where the two halves of the remote meet. On most Linear models, there is a small notch or slot on the side or bottom edge. Insert your small flathead screwdriver into this notch. Gently twist the screwdriver to pry the casing apart.
- Do not force it. If it feels stuck, check for hidden screws. Some older models have a tiny Phillips-head screw on the back that must be removed first.
- Once the clip releases, carefully separate the two halves. Be mindful of any rubber buttons or gaskets that might fall out.
Step 2: Remove the Old Battery
Locate the battery compartment. It is usually a circular metal holder. Note the orientation of the current battery. You will see a plus sign (+) indicating the positive side. In most Linear remotes, the positive side faces up (towards the cover), but this can vary by model.
Use your finger or the tip of the screwdriver to gently pop the old battery out. Dispose of the old battery responsibly at a local recycling center, as lithium batteries contain chemicals that should not go into regular household trash.
Step 3: Insert the New Battery
Take your new CR2032 (or CR2016) battery. Ensure your hands are dry to prevent oil from transferring to the battery contacts. Place the new battery into the holder, matching the polarity exactly as the old one was positioned.
- Positive Side (+): Usually facing up.
- Negative Side (-): Usually facing down against the metal spring/contact.
Press down gently until you hear or feel a slight click, ensuring it is seated firmly.
Step 4: Reassemble the Remote
Align the two halves of the remote casing. Ensure the rubber button pad is correctly positioned over the circuit board contacts. Press the halves together firmly until you hear the clips snap back into place. If there was a screw, reinsert and tighten it securely, but do not overtighten, as this can strip the plastic threads.
Step 5: Test the Remote
Stand within range of your garage door (usually 10–20 feet). Press the button. You should see a small LED light blink on the remote, indicating it is sending a signal. Listen for the garage door opener motor to engage. If the door opens, you have successfully learned how to change battery in Linear garage door opener remote.
Troubleshooting: What If It Still Doesn’t Work?
If you have replaced the battery and the remote still fails to operate, do not panic. Several other factors could be at play.
| Issue | Possible Cause | Solution |
|---|---|---|
| LED does not light up | Battery installed incorrectly | Remove battery and check polarity (+/-). |
| LED lights, but door doesn’t move | Remote lost synchronization | Reprogram the remote to the opener unit. |
| Intermittent operation | Dirty battery contacts | Clean contacts with a dry cloth or eraser. |
| No response at all | Opener power issue | Check if the garage door opener is plugged in. |
Reprogramming Your Remote
If the battery is new and the LED lights up, but the door remains closed, the remote may have lost its code. This is common after a battery change in some older systems. You will need to re-sync the remote.
- Locate the “Learn” or “Smart” button on your garage door opener motor unit (hanging from the ceiling).
- Press and release the Learn button. The indicator light will usually turn on or blink.
- Within 30 seconds, press and hold the button on your remote.
- Release the button when the opener light blinks or clicks.
For detailed technical specifications on frequency and coding protocols, you can refer to general radio frequency standards documented on Wikipedia.
Choosing the Right Battery: CR2032 vs. CR2016
One common question homeowners ask is whether they can substitute different battery types. While both are 3V lithium coin cells, they differ in thickness and capacity.
- CR2032: 20mm diameter, 3.2mm thick. Higher capacity (approx. 220-240 mAh). Lasts longer.
- CR2016: 20mm diameter, 1.6mm thick. Lower capacity (approx. 90 mAh). Thinner.
Can you use a CR2016 in a CR2032 slot? Technically, yes, but it is not recommended. The CR2016 is half the thickness of the CR2032. It may rattle loose in the compartment, leading to poor contact and intermittent failure. Conversely, a CR2032 will not fit into a slot designed for a CR2016. Always stick to the manufacturer’s recommendation printed inside the battery compartment.
Maintenance Tips to Extend Battery Life
To maximize the lifespan of your new battery and ensure reliable operation, consider these expert tips:
- Avoid Extreme Temperatures: Do not leave your remote in a hot car during summer or freezing outside during winter. Extreme heat degrades lithium batteries faster.
- Keep It Dry: Moisture can corrode the battery contacts. If you live in a humid area, consider keeping the remote in a pocket rather than a cup holder where condensation might form.
- Don’t Press Unnecessarily: Avoid pressing the button repeatedly if the door doesn’t open immediately. This drains the battery and can confuse the opener’s logic board.
- Regular Checks: Once a year, open the remote to check for corrosion or loose contacts, even if the battery is still working.
FAQ Section
Q1: How often should I change the battery in my Linear remote?
A: On average, a high-quality lithium battery in a garage door remote lasts between 1 to 2 years, depending on usage frequency. If you notice the range decreasing (you have to stand closer to the door), it is time to replace the battery.
Q2: Can I use a rechargeable coin cell battery?
A: It is not recommended. Standard rechargeable coin cells often have a lower voltage (3.0V vs 3.7V peak, but dropping quickly) and may not provide the consistent power surge needed for the remote’s radio transmitter. Stick to non-rechargeable lithium batteries for reliability.
Q3: My remote got wet. Will changing the battery fix it?
A: Not necessarily. If the remote was submerged, the circuit board may be corroded. Changing the battery is a good first step, but you may need to clean the board with isopropyl alcohol or replace the entire remote if water damage has occurred.
Q4: Where can I buy a replacement Linear remote if mine is broken?
A: You can purchase replacement remotes from major home improvement stores like Home Depot or Lowe’s, or online retailers such as Amazon. Ensure you buy a model compatible with your specific opener’s frequency (usually 318 MHz or 390 MHz for Linear).
Q5: Is it safe to dispose of the old battery in the trash?
A: No. Lithium batteries should be recycled. Many grocery stores, electronics retailers (like Best Buy), and hardware stores have dedicated battery recycling bins. This prevents environmental contamination and fire hazards.
Conclusion
Learning how to change battery in Linear garage door opener remote is a simple yet powerful DIY task that restores convenience to your daily routine. By following the steps outlined above—identifying your model, using the correct CR2032 or CR2016 battery, and ensuring proper polarity—you can resolve most remote issues in under five minutes.
Remember, prevention is key. Keep a spare battery in your junk drawer so you are never caught off guard. If you found this guide helpful, please share it with your neighbors or on social media to help others troubleshoot their garage door woes. A functioning garage door means a smoother start to every day!
Leave a Reply