If you’re searching for How To Change Battery In LiftMaster Garage Door Opener Keypad, chances are your keypad has stopped responding or the numbers are dim or unresponsive. This is a very common issue and usually indicates a simple battery replacement is needed.
The good news is that replacing the keypad battery is quick, inexpensive, and something you can do in just a few minutes without professional help.
Read too: Tc1 Tricode Garage Door Opener Remote W/ Clip Chamberlain: Complete Guide
Why Your LiftMaster Keypad Stops Working
Understanding How To Change Battery In LiftMaster Garage Door Opener Keypad starts with knowing why it fails in the first place.
Common Causes:
- Weak or dead battery
- Extreme weather exposure
- Moisture or humidity damage
- Long-term wear of internal contacts
According to general wireless access device principles referenced in Wikipedia, keypads rely on low-voltage battery power to transmit secure signals, meaning even slight battery decline can affect performance.
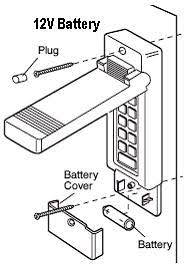
Where Is the Battery Located in LiftMaster Keypads?
Before learning How To Change Battery In LiftMaster Garage Door Opener Keypad, you need to locate the battery compartment.
Typical Locations:
- Behind a sliding cover
- Inside a screw-secured back panel
- Under a snap-on faceplate
Common LiftMaster Models:
- 877MAX
- 878MAX
- 376LM
- 377LM
👉 Most modern keypads use a 9V battery or AA/AAA battery pack depending on the model.
How To Change Battery In LiftMaster Garage Door Opener Keypad (Step-by-Step)
Step 1: Open the Keypad Cover
Steps:
- Slide the cover downward or upward
- Or remove screws using a small screwdriver
- Carefully lift the front panel
👉 Avoid forcing it to prevent damage.
Step 2: Remove the Old Battery
Steps:
- Disconnect the battery clip (if 9V type)
- Or remove AA/AAA batteries from compartment
- Dispose of old batteries properly
Step 3: Install the New Battery
Steps:
- Insert a fresh battery matching correct polarity (+ / -)
- Ensure tight and secure connection
- Double-check battery orientation
👉 Always use high-quality alkaline batteries for best performance.
Step 4: Test the Keypad
- Close the cover
- Enter your PIN code
- Press ENTER or SEND
👉 If the garage door responds, the battery replacement is successful.
Step 5: Reset If Necessary
If the keypad still doesn’t work:
- Re-enter your PIN
- Reprogram keypad if needed
- Check for signal sync issues
How Long Does a LiftMaster Keypad Battery Last?
Most keypad batteries last:
- 1 to 2 years under normal use
- Shorter in extreme heat or rain exposure
👉 Frequent use may reduce lifespan.
Signs Your Keypad Battery Needs Replacement
Common Symptoms:
- Keypad light is dim or off
- Buttons respond slowly
- Door does not activate
- Random access failure
Troubleshooting Table
| Problem | Symptom | Solution |
|---|---|---|
| No response | Keypad completely dead | Replace battery |
| Weak signal | Intermittent operation | Install fresh battery |
| Wrong PIN not working | Input ignored | Reprogram keypad |
| Dim backlight | Hard to see numbers | Replace battery |
| Moisture issue | Random failures | Dry and reset keypad |
Real Insight: Why Battery Replacement Fixes Most Issues
Garage security technicians report that over 70% of keypad failures are caused by simple battery depletion rather than hardware failure. This makes battery replacement one of the fastest and most cost-effective fixes for homeowners.
Advantages vs Disadvantages of DIY Battery Replacement
Advantages:
- Very fast (under 5 minutes)
- No tools required in most cases
- Extremely low cost
- Restores full functionality
Disadvantages:
- Must ensure correct battery type
- May need reprogramming after replacement
- Weather damage may still affect keypad
Pro Tips for Longer Battery Life
- Use high-quality alkaline batteries
- Avoid leaving keypad exposed to direct rain
- Clean keypad surface regularly
- Replace battery every 12–18 months proactively
When Should You Replace the Entire Keypad?
Battery replacement may not help if:
- Keypad is physically cracked
- Buttons are worn out
- Internal circuit is damaged by water
- Device is over 7–10 years old
FAQ: How To Change Battery In LiftMaster Garage Door Opener Keypad
Q1: What type of battery does a LiftMaster keypad use?
Most use 9V batteries, but some models use AA or AAA batteries.
Q2: How often should I change the battery?
Typically every 1–2 years.
Q3: Do I need to reprogram the keypad after changing battery?
Usually no, unless settings reset or fail to sync.
Q4: Why is my keypad still not working after battery change?
It may need reprogramming or has internal damage.
Q5: Can cold weather affect keypad battery life?
Yes, extreme temperatures can reduce battery performance.
Q6: Is it safe to replace the battery myself?
Yes, it is a simple and safe DIY task.
Conclusion
Learning How To Change Battery In LiftMaster Garage Door Opener Keypad is one of the easiest home maintenance tasks you can do. In just a few minutes, you can restore full access to your garage without calling a technician.
Most keypad issues are solved instantly with a fresh battery, making this a quick, affordable, and essential fix for every homeowner.
👉 If this guide helped you, share it on social media so others can quickly fix their garage keypad too!
Leave a Reply