Introduction
Is your new garage door opener sitting in its box while you stare at your garage door, wondering where to begin? You’re not alone. Thousands of homeowners face this exact challenge every year, and how to attach a garage door opener to the door is one of the most common questions we receive. Whether you’ve just purchased a replacement unit or are installing an opener for the first time, getting this connection right is crucial for both safety and functionality. In this comprehensive guide, we’ll walk you through every step, ensuring your garage door operates smoothly and safely for years to come.
Understanding the Garage Door Opener Connection System
Before diving into the installation process, it’s essential to understand what you’re actually connecting. The garage door opener doesn’t attach directly to the door itself—instead, it connects through a specialized bracket system that transfers the motor’s power to lift and lower your door.
The main components involved include:
- The opener motor unit (mounted on the ceiling)
- The rail or track (extends from the motor toward the door)
- The trolley (moves along the rail)
- The door bracket (attaches to the top section of your garage door)
- The arm assembly (connects the trolley to the door bracket)
According to the International Door Association, improper installation accounts for nearly 30% of garage door-related accidents, making proper attachment critical for household safety.
Tools and Materials You’ll Need
Gathering the right tools before starting will save you time and frustration. Here’s your complete checklist:
Essential Tools:
- Power drill with appropriate bits
- Socket wrench set (typically 9/16″ and 1/2″)
- Adjustable wrench
- Level (4-foot recommended)
- Tape measure
- Pliers
- Screwdrivers (flathead and Phillips)
- Stepladder or sturdy ladder
- Safety glasses
- Work gloves
Materials:
- Garage door opener kit (includes motor, rail, hardware)
- Door bracket (usually included with opener)
- Lag screws (typically 5/16″ x 2″)
- Bolts and nuts (various sizes, included in kit)
- Locking pliers or C-clamps (for temporary support)
Pro Tip: Lay out all components on a clean surface before beginning. This helps you verify nothing is missing and familiarizes you with each part.
Step-by-Step Guide: How To Attach A Garage Door Opener To The Door
Step 1: Prepare Your Garage Door
Before attaching anything, ensure your garage door is properly balanced and in good working condition.
- Disconnect any existing opener by pulling the emergency release cord
- Manually test the door by lifting it halfway—it should stay in place without support
- Inspect the top panel where the bracket will attach for damage or weakness
- Clean the attachment area to ensure proper screw penetration
If your door doesn’t balance properly, address this issue first. An unbalanced door can damage your new opener and create safety hazards.
Step 2: Install the Door Bracket
The door bracket is the critical connection point between your opener and the garage door.
- Position the bracket on the center of the top door panel
- Most brackets attach 2-4 inches below the top edge
- Ensure it’s centered horizontally
- Mark the screw holes using a pencil
- Use the bracket as a template
- Double-check alignment with a level
- Drill pilot holes slightly smaller than your lag screws
- Typically 1/8″ diameter works well
- Drill straight to avoid angled screws
- Secure the bracket using the provided lag screws
- Tighten firmly but don’t overtighten
- The bracket should not wiggle or move
Important: If your door has windows or decorative panels in the top section, you may need reinforcement brackets or a different mounting location. Consult your opener’s manual for specific guidance.
Step 3: Assemble and Mount the Rail
The rail connects the motor unit to the door bracket via the trolley and arm assembly.
- Assemble the rail sections according to manufacturer instructions
- Most modern openers have 2-3 piece rails
- Connect using provided bolts and tighten securely
- Attach the trolley to the rail
- Slide it onto the rail before mounting
- Ensure it moves freely without binding
- Mount the motor unit to your ceiling
- Use the provided hanging brackets
- Position so the rail angles slightly downward toward the door (approximately 1-2 inches over the rail length)
- Connect the rail to the motor unit
- Follow specific instructions for your model
- Ensure all connections are tight and secure
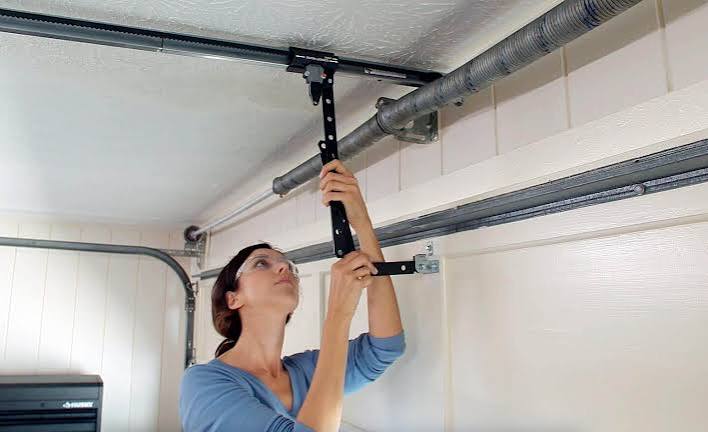
Step 4: Connect the Arm Assembly
This is where the actual connection happens between the moving trolley and your stationary door bracket.
- Measure the distance between the trolley and door bracket
- With the door fully closed, measure from the trolley to the bracket
- Add 2-3 inches for proper tension
- Cut the straight arm to the measured length if adjustable
- Some arms come pre-sized
- Others require cutting with a hacksaw
- Attach the curved arm to the door bracket
- Use the provided bolt and nut
- Leave slightly loose for final adjustment
- Connect the straight arm to the curved arm
- Insert the clevis pin
- Secure with the retaining clip
- Adjust the tension
- The arm should have slight upward angle when door is closed
- Approximately 1-2 inches above horizontal is ideal
Step 5: Final Adjustments and Testing
Proper adjustment ensures smooth operation and prevents premature wear.
- Check all connections for tightness
- Re-tighten any loose bolts or screws
- Verify the door bracket is secure
- Test manual operation
- Pull the emergency release cord
- Open and close the door manually several times
- Listen for unusual noises or binding
- Reconnect the opener
- Pull the release handle toward the motor
- The trolley should re-engage with the arm
- Program the travel limits
- Set the “down” limit so the door closes completely
- Set the “up” limit so the door opens fully
- Refer to your specific model’s instructions
- Test automatic operation
- Use the wall button first
- Then test with the remote control
- Observe the entire cycle for smooth movement
Common Mistakes to Avoid
| Mistake | Consequence | Solution |
|---|---|---|
| Overtightening bracket screws | Stripped holes, damaged door | Tighten firmly, stop when snug |
| Incorrect arm angle | Poor performance, motor strain | Maintain 1-2 inch upward angle |
| Skipping balance test | Premature opener failure | Always test door balance first |
| Misaligned bracket | Uneven wear, noise | Use level during installation |
| Ignoring safety sensors | Safety hazard | Install and test sensors properly |
When to Call a Professional
While many homeowners successfully install garage door openers themselves, certain situations warrant professional assistance:
- Heavy or oversized doors (double-wide or custom designs)
- Older doors showing signs of wear or damage
- Complex ceiling structures requiring special mounting
- Electrical concerns if you’re uncomfortable with wiring
- Persistent problems after following installation steps
The average professional installation costs between $150-$300, which may be worthwhile if you encounter complications or lack confidence in DIY installation.
FAQ Section
Q: Can I attach a garage door opener to any type of garage door?
A: Most standard sectional garage doors can accommodate an opener. However, one-piece swing-out doors, rolling steel doors, and some custom designs may require special brackets or modifications. Always check your opener’s compatibility specifications before purchasing.
Q: How do I know if my garage door is properly balanced?
A: Disconnect the opener and manually lift the door to halfway open. Release it—if it stays in place, it’s balanced. If it falls or rises on its own, the springs need adjustment. Never attempt spring adjustments yourself—this is dangerous work requiring professional expertise.
Q: What height should the door bracket be installed?
A: The door bracket typically installs 2-4 inches below the top edge of the uppermost door panel. The exact position depends on your door design and opener model. Consult your installation manual for specific recommendations, as improper height affects the arm angle and overall performance.
Q: How often should I inspect the garage door opener connection?
A: Inspect the connection points monthly for the first three months after installation, then quarterly thereafter. Look for loose bolts, worn components, or unusual noises. Annual professional maintenance is also recommended to ensure continued safe operation.
Q: My garage door opener makes grinding noises after installation. What’s wrong?
A: Grinding noises typically indicate misalignment, insufficient lubrication, or incorrect tension. Check that the rail is properly aligned, the arm angle is correct, and all moving parts are lubricated with garage door-specific lubricant (not WD-40). If problems persist, consult a professional technician.
Q: Is it safe to install a garage door opener alone?
A: While possible, having a helper makes the job significantly easier and safer, especially when mounting the motor unit and aligning the rail. If working alone, use clamps or temporary supports to hold components in place. Always prioritize safety over speed, and never rush critical steps.
Conclusion
Learning how to attach a garage door opener to the door doesn’t have to be intimidating. By following these detailed steps, gathering the right tools, and taking your time with each phase, you can successfully complete this project and enjoy the convenience of automatic garage door operation. Remember, proper installation isn’t just about functionality—it’s about safety for your family and longevity for your equipment.
Take photos during installation for future reference, keep your manual accessible, and don’t hesitate to reach out to manufacturer support if you encounter unexpected challenges. Your newly installed garage door opener should provide reliable service for 10-15 years with proper maintenance.
Did you find this guide helpful? Share it with friends and family who might be tackling their own garage door opener installation. Your experience could save them time, money, and frustration!
Leave a Reply