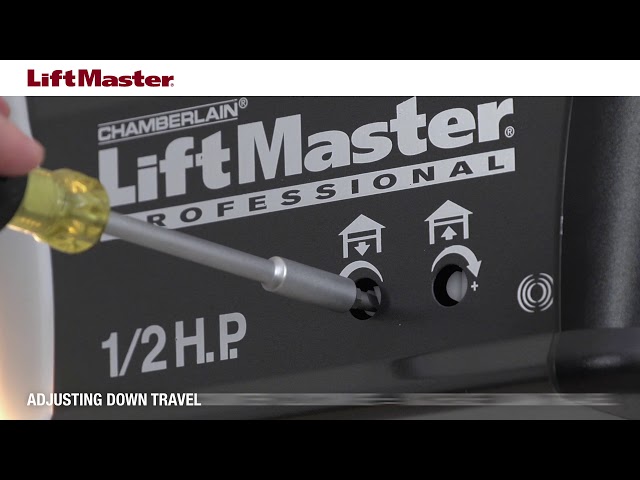
Is your garage door stopping halfway or slamming into the floor? You are not alone. Many homeowners struggle with improper door alignment, but learning how to adjust travel distance on garage door opener units can save you hundreds of dollars in service calls. This guide will walk you through the process safely and effectively, ensuring your door operates smoothly every time.
Why Does My Garage Door Stop Midway?
Before diving into the screws and dials, it is crucial to understand why this happens. Garage door openers use “travel limits” (also known as limit switches) to tell the motor when to stop moving up or down. Over time, these settings can drift due to temperature changes, wear and tear, or manual interference.
According to industry standards, a properly balanced garage door should stay in place when lifted halfway manually. If yours doesn’t, the issue might be mechanical rather than electronic. However, if the door is balanced but still stops incorrectly, adjusting the travel distance is the correct solution.
Safety First: Always disconnect the power to your garage door opener before making any adjustments. The door is heavy, and the springs are under high tension. If you are unsure about handling springs, consult a professional.
Identifying Your Garage Door Opener Type
Not all openers are created equal. The method for adjusting travel distance depends heavily on the brand and age of your unit. Most modern openers fall into two categories:
- Screw-Drive Limits: Older models or basic units often use physical screws labeled “Up” and “Down.”
- Digital/Electronic Limits: Newer smart openers use buttons and LED displays to set limits digitally.
| Feature | Screw-Drive Systems | Digital Systems |
|---|---|---|
| Adjustment Method | Turn screws with a flathead screwdriver | Press hold/release buttons |
| Precision | Moderate (requires trial and error) | High (often includes auto-set features) |
| Common Brands | Older Chamberlain, Craftsman | LiftMaster, Genie, Ryobi |
| Difficulty Level | Easy | Very Easy |
To find out which type you have, look at the back panel of your motor unit. You will typically see two plastic screws or a set of buttons near the light bulb. For more technical details on how these mechanisms work, you can refer to the general principles of garage door operators on Wikipedia.
Step-by-Step: How to Adjust Travel Distance on Garage Door Opener (Screw-Type)
If your unit has adjustment screws, follow these precise steps. This process usually takes less than 10 minutes.
Step 1: Locate the Limit Screws
Look for two screws on the side or back of the motor housing. They are usually colored or labeled:
- Up Limit: Often marked with an arrow pointing up or labeled “UP.”
- Down Limit: Often marked with an arrow pointing down or labeled “DOWN.”
Step 2: Adjust the Down Limit
The down limit determines how far the door closes. If it hits the floor too hard or reverses before touching, this needs adjustment.
- Close the door completely using the wall button.
- If the door reverses before hitting the floor, turn the Down screw clockwise (usually 1/4 turn at a time). This increases the travel distance.
- If the door slams into the floor, turn the Down screw counter-clockwise. This decreases the travel distance.
- Test the door after each small adjustment.
Step 3: Adjust the Up Limit
The up limit ensures the door opens fully without straining the motor.
- Open the door completely.
- If the door stops too low, turn the Up screw clockwise to increase the height.
- If the door hits the top track or header, turn the Up screw counter-clockwise to reduce the height.
- Ensure the door clears the opening by at least 2–3 inches for safety.
Step 4: Test the Safety Sensors
After adjusting the travel distance, you must test the reverse mechanism. Place a 2×4 piece of wood on the floor where the door closes. When the door touches the wood, it should immediately reverse. If it does not, your force settings may also need adjustment, or the sensors are misaligned.
How to Set Limits on Digital Garage Door Openers
Modern openers, such as those from LiftMaster or Genie, often feature a “Learn” button and digital controls. Here is how to handle them:
- Clear Old Settings: Hold down the “Up” and “Down” buttons simultaneously until the lights flash. This resets the memory.
- Set the Down Limit: Press and hold the “Down” button until the door reaches the desired closed position. Release the button. Some models require you to press the “Set” or “Learn” button to confirm.
- Set the Up Limit: Press and hold the “Up” button until the door reaches the fully open position. Release and confirm.
- Auto-Travel Feature: Many new units have an auto-travel function. Simply press the “Program” button, and the door will cycle open and closed once to learn the limits automatically.
Note: Always refer to your specific model’s manual, as button sequences vary significantly between brands.
Common Mistakes to Avoid
Even experienced DIYers can make errors when learning how to adjust travel distance on garage door opener systems. Avoid these pitfalls:
- Over-adjusting: Turning screws multiple full rotations can strip the gears or cause the door to crash. Always adjust in 1/4 or 1/2 turns.
- Ignoring Balance: If the door is heavy to lift manually, adjusting the limits won’t help. You need a spring adjustment, which is dangerous and best left to professionals.
- Forgetting the Force Settings: Travel distance and force settings are linked. If you change one, check the other. If the door reverses unnecessarily, the force might be set too low.
FAQ: Frequently Asked Questions
1. Why does my garage door go down then immediately come back up?
This is usually a safety sensor issue or a force setting problem. Check if the eyes (sensors) near the floor are aligned and clean. If they are blinking, something is blocking the beam. If the sensors are fine, increase the “down force” slightly using the adjustment dial.
2. Can I adjust the travel distance without a ladder?
In most cases, no. The adjustment screws or program buttons are located on the motor unit, which is mounted on the ceiling. You will need a sturdy ladder to reach them safely.
3. How often should I adjust my garage door limits?
You should only adjust limits when necessary. However, it is good practice to check the balance and operation of your door every six months. Seasonal temperature changes can affect the metal tracks and door weight, potentially requiring minor tweaks.
4. What if my garage door opener doesn’t have adjustment screws?
If you cannot find screws or buttons, you may have a very old model or a specialized commercial unit. In this case, consult the manufacturer’s website or consider upgrading to a modern opener with easier-to-use digital limits.
5. Is it dangerous to adjust the garage door myself?
Adjusting the travel limits is generally safe if you disconnect the power first. However, adjusting the springs is extremely dangerous due to high tension. Never attempt to loosen or tighten garage door springs yourself.
6. Will adjusting the travel distance fix a noisy garage door?
No. Noise is usually caused by loose hardware, lack of lubrication, or worn rollers. Adjusting the travel distance only affects where the door stops, not how smoothly it moves. Lubricate the chain or screw drive and tighten bolts to reduce noise.
Conclusion
Learning how to adjust travel distance on garage door opener units is a valuable skill that enhances both convenience and safety. By following the steps above, you can ensure your door opens fully and closes securely without damaging your vehicle or the door itself. Remember to make small adjustments, test frequently, and always prioritize safety.
If you found this guide helpful, please share it with your neighbors or on social media. A well-functioning garage door is a happy garage door!
Leave a Reply