Introduction
Is your garage door struggling to open or close smoothly? Sagging, slamming shut, or refusing to stay in place are all classic signs that your garage door springs need attention. Learning how to adjust the springs on a garage door can save you hundreds of dollars in service calls and keep your home secure. In this comprehensive guide, we’ll walk you through every step — from identifying your spring type to making precise adjustments safely.
⚠️ Important Safety Warning: Garage door springs store an enormous amount of tension. A mishandled spring can cause serious injury or property damage. If you feel unsure at any point, hire a licensed professional.
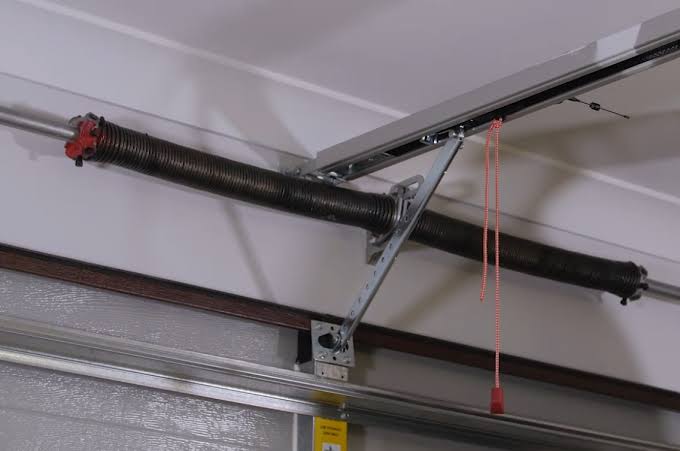
Understanding Garage Door Springs: Torsion vs. Extension
Before you touch anything, you need to know which type of spring system your garage door uses. There are two main types:
| Feature | Torsion Springs | Extension Springs |
|---|---|---|
| Location | Mounted above the door on a metal shaft | Run along the horizontal tracks on both sides |
| How They Work | Twist (torque) to lift the door | Stretch and contract to counterbalance weight |
| Lifespan | 10,000–20,000 cycles | 5,000–10,000 cycles |
| Safety Level | Safer when properly maintained | Higher risk if they snap without safety cables |
| Common In | Modern residential doors | Older or lighter doors |
According to the International Door Association (IDA), approximately 80% of modern residential garage doors use torsion spring systems due to their superior balance and longevity.
Knowing your spring type is the first critical step in understanding how to adjust the springs on a garage door correctly.
Signs Your Garage Door Springs Need Adjustment
Not sure if your springs are the problem? Look for these telltale symptoms:
- The door won’t stay open — it falls back down before reaching full height.
- Uneven movement — one side rises faster than the other.
- Loud banging or popping noises during operation.
- Visible gaps in the torsion spring coils when the door is closed.
- The opener strains or makes grinding sounds trying to lift the door.
- The door feels unusually heavy when operated manually.
If you notice two or more of these signs, it’s time to consider a spring adjustment or replacement.
Tools You’ll Need Before Starting
Preparation is everything. Gather these tools before you begin:
- Winding bars (two steel bars, typically 18 inches long) — never use screwdrivers as substitutes
- Adjustable wrench set (7/16″ and 9/16″ are most common)
- Socket set
- Stepladder (stable, non-conductive)
- Safety glasses and heavy-duty work gloves
- C-clamps or locking pliers
- Measuring tape
- Marker or chalk
💡 Pro Tip: Purchase winding bars specifically designed for garage door springs. Using improvised tools is one of the leading causes of DIY spring injuries.
Step-by-Step: How To Adjust The Springs On A Garage Door (Torsion System)
Step 1: Disconnect the Garage Door Opener
Pull the emergency release cord (usually a red handle hanging from the opener rail). This disengages the motor so you can operate the door manually. Unplug the opener from the power source entirely.
Step 2: Close the Door Completely and Secure It
Lower the door all the way to the ground. Place C-clamps on both tracks just below the bottom rollers. This prevents the door from shooting upward unexpectedly once you release spring tension.
Step 3: Identify the Winding Cone
Locate the winding cone at the end of the torsion spring shaft. You’ll see small holes around the cone — these are where the winding bars insert. Use your marker to note the current position of the cone relative to the shaft for reference.
Step 4: Insert the First Winding Bar
Insert one winding bar into a hole on the winding cone. Hold it firmly with both hands. The bar should point downward at roughly a 90-degree angle from the cone.
Step 5: Loosen the Set Screws
Using your wrench, carefully loosen the two set screws on the winding cone. Do not remove them completely — just loosen enough so the cone can rotate on the shaft. Keep steady pressure on the winding bar at all times.
Step 6: Add or Remove Quarter Turns
This is the core of learning how to adjust the springs on a garage door:
- To increase tension (door won’t stay open): Wind the spring by rotating the cone toward the center of the door. Each quarter turn adds lifting force.
- To decrease tension (door flies up too fast): Unwind the spring by rotating the cone away from the center.
General guideline: A standard 7-foot residential door typically requires about 7–8 full turns (28–32 quarter turns) per spring. Adjust in increments of one-quarter turn at a time, then test.
Step 7: Tighten the Set Screws
Once you’ve reached the desired tension, tighten both set screws securely against the shaft. Ensure they bite into the flat spots on the shaft for maximum grip.
Step 8: Remove the Winding Bar and Test
Slowly withdraw the winding bar. Remove the C-clamps from the tracks. Lift the door manually to about halfway — it should stay in place with minimal effort. Open it fully; it should remain open without drifting.
Step 9: Reconnect the Opener
Plug the opener back in and re-engage the carriage. Run the door through 2–3 complete open-close cycles and observe its behavior.
Step-by-Step: Adjusting Extension Springs
Extension spring adjustment is simpler but still demands caution:
- Disconnect the opener and close the door.
- Secure the door with C-clamps on the tracks.
- Locate the S-hook or pulley system connecting the spring to the track bracket.
- To increase tension, move the S-hook to a hole closer to the front of the track (shortening the spring’s resting length).
- To decrease tension, move the S-hook further back (lengthening the resting position).
- Always ensure safety cables run through the center of each extension spring. These cables prevent the spring from whipping across the garage if it breaks. For more information on mechanical spring physics, you can visit Wikipedia’s article on springs.
- Remove clamps, test manually, then reconnect the opener.
Common Mistakes to Avoid
Even experienced DIYers make errors when adjusting garage door springs. Here’s what to watch out for:
- ❌ Using screwdrivers instead of proper winding bars — they can slip and cause catastrophic release of energy.
- ❌ Adjusting only one spring on a dual-spring system — always adjust both equally to maintain balance.
- ❌ Skipping the C-clamp step — an unsecured door under tension is extremely dangerous.
- ❌ Over-tightening — too much tension puts stress on cables, rollers, and the opener motor.
- ❌ Ignoring worn springs — if a spring has a visible gap or crack, adjustment won’t help. It needs replacement.
When to Call a Professional Instead
While knowing how to adjust the springs on a garage door empowers you as a homeowner, some situations require expert intervention:
- The spring is broken or visibly damaged.
- You have a high-lift or custom-weight door (over 200 lbs).
- The door uses a commercial-grade system.
- You lack proper winding bars or safety equipment.
- After adjustment, the door still operates unevenly.
The average cost for professional spring adjustment ranges from $150 to $350, while full spring replacement typically costs $200 to $500 depending on your region and door size. Weigh this against the potential medical costs of a DIY injury.
FAQ Section
Q1: How often should I adjust my garage door springs?
Most torsion springs need minor adjustment every 1–2 years, depending on usage frequency. If you open and close your door 4+ times daily, inspect the springs every 6 months. Regular lubrication with a silicone-based spray can extend the time between adjustments.
Q2: Can I replace just one spring on a dual-spring system?
Technically yes, but it’s strongly discouraged. Replacing only one spring creates an imbalance that accelerates wear on the new spring and strains other components. Always replace both springs simultaneously for optimal performance and safety.
Q3: How do I know if my spring is left-wound or right-wound?
Look at the end of the spring from the winding cone side. If the coils spiral clockwise, it’s right-wound. If they spiral counterclockwise, it’s left-wound. Installing a spring with the wrong wind direction will cause improper tension and potential failure.
Q4: What happens if a garage door spring breaks?
A broken spring means the door loses its counterbalance. The opener will struggle or fail to lift the door, and manual operation becomes extremely heavy. Do not attempt to operate the door until the spring is replaced — the sudden shift in weight can damage tracks, cables, and rollers.
Q5: Is it safe to adjust garage door springs myself?
It can be done safely if you follow proper procedures, use correct tools, and understand the risks. However, garage door springs are considered one of the most dangerous home maintenance tasks. The U.S. Consumer Product Safety Commission reports thousands of garage door-related injuries annually. If you’re uncomfortable, hiring a certified technician is always the safer choice.
Q6: Why does my garage door reverse before hitting the floor?
This is usually related to the opener’s limit switch settings, not the springs. However, improperly adjusted springs can contribute by creating inconsistent resistance. Adjust the springs first, then recalibrate the opener’s travel limits according to the manufacturer’s manual.
Conclusion
Learning how to adjust the springs on a garage door is a valuable skill that can save you time, money, and frustration. By understanding your spring type, using the right tools, and following a methodical step-by-step process, you can restore smooth, balanced operation to your garage door. Remember: patience and safety always come first. Make small adjustments, test frequently, and never hesitate to call a professional when the job exceeds your comfort level.
Found this guide helpful? Share it with friends and family on Facebook, X (Twitter), or Pinterest so they can tackle their garage door issues with confidence too! 🔧🏠 Don’t forget to bookmark this page for future reference — your garage door will thank you.
Leave a Reply