Introduction
Is your garage door making unusual rattling noises or struggling to open smoothly? You’re not alone—loose chains are one of the most common issues homeowners face with chain-driven garage door openers. Knowing how to adjust the chain on a garage door opener can save you hundreds of dollars in repair costs and prevent potential safety hazards. In this comprehensive guide, we’ll walk you through everything you need to know to properly tension your garage door chain, ensuring quiet, efficient operation for years to come.
Why Does Your Garage Door Chain Need Adjustment?
Before diving into the adjustment process, it’s essential to understand why chain tension matters. Over time, normal wear and tear cause the chain to stretch slightly. Additionally, temperature fluctuations can affect metal components, leading to slack in the system.
According to the International Door Association, approximately 70% of garage door service calls involve issues related to improper maintenance, including chain tension problems. A properly adjusted chain should have about 1/4 to 1/2 inch of slack when measured at the midpoint between the motor unit and the trolley.
Signs Your Chain Needs Adjustment
- Excessive noise during operation (rattling, grinding, or squeaking)
- Visible sagging in the middle section of the chain
- Jerky or uneven movement when opening or closing
- The door reverses unexpectedly before reaching the floor
- Delayed response after pressing the remote button
If you notice any of these symptoms, it’s time to check your chain tension.
Tools You’ll Need for Chain Adjustment
Gathering the right tools before starting ensures a smooth, safe adjustment process. Here’s what you’ll need:
- Adjustable wrench or socket set (typically 7/16″ or 1/2″)
- Stepladder (stable and appropriate height for your opener)
- Measuring tape or ruler
- Work gloves (to protect your hands)
- Flashlight (for better visibility)
- Assistant (optional but helpful for holding the ladder)
Safety First: Always disconnect the power to your garage door opener before performing any maintenance. Unplug the unit or turn off the circuit breaker to prevent accidental activation.
Step-by-Step Guide: How To Adjust The Chain On A Garage Door Opener
Follow these detailed steps to properly adjust your garage door chain tension:
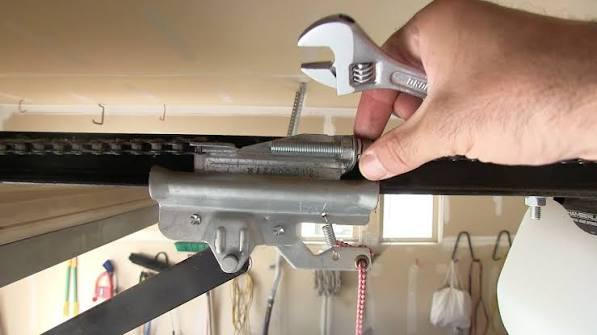
Step 1: Locate the Adjustment Bolts
Most chain-drive garage door openers have two adjustment bolts located at the rear of the motor unit, near where the chain connects to the trolley assembly. These bolts control the tension—one tightens while the other loosens. Consult your owner’s manual if you’re unsure about their exact location, as designs vary by manufacturer.
Step 2: Measure Current Chain Slack
Using your measuring tape, measure the distance from the bottom of the chain to the base rail at the midpoint between the motor and trolley. Record this measurement. The ideal slack is 1/4 to 1/2 inch. If it exceeds 1/2 inch, adjustment is necessary.
Step 3: Loosen the Lock Nut
Identify the lock nut on the adjustment bolt assembly. Using your wrench, loosen this nut counterclockwise just enough to allow the adjustment bolt to turn freely. Do not remove the nut completely.
Step 4: Adjust the Tension Bolt
Turn the adjustment bolt clockwise to tighten the chain or counterclockwise to loosen it. Make small adjustments—quarter turns at a time—and recheck the slack after each adjustment. Over-tightening can damage the motor, sprocket, or chain itself.
Step 5: Recheck and Fine-Tune
After adjusting, measure the slack again at multiple points along the chain to ensure even tension. The chain should move smoothly without binding or excessive play. If the tension feels correct, proceed to the next step.
Step 6: Secure the Lock Nut
Once satisfied with the tension, tighten the lock nut securely against the adjustment bolt. This prevents the bolt from vibrating loose during operation. Use your wrench to ensure it’s snug, but avoid over-tightening, which could strip the threads.
Step 7: Test the Garage Door
Reconnect power to the opener and test the door through several complete cycles. Listen for unusual noises and observe the movement. The door should operate smoothly and quietly. If problems persist, recheck your adjustment or consult a professional.
Common Mistakes to Avoid When Adjusting Garage Door Chains
Even experienced DIYers can make errors during chain adjustment. Here are the most frequent mistakes and how to avoid them:
| Mistake | Consequence | Solution |
|---|---|---|
| Over-tightening the chain | Motor strain, premature wear, broken chain | Adjust in small increments; check slack frequently |
| Ignoring the lock nut | Chain becomes loose again quickly | Always secure the lock nut after adjustment |
| Adjusting while powered | Risk of injury or equipment damage | Always disconnect power first |
| Not checking alignment | Uneven wear and noisy operation | Ensure the chain runs straight along the rail |
| Skipping regular maintenance | Major failures down the road | Inspect chain tension every 6 months |
For more information on garage door mechanics and safety standards, visit Wikipedia’s page on garage door openers.
When Should You Call a Professional?
While adjusting chain tension is a manageable DIY task, certain situations warrant professional assistance:
- The chain is damaged, rusted, or has broken links
- Adjustment doesn’t resolve noise or performance issues
- You’re uncomfortable working at heights or with mechanical components
- The opener is under warranty (DIY repairs may void coverage)
- Multiple components appear worn (sprockets, rollers, or cables)
Professional garage door technicians typically charge $75–$150 for chain adjustment services, which includes a full safety inspection. Considering that garage doors are the largest moving object in most homes, investing in professional maintenance can prevent costly accidents.
FAQ Section
Q1: How often should I adjust my garage door chain?
A: Check your chain tension every 6 months as part of routine maintenance. However, adjust only when necessary—if the slack exceeds 1/2 inch or you notice operational issues. Frequent adjustments may indicate underlying problems requiring professional attention.
Q2: Can I adjust the chain while the garage door is closed?
A: Yes, you can adjust the chain with the door in any position. However, many technicians recommend having the door halfway open to reduce tension on the system and make measurement easier. Always disconnect power regardless of door position.
Q3: What happens if the chain is too tight?
A: An over-tightened chain puts excessive stress on the motor, sprocket, and bearings, leading to premature wear and potential failure. It can also cause noisy operation and increased energy consumption. Always maintain the recommended 1/4 to 1/2 inch slack.
Q4: Is it normal for a garage door chain to make some noise?
A: Minimal noise is normal, especially in older units. However, loud rattling, grinding, or squeaking indicates problems such as loose chains, lack of lubrication, or worn components. Regular lubrication with garage door-specific lubricant can reduce noise significantly.
Q5: Can I replace the chain myself if it’s broken?
A: While possible, chain replacement is more complex than tension adjustment and involves disassembling significant portions of the opener mechanism. Unless you have mechanical experience, hiring a professional is recommended for chain replacement to ensure proper installation and safety.
Q6: Does chain tension affect garage door safety features?
A: Yes, improper chain tension can interfere with safety sensors and force settings, potentially causing the door to reverse unexpectedly or fail to detect obstacles. After adjusting the chain, always test the auto-reverse feature by placing a 2×4 board on the floor in the door’s path.
Leave a Reply