Introduction
Is your garage door feeling heavier than usual or not staying open properly? You’re not alone—thousands of US homeowners face this issue every year. Knowing how to adjust tension spring on an overhead garage door can save you hundreds in repair costs and prevent dangerous malfunctions. In this comprehensive guide, we’ll walk you through the process safely and effectively.
Why Adjusting Garage Door Springs Matters
Garage door springs are the unsung heroes of your overhead door system. They counterbalance the weight of the door, making it easy to open and close manually or with an opener. When these springs lose tension over time, your door becomes difficult to operate and may even become a safety hazard.
According to the International Door Association (IDA), improper spring tension accounts for nearly 30% of garage door service calls in the United States. Regular adjustment can extend your spring’s lifespan by up to 5 years and ensure smooth operation.
Safety First: Garage door springs store immense energy. A snapped spring can cause serious injury or property damage. If you’re unsure, always consult a licensed professional.
Understanding Torsion vs. Extension Springs
Before adjusting, identify which type of spring your door uses:
| Feature | Torsion Springs | Extension Springs |
|---|---|---|
| Location | Mounted above the door on a metal shaft | Run along the horizontal tracks on both sides |
| Adjustment Method | Winding/unwinding with winding bars | Adjusting pulley cables or S-hooks |
| Safety Risk | High – requires specialized tools | Moderate – easier to handle |
| Common Use | Heavier doors, modern installations | Lighter doors, older homes |
Most modern overhead garage doors use torsion springs, which is what we’ll focus on in this guide. For extension springs, the adjustment process differs significantly.
Tools You’ll Need
Gather these essential tools before starting:
- Two steel winding bars (specifically designed for torsion springs)
- Adjustable wrench or socket set
- Ladder (stable and tall enough to reach the spring assembly)
- Safety glasses and heavy-duty gloves
- Tape measure
- Marker or chalk
Pro Tip: Never use screwdrivers, pry bars, or makeshift tools as winding bars. They can slip and cause catastrophic failure.
Step-by-Step Guide: How to Adjust Tension Spring on an Overhead Garage Door
Step 1: Disconnect the Garage Door Opener
Pull the emergency release cord to disconnect the door from the automatic opener. This prevents accidental activation while you work. Manually lift the door halfway to test its current balance.
Step 2: Secure the Door in Place
Use locking pliers or C-clamps to secure the door tracks below the bottom roller. This prevents the door from falling if the spring releases unexpectedly. Never skip this step.
Step 3: Locate the Spring Assembly
Identify the torsion spring(s) mounted on the metal shaft above the door. Most residential doors have one or two springs. Note the current number of turns marked on the spring cone (if visible).
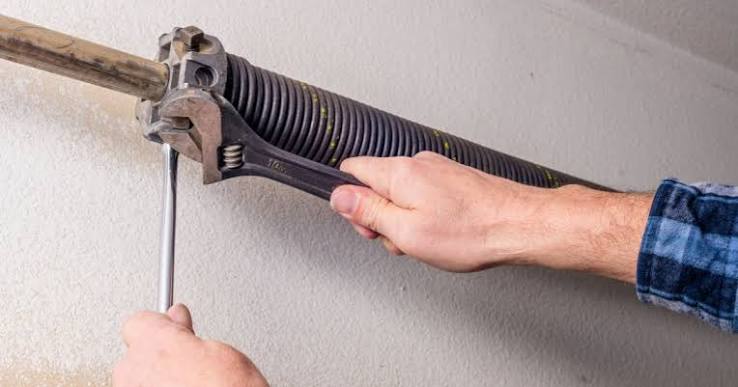
Step 4: Insert Winding Bars
Insert one winding bar into a hole on the winding cone. Hold it firmly with both hands. Insert the second bar into another hole for backup support. Keep your body positioned to the side, never directly in line with the spring.
Step 5: Adjust the Tension
- To increase tension (if the door feels heavy): Turn the winding cone counterclockwise in quarter-turn increments.
- To decrease tension (if the door slams shut): Turn the winding cone clockwise in quarter-turn increments.
Make adjustments in small increments—typically ¼ to ½ turn at a time. After each adjustment, remove the clamps and test the door’s balance.
Step 6: Test the Balance
A properly balanced door should stay in place when lifted halfway. It should rise smoothly with minimal effort and not slam down when released from the top position.
Step 7: Reconnect and Final Check
Once satisfied with the balance, reconnect the garage door opener. Run the door through several complete cycles to ensure smooth operation. Listen for unusual noises that might indicate misalignment.
Common Mistakes to Avoid
Even experienced DIYers make these errors:
- Over-adjusting: Making large turns instead of small increments can overtighten the spring, leading to premature failure.
- Ignoring both springs: If your door has two springs, adjust them equally to maintain balance.
- Skipping safety gear: Eye protection is non-negotiable. Spring fragments can fly at high velocity.
- Using incorrect tools: Improper winding bars can slip, causing severe injuries.
For more detailed safety standards, refer to the Consumer Product Safety Commission guidelines on garage door systems.
When to Call a Professional
While DIY adjustment is possible, certain situations require expert help:
- The spring is visibly damaged, rusted, or cracked
- You hear loud popping or grinding noises
- The door has fallen suddenly in the past
- You’re uncomfortable working at heights or with high-tension systems
Professional technicians typically charge $150–$300 for spring adjustment services, which includes safety inspection and lubrication.
FAQ Section
Q1: How often should I adjust my garage door springs?
A: Most torsion springs last 10,000–15,000 cycles (approximately 7–10 years for average use). Check tension annually or whenever you notice the door becoming harder to operate.
Q2: Can I adjust only one spring on a two-spring system?
A: No. Always adjust both springs equally to maintain proper balance. Uneven tension can cause the door to twist or operate unevenly, leading to track damage.
Q3: What signs indicate my springs need adjustment?
A: Look for these warning signs:
- Door feels unusually heavy when lifting manually
- Door doesn’t stay open when raised halfway
- Visible gaps in the spring coils
- Loud creaking or snapping sounds during operation
Q4: Is it safe to adjust garage door springs myself?
A: It can be safe if you follow proper procedures, use correct tools, and take safety precautions. However, if you lack confidence or experience, hiring a professional is the safer choice.
Q5: What happens if I overtighten the spring?
A: Overtightening puts excessive stress on the spring, cables, and opener motor. This can lead to premature spring failure, cable breakage, or opener burnout. Always adjust in small increments.
Q6: Do I need to lubricate the springs after adjustment?
A: Yes. Apply a silicone-based lubricant or garage door-specific spray to the springs, rollers, and hinges. Avoid WD-40 or oil-based products, which attract dust and degrade rubber components.
Conclusion
Learning how to adjust tension spring on an overhead garage door empowers you to maintain your home’s most-used entryway safely and cost-effectively. By following this step-by-step guide, using proper tools, and prioritizing safety, you can extend your spring’s lifespan and ensure smooth door operation for years to come.
Remember: when in doubt, call a professional. Your safety is worth far more than any DIY savings.
Found this guide helpful? Share it with friends and neighbors on Facebook, Twitter, or Pinterest to help them tackle their garage door issues too! Don’t forget to bookmark this page for future reference.
Leave a Reply