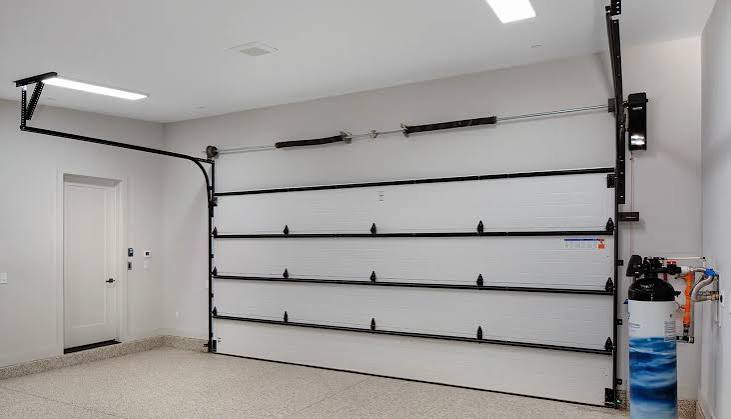
As the seasons change, you might notice your attached garage turning into an uncomfortable freezer or oven, making you wonder: How Do You Know If Your Garage Door Is Insulated? Figuring this out is the crucial first step to lowering your energy bills and creating a more comfortable home environment. Let’s explore the simple ways to check your door’s insulation and what to do next!
The Visual Test: How Do You Know If Your Garage Door Is Insulated?
The easiest way to determine if your garage door has insulation is to perform a quick visual inspection. Walk into your garage and look closely at the interior side of the door panels.
If you see exposed metal or wood framing with a vinyl or plastic backing, your door is likely uninsulated or only has a cosmetic backing. However, if the interior surface is completely flat, smooth, and sealed, it is a strong indicator of a sandwich-style insulated door.
Another quick giveaway is the manufacturer’s label. Most modern insulated doors have a silver or white sticker placed on the inside edge of the bottom panel. This label explicitly states the door’s R-value and the type of core material used. If this sticker is missing or faded, don’t worry. We will cover more hands-on testing methods in the step-by-step section below.
Why Insulation Matters: Energy Efficiency and Comfort
You might think the garage is just a place to park your car, but for homes with attached garages, it acts as a massive thermal buffer. An uninsulated garage door allows outdoor temperatures to bleed directly into your home’s interior walls.
According to the U.S. Department of Energy, properly sealing and insulating your home’s envelope can reduce heating and cooling costs by an average of 15%.
Mark Anderson, a certified garage door technician with over 15 years of field experience, notes: “Many homeowners overlook the garage door, but because it is the largest moving opening in a house, its insulation dictates up to 30% of the adjacent room’s thermal comfort.”
Understanding how heat moves through materials is essential for any homeowner. According to the principles of Thermal insulation, materials with low thermal conductivity slow down heat transfer, keeping warm air inside during the winter and blocking solar heat during the summer.
Real-World Case Study: In a 2023 energy audit conducted in Minnesota, a homeowner with an uninsulated attached garage experienced freezing floors in the bedroom directly above it. Within three months of upgrading to an R-16 insulated garage door, the homeowner reported a 12% drop in winter heating bills and noticed the bedroom floor was consistently 6°F warmer.
Insulated vs. Non-Insulated Garage Doors: Pros and Cons
To help you weigh your options, here is a clear breakdown of what you get with each type of door.
Uninsulated Garage Doors (Single Layer)
These are typically made of a single sheet of steel or aluminum.
- Pros: Lower upfront cost, lightweight, ideal for detached garages in mild climates.
- Cons: Zero thermal resistance, noisy operation, easily dented, offers no noise reduction.
Insulated Garage Doors (Dual or Triple Layer)
These feature a steel-aluminum shell with a core of polystyrene or polyurethane foam.
- Pros: High energy efficiency, extreme durability, quiet operation, protects items stored in the garage.
- Cons: Higher initial investment, heavier weight (requires a stronger spring system).
Step-by-Step: How to Inspect Your Garage Door Panels
If the visual test wasn’t conclusive, you can perform a physical inspection. Follow these concrete steps to get a definitive answer.
- Prepare Your Tools: Grab a heavy-duty flashlight (minimum 300 lumens), a standard tape measure, and a digital infrared thermometer gun.
- Disengage the Opener: Pull the red emergency release cord on your garage door opener to operate the door manually. This ensures your safety while inspecting.
- Check the Panel Thickness: Gently pull back a small section of the bottom weatherstripping at the corner. Insert your tape measure to gauge the depth. Insulated doors typically measure between 1.5 and 2.0 inches thick, while uninsulated single-layer doors are usually less than 0.5 inches thick.
- Perform the “Knock Test”: Tap the center of a panel with your knuckles. A dull, solid thud indicates a dense foam core. A loud, hollow, metallic echo suggests a single, uninsulated steel sheet.
- Use Thermal Imaging: On a day with at least a 30°F difference between indoor and outdoor temperatures, point your infrared thermometer at the interior panels. If the temperature reads within 3–5 degrees of the outside air, your door lacks insulation.
Understanding R-Value: The Metric That Matters
When discussing insulation, the term R-value will frequently pop up. R-value measures a material’s resistance to heat flow. The higher the number, the better the insulation.
- R-Value 0 to 6: Uninsulated or lightly insulated. Best for detached garages or warm, southern US climates where extreme heating isn’t necessary.
- R-Value 7 to 9: Standard insulation (often polystyrene). Good for attached garages in moderate climates.
- R-Value 10 to 13: High insulation. Recommended if you use your garage as a workshop or laundry room.
- R-Value 14 to 18+: Premium insulation (usually injected polyurethane). Essential for extreme climates and rooms built directly above the garage.
Types of Insulation: Polystyrene vs. Polyurethane
If you discover your door is insulated, it likely uses one of two core materials. Knowing the difference helps you understand your door’s performance level.
Polystyrene (Expanded Foam)
This material comes in rigid sheets that are cut and inserted into the door panels.
- Performance: Offers decent thermal resistance but leaves microscopic air gaps between the foam and the steel skin.
- Durability: Fair, but can crack under extreme physical impact.
Polyurethane (Injected Foam)
This is a liquid foam that is injected into the door cavity, where it expands to fill every single millimeter of space, bonding chemically to the steel skins.
- Performance: Provides up to twice the R-value of polystyrene at the same thickness.
- Durability: Acts as a structural adhesive, making the door panels significantly more dent-resistant and rigid.
Frequently Asked Questions (FAQ)
1. Can I add insulation to my existing uninsulated garage door?
Yes, you absolutely can. Many hardware stores sell DIY garage door insulation kits featuring rigid foam boards or reflective foil barriers. While a DIY kit (usually R-4 to R-8) won’t perform quite as well as a factory-injected polyurethane door, it is a highly cost-effective way to improve temperature regulation and reduce noise.
2. Does an insulated garage door increase home value?
Yes. Real estate appraisers and buyers increasingly look for energy-efficient home features. An insulated garage door improves your home’s overall curb appeal, lowers utility costs, and signals to buyers that the property has been well-maintained.
3. How much does a new insulated garage door cost?
In the US market, a standard single-car insulated garage door typically ranges from $800 to $1,500, while a double-car door ranges from $1,500 to $3,500, including professional installation. Premium doors with high R-values and custom wood overlays can exceed $5,000.
4. Will an insulated door keep my garage completely warm in winter?
Not entirely on its own. While an insulated door drastically slows heat transfer, the garage itself usually lacks the wall insulation and HVAC vents found inside the main house. To keep a garage fully warm, you must also insulate the garage walls, seal the attic hatch above the garage, and add a dedicated space heater or extend your home’s ductwork.
5. Is it worth insulating a detached garage?
If your detached garage is strictly used for parking vehicles or storing lawnmowers, insulation may not offer a high return on investment. However, if you use the space as a woodworking shop, home gym, or man-cave, insulating the door is absolutely essential for your personal comfort and to protect your tools from humidity and rust.
Conclusion
Discovering how do you know if your garage door is insulated is the gateway to a more energy-efficient, quiet, and comfortable home. Whether you perform the visual test, measure the panel thickness, or use an infrared thermometer, taking 10 minutes to inspect your door can save you hundreds of dollars in annual heating and cooling costs. If you find your door is lacking, upgrading to a high R-value polyurethane model is one of the best home improvement investments you can make this year.
Found this guide helpful? Don’t let your friends and family suffer through freezing garages and high energy bills! Share this article on Facebook, Pinterest, or X (Twitter) to help them master their home maintenance today.
Leave a Reply