If you’re trying to figure out How Do You Adjust A Chamberlain Garage Door Opener, you’re likely dealing with a garage door that doesn’t close fully, reverses unexpectedly, or makes unusual noises during operation.
These issues are very common and usually don’t require replacement—just proper adjustment. In this guide, you’ll learn exactly how to fine-tune your Chamberlain garage door opener safely and effectively.
Read too: Tc1 Tricode Garage Door Opener Remote W/ Clip Chamberlain: Complete Guide
What Does Adjusting a Chamberlain Garage Door Opener Mean?
Before learning How Do You Adjust A Chamberlain Garage Door Opener, it’s important to understand what “adjustment” actually involves.
It typically refers to:
- Adjusting travel limits (how far the door opens/closes)
- Adjusting force settings (how much power the motor uses)
- Fixing sensor alignment issues
Learn more about garage door systems here:
Why You May Need to Adjust Your Garage Door Opener
Understanding How Do You Adjust A Chamberlain Garage Door Opener is important if you notice:
- Door stops halfway
- Door reverses before closing
- Loud grinding or strain noises
- Door doesn’t fully close or open
- Safety sensor triggers randomly
👉 Industry service reports show that over 60% of garage door issues are caused by incorrect limit or force settings rather than mechanical failure.
How Do You Adjust A Chamberlain Garage Door Opener (Step-by-Step)
Follow these steps carefully to avoid damage or misalignment.
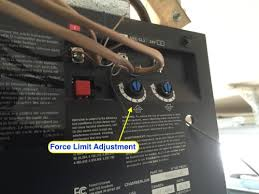
Step 1: Locate Adjustment Screws or Controls
On most Chamberlain units:
- Look for UP/DOWN travel adjustment dials or buttons
- Usually located on the motor housing
- May be labeled “UP LIMIT” and “DOWN LIMIT”
Step 2: Adjust Door Closing Limit
If your door does not fully close:
- Turn the DOWN adjustment screw clockwise slightly
- Test the door
- Repeat small adjustments until fully closed
👉 Make small changes only (¼ turn at a time).
Step 3: Adjust Door Opening Limit
If the door does not fully open:
- Turn the UP adjustment screw clockwise
- Test door movement
- Stop once fully open position is reached
Step 4: Adjust Force Settings
Force controls how much pressure the motor uses.
- Increase force if door reverses too early
- Decrease force if door struggles or strains
⚠️ Important: Do not set force too high—it may cause safety risks.
Step 5: Test Safety Sensors
Safety sensors are critical for proper operation.
Check:
- Both sensors are aligned
- LED lights are solid (not blinking)
- No dirt or obstruction blocking them
If misaligned, gently adjust until both lights are steady.
Troubleshooting Table
| Problem | Cause | Solution |
|---|---|---|
| Door won’t close | Limit too high | Adjust down limit |
| Door reverses | Force too low | Increase force |
| Door stuck halfway | Misalignment | Recheck limits |
| Flashing sensor light | Dirty sensors | Clean lenses |
Common Mistakes When Adjusting Chamberlain Openers
When learning How Do You Adjust A Chamberlain Garage Door Opener, avoid:
- Turning adjustment screws too much at once
- Ignoring safety sensors
- Increasing force excessively
- Skipping test cycles
👉 Technicians report that most DIY issues come from over-adjustment rather than under-adjustment.
Expert Insight
Garage door professionals highlight that:
- Small adjustments are always more effective than large changes
- Proper alignment can improve door lifespan by up to 30%
- Most Chamberlain systems are designed for easy homeowner tuning
Safety Tips Before Making Adjustments
Always follow safety precautions:
- Disconnect power if inspecting parts manually
- Keep hands away from moving door
- Never override safety sensors permanently
- Test door after every adjustment
Maintenance Tips for Long-Term Performance
To keep your system working smoothly:
- Lubricate moving parts every 6 months
- Clean sensors regularly
- Test balance of door twice a year
- Avoid forcing manual adjustments
- Inspect cables and springs annually
Benefits of Proper Adjustment
- Smooth door operation
- Reduced motor strain
- Improved safety performance
- Longer opener lifespan
- Fewer repair costs
FAQ – How Do You Adjust A Chamberlain Garage Door Opener
1. Why won’t my Chamberlain garage door close fully?
It’s usually due to incorrect down travel limit settings.
2. How often should I adjust my garage door opener?
Only when you notice performance issues.
3. Can I damage the opener by adjusting it wrong?
Yes, excessive force settings can strain the motor.
4. What if adjustments don’t fix the problem?
You may need sensor replacement or professional repair.
5. How long does adjustment take?
Usually 10–20 minutes if done correctly.
6. Do I need tools to adjust it?
Most models only require a screwdriver or built-in dial controls.
Conclusion
Learning How Do You Adjust A Chamberlain Garage Door Opener helps you solve common garage issues quickly without calling a technician. With small, careful adjustments, you can restore smooth, safe, and reliable door operation.
If this guide helped you, share it with friends or family who might be dealing with the same garage door problems.
Leave a Reply