Replacing a broken garage door spring can feel overwhelming, especially when you are stuck with a car trapped inside or outside your home. You might be asking yourself, “How do I replace the spring on my garage door” without calling an expensive professional? This guide will walk you through the process safely, helping you understand the risks, tools needed, and exact steps to restore your garage door’s functionality.
Garage door springs are under extreme tension and can cause serious injury if handled incorrectly. However, with the right knowledge, precautions, and tools, many homeowners successfully complete this repair. Let’s dive into everything you need to know.
Understanding Garage Door Springs: Torsion vs. Extension
Before attempting any replacement, it is crucial to identify which type of spring your garage door uses. There are two main types: torsion springs and extension springs. Each has distinct characteristics, installation methods, and safety considerations.
Torsion Springs
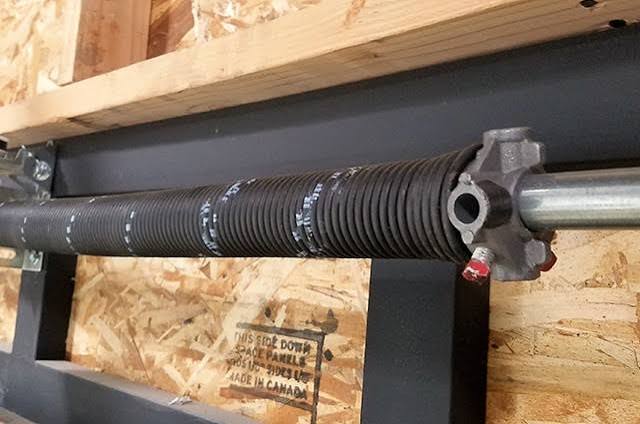
Torsion springs are mounted horizontally above the garage door opening on a metal shaft. They work by twisting (torque) to lift the door. These springs are commonly found in modern residential garage doors because they offer smoother operation and longer lifespans.
- Location: Above the door, centered on the header wall.
- Lifespan: Typically 10,000–15,000 cycles (one cycle = one open and close).
- Difficulty: High risk due to high tension; requires winding bars.
Extension Springs
Extension springs are located on both sides of the door, running parallel to the horizontal tracks. They stretch to provide lifting force. These are often found in older homes or lighter-duty doors.
- Location: Alongside the upper horizontal tracks.
- Lifespan: Approximately 7,000–10,000 cycles.
- Difficulty: Moderate risk; requires safety cables to prevent snapping hazards.
According to the International Door Association, improper handling of garage door springs accounts for thousands of injuries annually in the United States. Understanding your spring type is the first step toward a safe replacement.
| Feature | Torsion Spring | Extension Spring |
|---|---|---|
| Position | Above door | Sides of door |
| Mechanism | Twisting torque | Stretching tension |
| Safety Risk | Very High | High |
| Tools Needed | Winding bars, vice grips | Locking pliers, safety cables |
| Best For | Heavy doors, frequent use | Lighter doors, budget repairs |
Safety First: Essential Precautions Before Starting
Never attempt to replace a garage door spring without proper safety gear and preparation. The energy stored in these springs is equivalent to hundreds of pounds of force. A sudden release can cause severe injury or property damage.
Required Safety Equipment
- Safety glasses: Protect eyes from flying debris or snapped components.
- Heavy-duty gloves: Prevent cuts and improve grip.
- Steel-toed boots: Shield feet from falling tools or hardware.
- Clamps or locking pliers: Secure the door in place during work.
Critical Safety Rules
- Disconnect the opener: Unplug the garage door opener to prevent accidental activation.
- Secure the door: Use C-clamps or locking pliers on the track below the bottom roller to keep the door stationary.
- Work with a partner: Having someone assist you adds an extra layer of safety.
- Use correct tools: Never substitute screwdrivers or pry bars for proper winding bars.
If you feel uncertain at any point, stop immediately and contact a licensed garage door technician. Your safety is more valuable than saving money on a repair.
Tools and Materials You Will Need
Gathering the right tools before starting ensures a smoother and safer replacement process. Here is a comprehensive checklist:
- Winding bars (for torsion springs): Two solid steel bars, typically 18–24 inches long.
- Locking pliers (Vise-Grips): To secure the door and hold components.
- Socket set and wrenches: For removing bolts and brackets.
- Ladder: Sturdy and tall enough to reach the spring assembly comfortably.
- New spring(s): Ensure exact match in length, wire size, and coil count.
- Measuring tape: For verifying dimensions.
- Penetrating oil: Helps loosen rusted bolts.
Pro Tip: Take photos of the existing spring setup before disassembly. This visual reference helps ensure correct reinstallation.
Step-by-Step Guide: Replacing Torsion Springs
Replacing torsion springs is complex and dangerous. Follow these steps meticulously.
Step 1: Release Tension from the Old Spring
Insert winding bars into the holes on the winding cone. Slowly unwind the spring by rotating the bar counterclockwise. Never remove the winding bar until the spring is fully unwound. Alternate between two bars to maintain control.
Step 2: Remove the Old Spring
Once tension is released, unbolt the spring from the center bracket and end plates. Carefully slide the spring off the torsion tube. Dispose of it properly, as it remains hazardous even when unwound.
Step 3: Install the New Spring
Slide the new spring onto the torsion tube, ensuring correct orientation (left-wind vs. right-wind). Secure it with the end plates and center bracket. Double-check that all bolts are tightened securely.
Step 4: Wind the New Spring
Using winding bars, wind the spring clockwise to the manufacturer’s specified number of quarter-turns. Refer to the spring’s label or documentation for exact turns. Each quarter-turn adds significant tension.
Step 5: Test the Door
Remove clamps and reconnect the opener. Operate the door manually first to check balance. If it stays in place when halfway open, the spring tension is correct.
Step-by-Step Guide: Replacing Extension Springs
Extension springs are slightly less dangerous but still require caution.
Step 1: Secure the Door
Clamp the door tracks below the bottom rollers to prevent movement.
Step 2: Detach the Old Spring
Unhook the spring from the pulley system and rear track hanger. Use locking pliers to hold the cable if necessary.
Step 3: Install Safety Cables
Thread a new safety cable through the center of the new extension spring. This prevents the spring from flying across the garage if it breaks.
Step 4: Attach the New Spring
Connect one end to the rear track hanger and the other to the pulley bracket. Ensure all hooks and connections are secure.
Step 5: Test Balance
Release the clamps and test the door’s movement. Adjust tension if needed by changing the S-hook position on the track.
When to Call a Professional
While DIY replacement is possible, certain situations warrant professional assistance:
- You lack confidence or experience with high-tension systems.
- The door is unusually heavy or oversized.
- Multiple components (cables, rollers, tracks) also need repair.
- You notice structural damage to the door or frame.
Professional technicians have specialized tools, insurance, and expertise to handle complex repairs safely.
FAQ Section
Q1: How long do garage door springs last?
Most torsion springs last 10,000–15,000 cycles, while extension springs last 7,000–10,000 cycles. Average usage results in a lifespan of 7–10 years.
Q2: Can I replace just one torsion spring?
It is recommended to replace both springs simultaneously, even if only one is broken. This ensures balanced tension and prevents premature failure of the remaining spring.
Q3: What happens if I install the wrong spring?
Incorrect springs can cause poor door balance, opener strain, or sudden failure. Always match the wire size, length, and coil count exactly.
Q4: Is it illegal to replace garage door springs myself?
No, it is not illegal, but some local regulations may require licensed professionals for certain repairs. Check local codes if unsure.
Q5: How much does professional spring replacement cost?
Professional replacement typically costs $150–$350, including parts and labor. DIY costs range from $50–$100 for parts only.
Q6: Why did my spring break?
Common causes include metal fatigue, lack of lubrication, corrosion, or improper installation. Regular maintenance extends spring life.
Conclusion
Learning how do I replace the spring on my garage door empowers you to handle common household repairs confidently. By understanding the differences between torsion and extension springs, prioritizing safety, and following precise steps, you can restore your garage door’s functionality efficiently.
Remember, safety is paramount. If any step feels uncertain, consult a professional. Share this guide with friends or family who might benefit from thesLearn how do I replace the spring on my garage door with our expert step-by-step guide. Stay safe and save money with proper DIY techniques.e tips, and stay safe while tackling your next DIY project!
Leave a Reply