Introduction
Locked out of your own garage? You are not alone. Millions of US homeowners face this frustrating issue every year, but the solution is much simpler than you might think. If you are wondering, “How do I program a Liftmaster garage door opener remote?” this comprehensive, step-by-step guide will get your door moving smoothly and securely in just a few minutes.
How Do I Program A Liftmaster Garage Door Opener Remote: A Step-by-Step Guide
Programming your remote does not require a professional technician. With a fresh battery and a sturdy step ladder, you can complete this task safely and efficiently. Follow these three concrete steps to sync your remote successfully.
Step 1: Locate the “Learn” Button
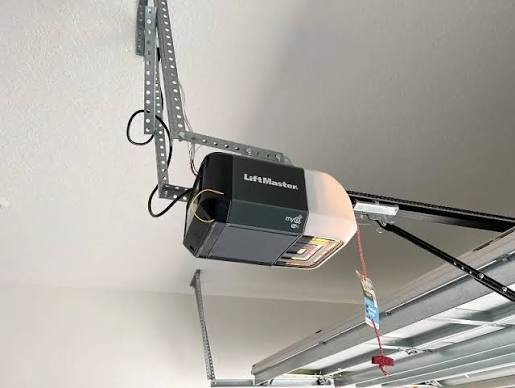
First, ensure your garage door is fully closed for safety. Use a step ladder to reach the motor unit mounted on your garage ceiling. Look for the “Learn” button on the back or side of the opener. It is typically located near the hanging antenna wire and is accompanied by a small LED indicator light. The button color (yellow, purple, red, orange, or green) determines your programming method.
Step 2: Clear Old Codes (Highly Recommended)
If you are replacing a lost remote or suspect unauthorized access, clear the opener’s memory first. Press and hold the “Learn” button for approximately 6 seconds until the LED indicator light turns off. This erases all previously paired remotes and keypad codes, ensuring a clean, secure slate for your new setup.
Step 3: Sync the Remote to the Opener
Press the “Learn” button once briefly. The LED light will illuminate or blink, indicating the unit is in programming mode. You have exactly 30 seconds to complete the next action. Walk to your remote, press and hold the desired button for 2 to 3 seconds, then release. Watch the motor unit: the LED light will blink or you will hear two distinct clicks, confirming the remote is successfully paired. Test the remote from a distance of 10 feet to verify functionality.
Decoding Your Liftmaster Learn Button Colors
Not all Liftmaster openers are identical. Identifying your “Learn” button color is crucial because it dictates the radio frequency and security protocol your device uses. Refer to the table below to identify your model’s specifications.
| Learn Button Color | Model Era | Frequency | Security Technology |
|---|---|---|---|
| Yellow | 2011 – Present | 315 MHz | Security+ 2.0® (Advanced Rolling Code) |
| Purple | 2005 – Present | 390 MHz | Security+ 2.0® (Advanced Rolling Code) |
| Red | 1997 – 2011 | 390 MHz | Security+® (Original Rolling Code) |
| Orange | 1997 – 2011 | 390 MHz | Security+® (Original Rolling Code) |
| Green | 1993 – 1997 | 315 MHz | Legacy Dip-Switch or Early Rolling Code |
Pro Tip: If your opener has a green “Learn” button, it may rely on outdated dip-switch technology. In this case, you must manually match the tiny switches inside the remote to the exact pattern on the motor unit.
Troubleshooting: What If the Remote Won’t Program?
Even with careful steps, technology can occasionally hiccup. If your remote fails to sync, do not panic. Check these common culprits before assuming the hardware is broken.
- Replace the Battery: A weak battery is the number one cause of programming failure. Install a fresh, high-quality 3V CR2032 coin battery. Ensure the positive (+) side is facing up as indicated in the battery compartment.
- Check the “Lock” Feature: Many Liftmaster wall consoles have a “Lock” button. If activated, it disables all remote controls to prevent unauthorized entry while you are home. Press and hold the lock icon for 2 seconds to disable it.
- Inspect the Antenna Wire: The thin wire hanging from the motor unit must dangle straight down. If it is tucked behind metal ductwork or wrapped around the housing, the signal cannot transmit properly.
- Distance and Interference: Ensure you are standing within 5 feet of the motor unit during programming. LED light bulbs in the garage can sometimes emit electromagnetic interference; try turning them off temporarily while syncing.
Expert Insight: Why Rolling Codes Matter for Your Security
Modern garage door security relies heavily on encryption. According to industry data, over 80% of modern garage door openers utilize rolling code technology to prevent “code-grabbing” theft, where thieves intercept and replay your remote’s signal.
Liftmaster’s Security+ 2.0® system generates a new, unique code every single time you press the button. This dynamic encryption ensures that even if a signal is intercepted, it cannot be reused to open your garage. Understanding this technology highlights why clearing old codes (Step 2) is a vital security habit, especially when moving into a new home or losing a remote. For a deeper technical understanding of how this encryption prevents unauthorized access, you can read more about rolling code technology on Wikipedia.
Frequently Asked Questions (FAQ)
Q1: How do I know if my Liftmaster remote is compatible with my opener?
A: Compatibility is primarily determined by the “Learn” button color and the manufacturing year. Remotes labeled “Security+ 2.0” are generally backward compatible with older Security+ (red/orange) models, but they will not work with very old green-button or dip-switch models. Always check the packaging of your new remote for a compatibility chart.
Q2: Can I program a Liftmaster remote without using the “Learn” button?
A: Unfortunately, no. The “Learn” button is a mandatory security feature designed to prevent unauthorized individuals from pairing their own remotes to your system. If the button is broken or unresponsive, the logic board of the motor unit may need to be replaced by a certified technician.
Q3: How many remotes can I program to one Liftmaster opener?
A: Most modern Liftmaster garage door openers can store up to 50 to 75 unique remote controls and keypads simultaneously. This ample memory ensures you can equip every family member’s car, plus a wireless keypad, without maxing out the system.
Q4: Why is my Liftmaster garage door remote blinking after I press the button?
A: A blinking LED on the remote typically indicates a low battery. If the battery is fresh and it still blinks without operating the door, the remote may have lost its programming. Simply repeat the 3-step programming process to re-sync it.
Q5: Does programming a new remote erase my old remotes?
A: No, pressing the “Learn” button briefly to add a new remote does not erase existing ones. However, if you hold the “Learn” button for 6 seconds, it will wipe the entire memory. Only do this if you specifically want to remove all old devices for security reasons.
Conclusion
Learning how to program your garage door remote empowers you to maintain control, convenience, and security over your home. By identifying your “Learn” button color, following the precise 3-step syncing process, and performing basic troubleshooting, you can resolve most remote issues in under ten minutes.
Don’t let a disconnected remote disrupt your daily routine. Take charge of your smart home setup today! If you found this guide helpful, please share it on your favorite social media platforms to help friends and family conquer their garage door woes. Have questions? Drop them in the comments below, and we will be happy to assist you!
Leave a Reply