Introduction
Is your garage door slamming shut, refusing to stay open, or feeling impossibly heavy to lift? You’re not alone — thousands of homeowners face this exact frustration every year, and the culprit is almost always improper spring tension. If you’ve been wondering “how do I adjust the tension on my garage door,“ you’ve come to the right place. In this comprehensive guide, we’ll walk you through everything you need to know to diagnose, test, and safely adjust your garage door’s spring tension so it operates smoothly for years to come.
Why Garage Door Tension Matters More Than You Think
Your garage door is likely the largest moving object in your entire home, weighing anywhere from 130 to over 400 pounds depending on its size and material. The springs — not the opener motor — are what actually do the heavy lifting. When tension is correctly calibrated, the door should feel nearly weightless when you operate it manually.
When tension is off, several problems emerge:
- Too little tension: The door feels heavy, slams shut dangerously, and puts excessive strain on your opener motor.
- Too much tension: The door rockets upward, won’t stay closed, and creates a serious safety hazard.
- Uneven tension: One side sags while the other rises, causing binding, noise, and premature wear on tracks and rollers.
According to the International Door Association (IDA), improperly adjusted garage door springs are among the top three causes of residential garage door injuries each year. Getting this right isn’t just about convenience — it’s about your family’s safety.
Understanding Your Garage Door Spring System
Before you grab any tools, you need to identify which type of spring system your garage door uses. There are two primary types, and the adjustment process differs significantly between them.
Torsion Springs (Mounted Above the Door)
Torsion springs are mounted horizontally on a metal shaft above the garage door opening. They work by twisting (torquing) to store energy. Most modern residential garage doors use one or two torsion springs.
| Feature | Torsion Springs |
|---|---|
| Location | Above the door on a steel shaft |
| Lifespan | 10,000–20,000 cycles |
| Adjustment Method | Winding bars inserted into winding cones |
| Safety Level | Higher risk — under extreme tension |
| Common On | Heavier double-car doors |
Extension Springs (Mounted Along the Tracks)
Extension springs run parallel to the horizontal tracks on both sides of the door. They work by stretching as the door closes and contracting as it opens.
| Feature | Extension Springs |
|---|---|
| Location | Alongside the horizontal tracks |
| Lifespan | 5,000–10,000 cycles |
| Adjustment Method | Repositioning S-hooks or adjusting cable length |
| Safety Level | Moderate risk — can snap violently |
| Common On | Lighter single-car doors |
Pro Tip: If your springs look rusty, have visible gaps between coils, or make loud popping sounds, they may need replacement rather than adjustment. A worn-out spring cannot hold proper tension no matter how many times you adjust it. For more background on the mechanics of these systems, you can read about garage door openers and spring mechanisms on Wikipedia.
The Garage Door Balance Test: Do This First
Before adjusting anything, you must determine whether your door is actually out of balance. Here’s a simple three-step balance test that takes less than five minutes:
- Disconnect the opener. Pull the red emergency release cord hanging from the opener rail to disengage the automatic mechanism.
- Lift the door halfway. Raise the door manually to approximately chest height (about 3–4 feet off the ground) and let go.
- Observe the result.
- ✅ Balanced: The door stays in place with minimal movement.
- ⚠️ Undersprung (needs more tension): The door falls back down toward the closed position.
- ⚠️ Oversprung (needs less tension): The door rises further on its own toward the fully open position.
If your door fails this test, it’s time to adjust the tension. If it passes, your problem likely lies elsewhere — such as worn rollers, misaligned tracks, or a failing opener.
How to Adjust Torsion Spring Tension (Step-by-Step)
⚠️ CRITICAL SAFETY WARNING: Torsion springs store an enormous amount of kinetic energy — enough to cause severe injury or death if handled incorrectly. If you are not confident in your abilities, hire a certified garage door technician. Never attempt this with children or pets nearby.
Tools You’ll Need
- Two steel winding bars (typically 18 inches long, ½-inch diameter) — never use screwdrivers
- Adjustable wrench or socket set
- Stepladder rated for your weight
- Safety glasses and heavy-duty work gloves
- C-clamps or locking pliers
Step 1: Secure the Door
Close the garage door completely. Place C-clamps on the tracks just below the bottom roller on each side. This prevents the door from shooting upward if a spring releases unexpectedly.
Step 2: Identify the Winding Cone
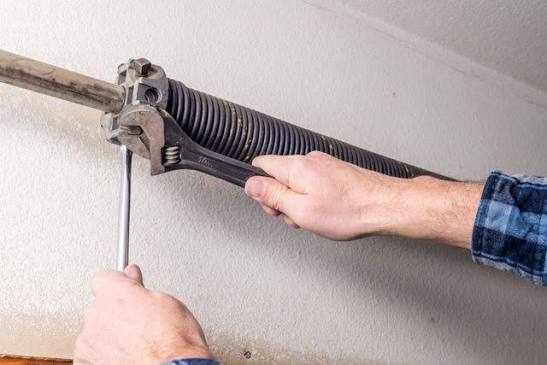
Locate the winding cone at the end of the torsion spring shaft. You’ll see a small hole (or set of holes) drilled into the cone — this is where the winding bars insert.
Step 3: Insert the First Winding Bar
Insert one winding bar firmly into a hole on the winding cone. Hold it securely with both hands. The spring is under full tension at this point, so do not let go.
Step 4: Insert the Second Winding Bar
Insert the second winding bar into the next available hole on the cone (usually 90 degrees from the first). You now have a secure two-point grip.
Step 5: Wind the Spring
- To increase tension (door too heavy): Rotate the winding cone toward the center of the door (upward direction when facing the spring). Each quarter-turn adds approximately 7.5 pounds of lift force.
- To decrease tension (door too light): Rotate the winding cone away from the center (downward direction).
Make adjustments in small increments — typically ¼ to ½ turn at a time. A standard 7-foot residential door usually requires about 30–36 quarter turns total from a fully unwound state, but your specific requirement depends on door weight and spring size.
Step 6: Re-test the Balance
After each adjustment, remove the C-clamps and repeat the balance test described earlier. Continue fine-tuning until the door holds steady at the halfway point.
Step 7: Tighten the Set Screws
Once balanced, use your wrench to tighten the set screws on the winding cone firmly against the shaft. This locks the spring in its new position.
How to Adjust Extension Spring Tension (Step-by-Step)
Extension springs are somewhat simpler to adjust but still demand caution. Always wear safety glasses — a snapping extension spring can whip across the garage at dangerous speeds.
Step 1: Open the Door Fully and Disconnect the Opener
Raise the door all the way up and engage the manual lock or clamp the tracks to hold it in place. Pull the emergency release cord.
Step 2: Locate the S-Hook or Pulley Attachment
Each extension spring connects to the rear track hanger via an S-hook or a pulley-and-cable system. The attachment point determines the spring’s effective tension.
Step 3: Move the S-Hook to Adjust Tension
- To increase tension: Move the S-hook to a hole closer to the front of the track (shortening the spring’s resting length).
- To decrease tension: Move the S-hook to a hole farther from the front (lengthening the resting length).
Most track hangers have 3–5 pre-drilled holes for this purpose. Move both springs equally to maintain even tension across the door.
Step 4: Adjust the Safety Cable (If Applicable)
Many extension spring systems include a safety cable running through the center of the spring. Ensure this cable has roughly 2–3 inches of slack when the door is fully open. Too tight restricts movement; too loose reduces its protective function.
Step 5: Re-test and Fine-Tune
Remove the clamps, lower the door to the halfway point, and check the balance. Repeat adjustments as needed until the door stays put.
Common Mistakes to Avoid
Even experienced DIYers make these errors when learning how do I adjust the tension on my garage door:
- ❌ Using improper tools. Screwdrivers, rebar, or wooden dowels can slip out of the winding cone and cause catastrophic release. Always use rated steel winding bars.
- ❌ Adjusting only one spring. On dual-spring systems, both springs must be wound equally. Uneven tension warps the door and damages hardware.
- ❌ Over-winding. Adding too many turns doesn’t make the door “better” — it accelerates spring fatigue and can snap the spring prematurely.
- ❌ Ignoring spring age. If your springs are older than 7–10 years or show signs of corrosion, adjustment is a temporary band-aid. Plan for replacement.
- ❌ Skipping the safety cable. On extension spring systems, the safety cable is your last line of defense against a snapped spring. Never operate without one.
When to Call a Professional Instead
While minor tension adjustments are within reach for handy homeowners, certain situations demand professional intervention:
- The spring is visibly broken, cracked, or separated.
- You hear loud bangs or grinding noises during operation.
- The door derails from its tracks after adjustment.
- You have a high-lift or vertical-lift door configuration.
- You simply don’t feel comfortable — and there is zero shame in that.
A licensed garage door technician typically charges between $75 and $150 for a tension adjustment service call, which is a small price compared to a trip to the emergency room.
Frequently Asked Questions (FAQ)
Q1: How often should I check my garage door spring tension?
You should perform the balance test at least twice a year — ideally in spring and fall. Temperature fluctuations affect metal expansion and contraction, which can subtly shift tension over time. Additionally, check the tension anytime you notice the door operating differently than usual.
Q2: Can I adjust garage door tension without special tools?
For extension springs, you may only need a pair of pliers and a stepladder. However, for torsion springs, steel winding bars are non-negotiable. Attempting to wind a torsion spring with improvised tools is extremely dangerous and is the leading cause of DIY garage door injuries.
Q3: How many turns should I add to my torsion spring?
There is no universal answer because it depends on your door’s weight, height, and the spring’s wire gauge and inside diameter. As a rough guideline, a standard 7-foot, 150-pound single-car door typically needs 30–34 quarter turns per spring. Always adjust incrementally and re-test after each change.
Q4: Is it normal for my garage door springs to make noise?
Light squeaking can usually be resolved with a spray of lithium-based garage door lubricant applied to the spring coils. However, loud popping, banging, or grinding sounds indicate a mechanical problem — possibly a broken spring, loose hardware, or severely misaligned tension — that requires immediate attention.
Q5: Will adjusting the tension void my garage door warranty?
In most cases, yes. Many manufacturers explicitly state that unauthorized spring adjustments void the warranty on both the springs and the door assembly. Check your owner’s manual or contact the manufacturer before proceeding. If your door is still under warranty, schedule service through an authorized dealer.
Q6: How long do garage door springs last after a tension adjustment?
A properly adjusted spring should last for the remainder of its rated cycle life — typically 10,000 to 20,000 open-close cycles for torsion springs and 5,000 to 10,000 cycles for extension springs. At average household usage (2–4 cycles per day), that translates to roughly 7–15 years for torsion and 3–7 years for extension springs.
Conclusion
Learning how do I adjust the tension on my garage door is one of the most valuable home maintenance skills you can develop. A properly balanced door operates quietly, extends the lifespan of your opener motor, reduces energy consumption, and — most importantly — keeps your family safe from unexpected door failures.
Remember the key takeaways: always test the balance first, use the correct tools for your spring type, make small incremental adjustments, and never hesitate to call a professional when the job exceeds your comfort level. Your garage door works hard for you every single day; giving it the attention it deserves will pay dividends for years to come.
Found this guide helpful? Share it with friends, family, and neighbors on Facebook, Twitter/X, or Pinterest who might be struggling with a stubborn garage door. A quick share could save someone from a costly repair bill — or worse, a preventable injury. Let’s keep our garages safe, one spring at a time! 🏠🔧
Leave a Reply