Introduction
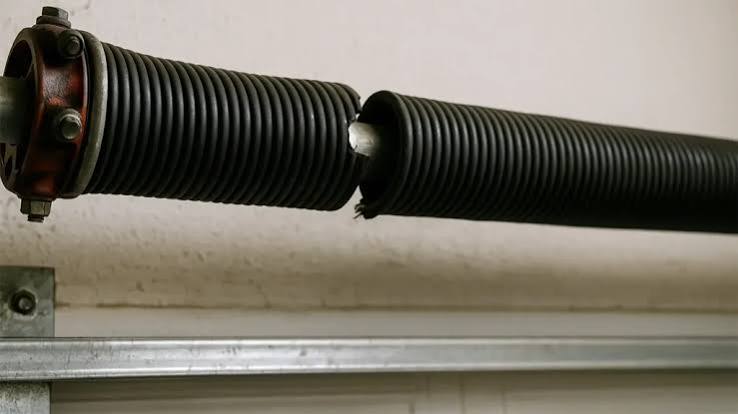
Hearing a loud bang from your garage is never a good sign. If you are staring at a crooked door that refuses to open, you are likely dealing with a garage door spring broken on one side. This is a common but potentially dangerous issue that halts your daily routine instantly.
You might feel frustrated or worried about the cost of repairs. Don’t panic. In this guide, we will walk you through exactly what happened, why it’s risky to ignore, and whether you should attempt a DIY fix or call a professional. Safety is our top priority, so read carefully before touching any tools.
Why Did Only One Spring Break?
It can be confusing when only one spring snaps while the other remains intact. Most modern garage doors use a dual-spring system to balance the heavy weight of the door. When one fails, the entire system collapses.
The Cycle Life Factor
Garage door springs are rated by “cycles.” One cycle equals one full opening and closing of the door. Standard springs last between 10,000 and 20,000 cycles. If your springs were installed at the same time, they have endured the same wear and tear. However, minor manufacturing defects or uneven tension can cause one to fail slightly before the other.
Torsion vs. Extension Springs
Understanding your spring type is crucial for safety:
- Torsion Springs: Mounted horizontally above the door header. They store energy by twisting. These are under extreme tension and are highly dangerous to handle without proper training.
- Extension Springs: Located on both sides of the upper horizontal tracks. They stretch to lift the door. While still dangerous, they are generally considered slightly less volatile than torsion springs if proper safety cables are installed.
Expert Insight: According to industry standards, if one spring breaks, the other is likely near the end of its life as well. Replacing both simultaneously is recommended to ensure balanced operation and prevent future immediate failures.
Is It Safe to Fix a Broken Garage Door Spring Yourself?
This is the most critical question. The short answer is: It depends on the spring type and your experience level.
The Dangers of Torsion Springs
Torsion springs store massive amounts of kinetic energy. A standard residential door weighs between 150–400 pounds. The spring holds all that weight in check. If a winding bar slips or a cable snaps during repair, the spring can unwind violently. This can cause severe injury, including broken bones or even fatal accidents.
| Feature | Torsion Springs | Extension Springs |
|---|---|---|
| Location | Above door header | Alongside vertical tracks |
| Risk Level | Extremely High | High (if no safety cable) |
| DIY Difficulty | Expert Only | Intermediate |
| Tools Needed | Winding bars, vice grips | C-clamps, locking pliers |
When to Call a Professional
You should immediately call a licensed technician if:
- You have torsion springs and no prior experience.
- The cables are frayed or detached.
- The door panels are damaged or bent.
- You do not own the specific safety tools (winding bars).
For more detailed safety standards regarding garage door components, you can refer to general mechanical safety guidelines on Wikipedia.
Step-by-Step: How to Fix Extension Springs (DIY Friendly)
If you have extension springs and feel confident, follow these steps strictly. Always wear safety glasses and heavy-duty gloves.
Step 1: Secure the Door
Before doing anything, ensure the door is fully closed. Use two C-clamps to lock the door onto the vertical tracks just below the bottom roller brackets. This prevents the door from falling if the remaining spring fails.
Step 2: Release Tension
Locate the broken spring. There should be a safety cable running through it. If the cable is intact, it may hold the broken pieces. Carefully disconnect the pulley and cable system from the broken spring. Do not cut the safety cable yet.
Step 3: Remove the Broken Spring
Unhook the broken spring from the rear hanger bracket and the front pulley fork. Remove it from the track area. Dispose of it carefully, as sharp metal edges may be exposed.
Step 4: Install the New Spring
Buy a replacement spring that matches the exact length, wire size, and color code of the old one. Do not guess. An incorrect spring can damage your opener or door.
- Hook one end of the new spring to the rear hanger.
- Attach the other end to the pulley fork.
- Ensure the safety cable is threaded through the new spring correctly.
Step 5: Reconnect and Test
Reattach the lift cable to the pulley. Remove the C-clamps slowly. Operate the door manually first to check for smooth movement. If it feels too heavy or too light, the spring tension may be incorrect.
What If You Have Torsion Springs?
If you have torsion springs, do not attempt to replace them yourself unless you are trained. However, understanding the process helps you verify if a technician is doing the job correctly.
A professional will:
- Disconnect the garage door opener.
- Clamp the door to the tracks.
- Use two steel winding bars to unwind the tension from the intact spring (if replacing both) or release the broken side.
- Remove the old springs and install new ones.
- Wind the new springs to the precise number of turns required for your door’s weight.
- Test the balance by lifting the door halfway. It should stay in place.
Note: Using improper tools like screwdrivers instead of winding bars is a leading cause of garage door injuries.
Cost Comparison: DIY vs. Professional Repair
Many homeowners hesitate due to cost. Here is a realistic breakdown for the US market in 2026.
| Service Type | Estimated Cost | Pros | Cons |
|---|---|---|---|
| DIY (Extension) | $50–$100 (parts) | Saves labor cost | Risk of injury, time-consuming |
| Professional (Single) | $150–$250 | Warranty, speed | Higher upfront cost |
| Professional (Pair) | $250–$400 | Balanced performance, longevity | Highest initial cost |
Prices vary by region and door weight.
While DIY seems cheaper, consider the value of a warranty. Professional repairs often come with a 1–5 year warranty on parts and labor. If a DIY spring fails in three months, you pay again.
FAQ Section
Q1: Can I open my garage door if one spring is broken?
A: It is not recommended. The door will be extremely heavy and unbalanced. Forcing it open can damage the tracks, rollers, and opener. It also poses a risk of the door crashing down.
Q2: How long do garage door springs last?
A: Standard springs last 7–10 years with average use (3–4 cycles per day). High-cycle springs can last up to 20,000 cycles. Climate and humidity also affect lifespan.
Q3: Why does my garage door make a loud noise when opening?
A: A loud bang usually indicates a broken spring. Grinding noises may suggest worn rollers or lack of lubrication. Squeaking often means the hinges need oil.
Q4: Should I replace both springs if only one is broken?
A: Yes. Since both springs were installed at the same time, the second one is likely near failure. Replacing both ensures balanced lifting and saves you from another service call soon.
Q5: What tools do I need to fix a garage door spring?
A: For extension springs: C-clamps, locking pliers, socket set, and safety glasses. For torsion springs: Two steel winding bars, vice grips, and a ladder. Never use makeshift tools for torsion springs.
Q6: How do I know if my spring is torsion or extension?
A: Look above the door. If you see a metal rod with coils wrapped around it horizontally, it’s a torsion spring. If you see springs stretching along the side tracks, they are extension springs.
Conclusion
Dealing with a garage door spring broken on one side is stressful, but it is a solvable problem. Remember, safety must always come first. If you have torsion springs, the risk of severe injury is too high for most DIYers. Invest in a professional repair to ensure your family’s safety and the longevity of your door.
If you have extension springs and the right tools, you can save money by doing it yourself—just follow the steps meticulously. Whichever path you choose, regular maintenance and lubrication can extend the life of your new springs.
Found this guide helpful? Share it with your neighbors or on social media to help others stay safe! Don’t forget to bookmark this page for future home maintenance tips.
Leave a Reply