Introduction
Is your garage door acting up, leaving you stranded or worried about your home’s security? Finding the right Craftsman 3 4 Hp Garage Door Opener Replacement Parts doesn’t have to be a stressful guessing game. We are here to help you confidently identify, source, and install the exact components you need to get your door running smoothly again.
Finding the Right Craftsman 3 4 Hp Garage Door Opener Replacement Parts
Before ordering any components, accurate identification is crucial. Craftsman has manufactured numerous models over the decades, and parts are not always universally interchangeable.
To find your exact model number, grab a stepladder and look at the back or side of the motor unit. You will find a sticker or stamped label displaying a model number (e.g., 139.53999D or 41A3820-1). Write this down. This alphanumeric code is your golden ticket to ensuring compatibility.
Pro Tip: Always cross-reference your model number with the manufacturer’s parts diagram before purchasing. A mismatched part can lead to further damage or void existing warranties.
Most Common Replacement Parts for Craftsman 3/4 HP Openers
Based on industry repair data, certain components wear out faster than others due to mechanical friction and electrical stress. Below is a breakdown of the most frequently replaced parts:
| Part Name | Symptom of Failure | Estimated Cost (USD) |
|---|---|---|
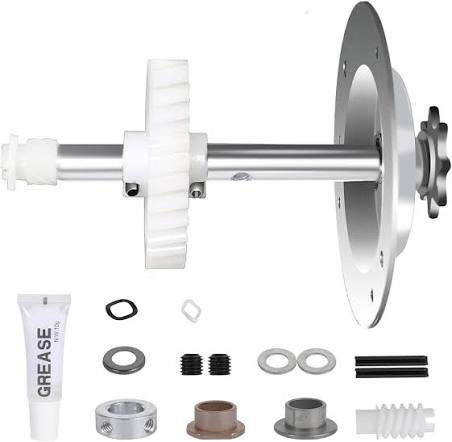
| Gear and Sprocket Kit | Motor hums, but door doesn’t move; grinding noise. | $25 – $45 |
| Logic Control Board | Opener is completely unresponsive; lights flash erratically. | $60 – $120 |
| Start Capacitor | Motor struggles to start or makes a loud buzzing sound. | $15 – $30 |
| Safety Reversal Sensors | Door closes partially then reverses; LED lights blink. | $20 – $40 |
| Wall Control Panel | Buttons are unresponsive or the display is blank. | $25 – $50 |
Note: Prices are approximate and may vary based on retailer and specific model compatibility.
Step-by-Step Guide: Replacing the Gear and Sprocket Kit
The nylon drive gear is the most common failure point in Craftsman openers. Over time, the plastic teeth strip away, disconnecting the motor from the drive mechanism. Follow this detailed, step-by-step tutorial to replace it safely.
Tools Required:
- Phillips head screwdriver
- 7/16-inch socket wrench
- Flathead screwdriver
- White lithium grease
Step 1: Disconnect Power
Unplug the garage door opener from the wall outlet. Never attempt internal repairs while the unit is energized.
Step 2: Remove the Light Lens
Carefully pry off the plastic light lens covering the bulbs. Remove the bulbs and set them aside in a safe place to avoid breakage.
Step 3: Detach the Motor Housing
Locate the four screws securing the top half of the motor housing to the base. Remove these screws using your Phillips head screwdriver. Gently lift the top cover off.
Step 4: Remove the Trolley Assembly
Using the 7/16-inch socket wrench, loosen and remove the nut securing the trolley to the drive shaft. Slide the trolley assembly off the rail.
Step 5: Swap the Gear and Sprocket
Pull out the old, stripped white nylon gear and the metal sprocket. Insert the new gear and sprocket into the housing. Ensure the retaining clips are securely snapped into place.
Step 6: Lubricate and Reassemble
Apply exactly 1 ounce of white lithium grease evenly across the teeth of the new nylon gear. Do not over-lubricate, as excess grease can attract dust and debris. Reattach the trolley, secure the housing with the four screws, replace the light bulbs, and plug the unit back in.
Expert Insights and Reliability Data
According to long-term reliability studies by consumer advocacy groups, the average lifespan of a residential garage door opener is 10 to 15 years. However, the internal nylon gears typically require replacement every 7 to 10 years due to constant mechanical stress.
As noted in comprehensive technical overviews, the evolution of the garage door opener has prioritized safety features like automatic reversal, but the fundamental mechanical drive systems remain largely unchanged. This means that while your opener may be older, the core mechanical principles—and the availability of their replacement parts—remain highly reliable and well-documented.
Investing in a genuine gear and sprocket kit, rather than a cheap aftermarket alternative, can extend the life of your opener by another 5 to 7 years, saving you the $300+ cost of a full unit replacement.
Proactive Maintenance Tips to Extend Part Lifespan
Preventative care is always cheaper than reactive repair. Implement these simple habits:
- Bi-annual Lubrication: Every six months, apply a small amount of garage-door-specific lubricant to the chain or belt, rollers, and hinges. Avoid using WD-40, as it is a degreaser, not a long-term lubricant.
- Sensor Alignment Check: Monthly, verify that the safety sensors on both sides of the door are aligned. The indicator lights should be solid, not blinking.
- Balance Test: Disconnect the opener using the emergency release cord. Manually lift the door halfway. If it doesn’t stay in place, your springs are unbalanced, which puts excessive strain on the opener’s motor and gears. Call a professional for spring adjustment.
Frequently Asked Questions (FAQ)
Q1: How do I find the model number for my Craftsman garage door opener?
A: The model number is located on a sticker or stamped directly into the metal on the back or side of the main motor unit. You may need a stepladder and a flashlight to read it clearly. It usually starts with a sequence like “139.” or “41A”.
Q2: Can I upgrade my old Craftsman opener with new smart features?
A: Yes! If your opener is functional but lacks connectivity, you can purchase a universal smart garage door controller (like myQ or similar brands). These devices attach to your existing wall control panel and allow you to operate and monitor your door via a smartphone app.
Q3: Is it safe to replace garage door opener parts myself?
A: Replacing internal opener components like gears, logic boards, or capacitors is generally safe for DIYers provided the unit is unplugged. However, never attempt to repair or adjust the high-tension torsion springs yourself. Spring repair is highly dangerous and should always be left to certified professionals.
Q4: Are Craftsman 3 4 Hp Garage Door Opener Replacement Parts still available for older models?
A: Yes, Craftsman and third-party manufacturers continue to produce legacy parts for models dating back to the 1990s. As long as you have the correct model number, you can source gears, circuit boards, and remotes through authorized dealers or reputable online hardware retailers.
Q5: Why does my garage door opener motor run, but the door doesn’t move?
A: This is the classic symptom of a stripped nylon drive gear. The motor is functioning correctly, but the worn-out gear can no longer grip the drive shaft to pull the chain or belt. Replacing the gear and sprocket kit will resolve this issue.
Conclusion
Maintaining your garage door doesn’t have to be a daunting task. By knowing how to identify the correct Craftsman 3 4 Hp Garage Door Opener Replacement Parts, you can save hundreds of dollars in service fees and extend the lifespan of your system. Whether it’s a simple gear replacement or a logic board upgrade, tackling these repairs with the right knowledge ensures your home remains secure and accessible.
Found this guide helpful? Share it with your friends, family, or neighborhood community groups on Facebook, Twitter, or Pinterest to help them tackle their garage door repairs with confidence! Don’t forget to bookmark this page for future maintenance reference.
Leave a Reply