Have you ever been stuck outside your garage because your remote suddenly stopped working? It is incredibly frustrating, but don’t worry—you are definitely not alone. In this comprehensive guide, we will show you exactly how to use, program, and troubleshoot the Craftsman 1/2 HP Garage Door Opener Learn Button (often searched as Craftsman 1 2 Hp Garage Door Opener Learn Button) to get your door working smoothly again.
Where Do You Find the Craftsman 1/2 HP Garage Door Opener Learn Button?
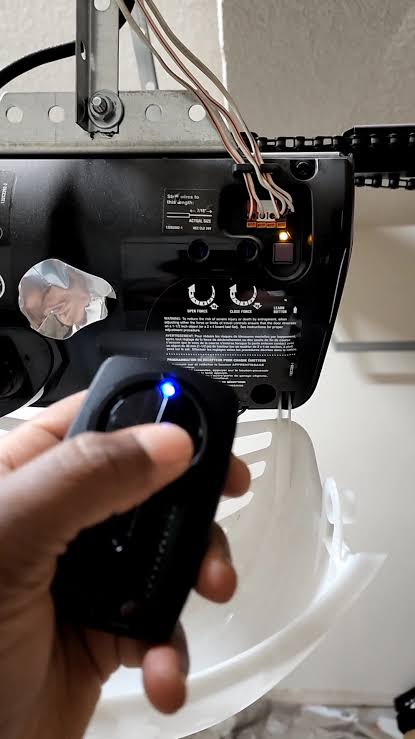
Before we dive into the solutions, we need to locate the button. The Craftsman 1/2 HP Garage Door Opener Learn Button is typically located on the back or side of the motor unit hanging from your garage ceiling.
To safely reach it, use a sturdy stepladder. Once you are up there, look for a small, round button situated near the hanging white antenna wire.
Interestingly, the color of this button tells you a lot about your opener’s frequency and compatibility. Here is a quick reference table to help you identify yours:
| Learn Button Color | Frequency | Compatibility Type |
|---|---|---|
| Purple | 315 MHz | Security+ (Rolling Code) |
| Red/Orange | 390 MHz | Security+ (Rolling Code) |
| Yellow | 315 MHz | Security+ 2.0 (Rolling Code) |
| Green | 390 MHz | Older Smart/Learn Code |
Knowing your button color is crucial. It dictates exactly which replacement remotes and wireless keypads will work with your specific system.
How Do You Program a Remote to the Craftsman 1/2 HP Garage Door Opener?
Programming a new remote is surprisingly simple. You do not need any specialized tools—just your remote and a few seconds of your time.
Follow these concrete steps to sync your handheld remote:
- Clear the Area: Ensure your garage door path is completely clear of people, pets, and objects.
- Access the Motor Unit: Climb your stepladder safely and locate the motor unit.
- Press the Learn Button: Press and immediately release the learn button. The indicator light next to it will turn on solid or begin blinking.
- Activate the Remote: Within 30 seconds, press and hold the desired button on your handheld remote.
- Confirm the Sync: Hold the remote button until the motor unit’s lights flash or you hear a distinct double click. This usually takes about 2 to 3 seconds.
- Test the System: Step down from the ladder and press the remote button to test the door.
Expert Insight: According to professional garage door technicians, failing to press the remote button within the 30-second window is the most common reason programming fails. Always have your remote in hand before pressing the learn button!
How to Program an External Wireless Keypad
If you are installing an external keypad outside your garage, the process is slightly different:
- Press and release the learn button on the motor unit.
- Within 30 seconds, enter your desired 4-digit PIN on the external keypad.
- Press and hold the ‘Enter’ or ‘Send’ button on the keypad.
- Wait for the motor unit lights to flash, confirming the PIN is saved.
What Should You Do If the Learn Button Is Blinking or Flashing?
If you notice the indicator light next to your learn button is blinking continuously, it usually means the opener’s memory is full. A standard Craftsman opener can hold up to 10 different remote controls or keypads in its memory.
When the memory is full, the system stops accepting new devices. Here is how to clear the memory and fix the blinking issue:
- Press and Hold: Press and hold the learn button.
- Wait for the Light to Die: Keep holding it for about 6 to 10 seconds.
- Release: Once the indicator light turns off completely, release the button. This erases all previously programmed remotes and keypads.
- Reprogram: You will now need to reprogram all your remotes, keyless entry pads, and vehicle HomeLink systems using the steps mentioned above.
How Do You Reset the Craftsman 1/2 HP Garage Door Opener Learn Button?
Sometimes, a full system reset is the best way to solve persistent syncing issues. Resetting clears out any corrupted data on the logic board.
Here is a quick breakdown of the pros and cons of performing a full reset:
Pros vs. Cons of Resetting Your Opener
- Pros:
- Eliminates “ghost remotes” (neighbors’ remotes accidentally opening your door).
- Clears logic board errors and memory glitches.
- Boosts overall home security by wiping old access codes.
- Cons:
- Requires you to reprogram every single remote and keypad.
- Can be slightly time-consuming if you have multiple vehicles synced.
To perform the reset, simply follow the memory-clearing steps in the previous section. Hold the button for 6-10 seconds until the light goes out. After the light turns off, the system is completely wiped and ready for fresh programming.
Why Is My Craftsman Garage Door Opener Learn Button Not Lighting Up?
If you press the button and absolutely nothing happens—no light, no click—you might be facing a more serious issue.
First, check the simplest culprits:
- Power Supply: Ensure the opener is firmly plugged into the ceiling outlet. Check your home’s circuit breaker to see if a fuse has tripped.
- Lock Feature: Many Craftsman wall consoles have a “Lock” button. If this is activated, it disables the remotes and affects the system’s responsiveness.
If the power is fine and the lock is off, the issue might lie with the logic board. The logic board is the brain of your garage door opener. According to industry data, logic board failures account for nearly 20% of all garage door motor repairs, often caused by electrical spikes.
Garage door openers are highly susceptible to power surges, especially during summer thunderstorms. A minor electrical spike can instantly fry the sensitive microchips on the logic board. To prevent this in the future, always plug your garage door opener into a high-quality surge protector rated for motorized appliances.
For a deeper understanding of how these motor systems and their electronic components operate, you can read more about the Garage door opener on Wikipedia.
If the logic board is fried, you will likely need to replace it or consider upgrading to a newer, more secure model.
Frequently Asked Questions (FAQ)
1. How long do you hold the learn button on a Craftsman garage door opener? It depends on your goal. To program a remote, you only press and release it (less than 1 second). To erase the memory or reset the system, you must press and hold it for 6 to 10 seconds until the indicator light turns off.
2. What color is the learn button on a Craftsman 1/2 HP garage door opener? The color varies by manufacturing year. Older models (pre-2005) often have a green or red learn button. Newer models typically feature a yellow, purple, or orange learn button. The color indicates the radio frequency used for security.
3. How do I know if my garage door opener logic board is bad? Common signs of a bad logic board include the learn button not lighting up at all, the motor unit making a rapid clicking sound without moving, or the opener completely dying after a lightning storm or power outage.
4. Can I use any remote with a Craftsman 1/2 HP garage door opener? No, you cannot use just any remote. The remote must match the frequency of your learn button color. For example, if you have a purple learn button, you must buy a remote specifically compatible with Security+ 315 MHz rolling code technology.
5. How often should I reset my garage door opener? You do not need to reset it regularly. However, it is highly recommended to reset and reprogram your system if you lose a remote, move into a new house, or notice that the door is opening randomly without your command.
6. Why does my garage door close but immediately reverse back up? This is usually not an issue with the learn button, but rather the photo-eye safety sensors located near the floor. If the sensor lenses are dirty, misaligned, or blocked by direct sunlight, the door will reverse as a safety precaution. Clean the lenses with a soft cloth and ensure both sensors are pointing directly at each other.
Leave a Reply