Introduction
Is your garage door making a terrible grinding noise, or worse, refusing to open even though the motor is running? You are not alone. This is one of the most common issues homeowners face with older garage door openers, and it usually points to a worn-out drive gear.
Fortunately, you don’t need to call an expensive technician or buy a brand-new unit. By performing a Craftsman 1/2 HP garage door opener drive gear replacement, you can restore smooth, quiet operation to your door for a fraction of the cost. In this guide, we will walk you through everything you need to know to fix this problem yourself, safely and effectively.
Why Does the Drive Gear Fail?
Before we jump into the tools and steps, it is helpful to understand why this part fails. Knowing the cause can help you prevent future issues and understand the importance of using the right replacement parts.
The drive gear in your Craftsman opener is typically made of nylon or plastic composite. This material is chosen because it is quieter than metal and acts as a “sacrificial” component. If the door encounters an obstruction or becomes too heavy due to lack of maintenance, the plastic gear strips instead of burning out the expensive motor.
However, over time, normal wear and tear takes its toll. According to general mechanical principles, friction generates heat, which degrades plastic components. Most manufacturers design these gears to last between 5 to 10 years, depending on usage frequency. If you use your garage door multiple times a day, expect the gear to wear out sooner.
For more detailed information on the mechanics of garage door openers, you can refer to Wikipedia’s entry on Garage Door Openers, which provides a comprehensive overview of how these systems operate.
Signs You Need a Drive Gear Replacement
How do you know if the drive gear is the culprit and not something else? Here are the most common symptoms:
- Grinding Noise: A loud, metallic grinding sound coming from the motor head when you try to open or close the door.
- Motor Runs, Door Doesn’t Move: You hear the motor humming or running, but the chain or belt does not move, and the door stays shut.
- Jerky Movement: The door starts to move but then stops or moves unevenly.
- Visible Plastic Shavings: If you open the motor cover, you might see white plastic shavings inside the housing. This is a clear sign that the gear teeth have stripped.
If you experience any of these issues, it is highly likely that your drive gear needs replacement. Ignoring these signs can lead to further damage to the sprocket or the motor itself.
Tools and Parts You Will Need
Preparation is key to a successful repair. Gather all the necessary tools and parts before you start. This will save you time and frustration.
Essential Tools:
- Phillips Head Screwdriver: For removing the motor cover and internal components.
- Flathead Screwdriver: Useful for prying off clips or covers.
- Pliers: Needle-nose pliers are helpful for handling small pins and clips.
- Socket Set: Some models may require a socket wrench to remove the motor shaft nut.
- Lubricant: White lithium grease or a specialized garage door lubricant. Do not use WD-40 as it attracts dust and dries out.
Replacement Parts:
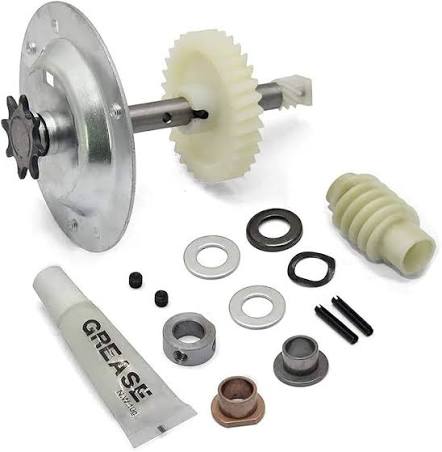
- Drive Gear Kit: Ensure you buy a kit specifically designed for your Craftsman 1/2 HP model. These kits usually include the main drive gear, the worm gear, and sometimes the sprocket.
- Retaining Clips: Often included in the kit, but good to have spares.
Pro Tip: Always check your opener’s model number (usually found on a sticker on the back or side of the motor unit) before purchasing parts. This ensures compatibility.
Step-by-Step Guide to Replacing the Drive Gear
Follow these steps carefully. Safety is paramount, so always disconnect the power before working on your garage door opener.
Step 1: Safety First and Power Disconnection
Unplug the garage door opener from the electrical outlet. If it is hardwired, turn off the circuit breaker. This prevents accidental activation while you are working inside the motor housing.
Step 2: Remove the Motor Cover
Locate the screws holding the plastic cover of the motor unit. Use your Phillips head screwdriver to remove them. Carefully lift the cover off. You may need to gently pry it loose if it is stuck.
Step 3: Access the Drive Mechanism
Once the cover is off, you will see the motor, the chain or belt, and the gear assembly. Identify the drive gear. It is usually located near the motor shaft. Take a photo with your phone for reference during reassembly.
Step 4: Remove the Old Gear
- Detach the Chain/Belt: Loosen the tension on the chain or belt by adjusting the trolley. You may need to remove the retaining clip that holds the sprocket in place.
- Remove the Sprocket: If the sprocket is separate, slide it off the shaft.
- Extract the Worm Gear: The worm gear is often pressed onto the motor shaft. You may need to use pliers or a gentle pulling motion to remove it. Be careful not to damage the motor shaft.
- Remove the Drive Gear: The main drive gear should now be accessible. Slide it off the shaft. If it is stuck, wiggle it gently.
Step 5: Clean and Inspect
Clean the inside of the motor housing with a dry cloth. Remove any plastic shavings or old grease. Inspect the motor shaft for any damage. If the shaft is bent or scored, you may need professional help.
Step 6: Install the New Gear
- Lubricate: Apply a generous amount of white lithium grease to the new worm gear and the motor shaft.
- Install Worm Gear: Press the new worm gear onto the motor shaft. Ensure it is seated firmly.
- Install Drive Gear: Slide the new drive gear into place. Make sure the teeth align correctly with the worm gear.
- Reattach Sprocket and Chain: Put the sprocket back on and secure it with the retaining clip. Reattach the chain or belt and adjust the tension. It should be snug but not overly tight.
Step 7: Test the Opener
Put the motor cover back on and secure the screws. Plug the opener back in. Test the door by using the wall button. Listen for any unusual noises. The operation should be smooth and quiet.
Common Mistakes to Avoid
Even experienced DIYers can make mistakes. Here are some pitfalls to watch out for:
| Mistake | Consequence | Solution |
|---|---|---|
| Using Wrong Lubricant | Attracts dirt, causes faster wear | Use only white lithium grease |
| Over-tightening Chain | Strains motor, wears gear faster | Follow manufacturer’s tension guidelines |
| Ignoring Model Number | Parts don’t fit, wasted money | Double-check model number before buying |
| Skipping Safety Steps | Risk of electric shock or injury | Always unplug the unit first |
FAQ: Frequently Asked Questions
Q1: How much does it cost to replace a Craftsman drive gear?
A: The cost of a drive gear kit typically ranges from $20 to $40. If you hire a professional, labor costs can add $100–$200. Doing it yourself saves significant money.
Q2: Can I just lubricate the old gear instead of replacing it?
A: No. If the gear is stripped or making grinding noises, lubrication will not fix the physical damage. The teeth are gone, and the gear must be replaced to function properly.
Q3: How long does the replacement take?
A: For a beginner, it usually takes 1–2 hours. If you are experienced, you can complete the job in under an hour. Take your time to ensure everything is aligned correctly.
Q4: Is it safe to work on the garage door opener myself?
A: Yes, as long as you disconnect the power source first. Never work on the opener while it is plugged in. Also, ensure the garage door is closed and secured so it doesn’t fall unexpectedly.
Q5: What if the new gear doesn’t solve the problem?
A: If the door still doesn’t work after replacing the gear, the issue might be with the motor capacitor, the logic board, or the door springs. In this case, consult a professional technician.
Q6: Where can I buy the correct drive gear kit?
A: You can find compatible kits at major home improvement stores like Home Depot or Lowe’s, or online retailers like Amazon. Always verify the part number against your opener’s model number.
Conclusion
Replacing the drive gear in your Craftsman 1/2 HP garage door opener is a manageable DIY project that can save you hundreds of dollars. By following this guide, you can restore your garage door’s functionality and enjoy peace of mind knowing you fixed it yourself.
Remember, regular maintenance, such as lubricating moving parts and checking door balance, can extend the life of your new gear. Don’t let a noisy garage door disrupt your day. Take action today!
Did you find this guide helpful? Share it with your friends and neighbors on social media who might be struggling with their garage doors. Let’s help everyone keep their homes running smoothly!
Leave a Reply