Introduction
Is your garage door stuck halfway, or did you just move into a new home only to realize the previous owners left without the instruction booklet? It is a frustrating situation that many homeowners face. Without proper guidance, even simple tasks like syncing a new remote can feel impossible. This guide serves as your comprehensive Craftsman 1 2 Hp Garage Door Opener 41A4315 7D Manual, designed to help you troubleshoot, program, and maintain your unit with confidence.
Whether you are dealing with connectivity issues or need to adjust the travel limits, we have broken down the technical jargon into easy-to-follow steps. Let’s get your garage door moving smoothly again.
Understanding Your Craftsman 41A4315-7D Model
Before diving into repairs, it is crucial to understand what you are working with. The model number 41A4315-7D refers to a specific generation of Craftsman chain-drive openers. These units are known for their durability and 1/2 horsepower motor, which is sufficient for most standard single-car and double-car garage doors.
Key Specifications
- Motor Power: 1/2 HP
- Drive Type: Chain Drive (known for strength, though slightly noisier than belt drives)
- Frequency: Typically operates on 315 MHz or 390 MHz (depending on the manufacturing year)
- Security Code: Uses rolling code technology for enhanced security against code grabbing.
According to industry standards, a 1/2 HP opener is ideal for wooden or insulated steel doors weighing up to 350 pounds. If you have a heavier custom door, you might experience strain, but for most residential setups, this model is a workhorse.
How to Program Remotes and Keypads
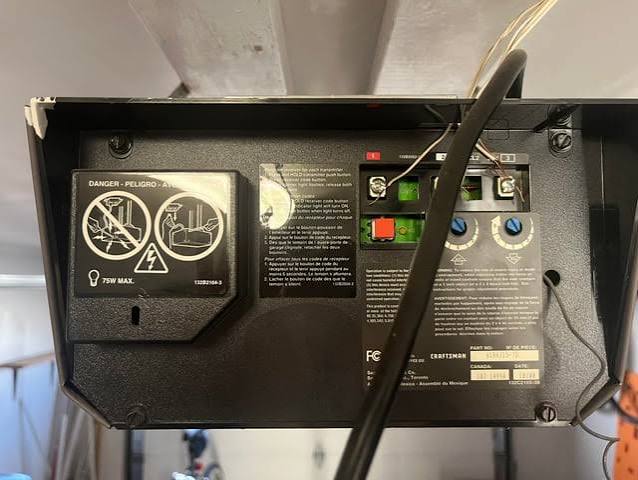
One of the most common reasons users search for a manual is to sync new devices. The “Learn” button is the heart of this process. On the 41A4315-7D model, this button is usually located on the back panel of the motor unit, near the hanging antenna wire. It is often colored purple, red, or orange, depending on the specific production batch.
Step-by-Step Remote Programming
- Locate the Learn Button: Climb your ladder safely and find the small button on the motor head.
- Clear Old Codes (Optional): If you are worried about security or have too many remotes, press and hold the Learn button for 6–10 seconds until the indicator light blinks out. This erases all previously programmed remotes.
- Activate Programming Mode: Press and release the Learn button once. The indicator light will turn on or blink, signaling it is ready to receive a signal. You have 30 seconds to complete the next step.
- Sync the Remote: Within 30 seconds, press and hold the button on your handheld remote that you wish to use. Hold it until the motor unit’s lights flash or you hear two clicks.
- Test: Press the remote button again to ensure the door activates.
Pro Tip: If you have a wireless keypad, the process is similar. Enter your desired PIN, then press and hold the “Enter” button while pressing the Learn button on the motor unit.
For more detailed information on radio frequency standards used in garage door openers, you can refer to general technical documentation on Wikipedia.
Adjusting Travel Limits and Force Settings
If your door reverses before hitting the floor or doesn’t close all the way, your travel limits are likely misaligned. The 41A4315-7D uses screw-based adjustments rather than digital menus, which makes them reliable but requires a bit of manual tweaking.
Setting the Down Limit
The down limit determines how far the door travels toward the floor.
- Locate the adjustment screws on the side of the motor unit. They are usually labeled with arrows indicating “Up” and “Down.”
- Use a flathead screwdriver to turn the Down adjustment screw.
- Turn the screw in small increments (1/4 turn at a time).
- Test the door after each adjustment. The door should close completely and seal against the weather stripping without forcing itself into the ground.
Setting the Force Control
Force settings prevent the door from crushing objects or people. If the door reverses immediately upon touching the floor, the force is set too low. If it doesn’t reverse when it hits an obstruction, it is too high.
- Increase Force: Turn the force adjustment knob clockwise.
- Decrease Force: Turn the force adjustment knob counter-clockwise.
Safety Warning: Always test the safety reversal system after adjusting force. Place a 2×4 piece of wood flat on the floor under the center of the door. Close the door. Upon contact, the door must automatically reverse. If it does not, discontinue use and consult a professional.
Troubleshooting Common Issues
Even robust machines like the Craftsman 1/2 HP encounter issues. Here is a breakdown of common problems and their solutions.
| Problem | Possible Cause | Solution |
|---|---|---|
| Door doesn’t move | Power outage or disconnected plug | Check the outlet and circuit breaker. Ensure the lock feature isn’t activated on the wall console. |
| Remote doesn’t work | Dead batteries or desynced code | Replace batteries first. Reprogram the remote using the Learn button method above. |
| Door reverses before closing | Obstructed safety eyes or dirty lenses | Clean the sensor lenses with a soft cloth. Ensure nothing is blocking the beam between the two sensors. |
| Motor hums but door doesn’t move | Broken gear or stripped sprocket | This is a common wear-and-tear issue. The plastic drive gear may need replacement. |
| Noisy operation | Loose chain or lack of lubrication | Tighten the chain (should have 1/4 inch slack) and lubricate the chain and rollers with silicone spray. |
The “Humming” Sound Issue
A frequent complaint with older Craftsman models is a humming noise without movement. This is often due to the drive gear. Over time, the plastic gear inside the motor housing wears down. While the motor runs, it cannot transfer power to the chain. Replacing this gear is a cost-effective repair compared to buying a new opener, but it requires disassembling the motor cover.
Maintenance Tips for Longevity
To extend the life of your Craftsman 41A4315-7D, regular maintenance is key. Most homeowners neglect their garage doors until they break, but a little effort goes a long way.
- Lubricate Moving Parts: Every six months, apply a silicone-based lubricant to the chain, rollers, and hinges. Avoid using WD-40 as it attracts dust and dries out over time.
- Inspect the Cables: Look for fraying or wear on the lift cables. If you see exposed wires, call a professional immediately. These cables are under high tension and can be dangerous.
- Check the Balance: Disconnect the opener by pulling the red emergency release cord. Manually lift the door halfway. It should stay in place. If it falls or rises, the springs are unbalanced and need professional adjustment.
FAQ Section
1. Where can I find the serial number on my Craftsman opener?
The serial number is typically located on a sticker on the back or side of the motor unit, near the light lens. It is essential for ordering specific replacement parts or verifying warranty status.
2. Why does my garage door opener light blink 10 times?
On many Craftsman models, a blinking light (often 10 times) indicates that the safety reversal sensors are misaligned or obstructed. Check that the LED lights on both sensors are solid and not flickering. Align them so they face each other directly.
3. Can I use a universal remote with the 41A4315-7D?
Yes, most universal remotes compatible with Craftsman/Chamberlain/LiftMaster systems will work. Ensure the remote supports the frequency of your unit (usually 315 MHz or 390 MHz). You will need to program it using the Learn button on the motor unit.
4. How do I reset the Craftsman 41A4315-7D to factory settings?
To reset the logic board, unplug the unit from the power source for at least 30 seconds. Plug it back in. To clear all remote codes, press and hold the Learn button for 10 seconds until the light goes out. You will then need to reprogram all your remotes and keypads.
5. Is the 41A4315-7D compatible with MyQ smart home devices?
Most older models like the 41A4315-7D do not have built-in Wi-Fi. However, you can add smart functionality by purchasing a separate MyQ Smart Garage Hub. This device connects to your existing opener’s terminals and allows you to control the door via smartphone.
Conclusion
Owning a Craftsman 1 2 Hp Garage Door Opener 41A4315 7D means having a reliable tool for your home, but only if you know how to maintain it. By understanding how to program your remotes, adjust travel limits, and troubleshoot common sensor issues, you can save money on service calls and keep your home secure.
Remember, safety is paramount. Always test the reversal mechanism and never attempt to repair high-tension springs yourself. If you found this guide helpful, please share it with friends or neighbors who might be struggling with their garage doors. A well-functioning garage door is a happy garage door!
Disclaimer: This article is for informational purposes only. Always refer to the official manufacturer’s guidelines for specific safety instructions. If you are unsure about any electrical or mechanical repairs, consult a certified garage door technician.
Leave a Reply