Dealing with a Chamberlain Garage Door Wall Button Not Working But Remote Works situation can be confusing and frustrating. If your remote opens the door just fine but the wall control does nothing, you’re likely facing a wiring, power, or control panel issue. The good news? Most fixes are simple and can be done without calling a technician.
Why Is My Chamberlain Garage Door Wall Button Not Working But Remote Works?
This issue usually means your garage door opener is functioning, but the wall control system is not communicating properly.
Read too: Tc1 Tricode Garage Door Opener Remote W/ Clip Chamberlain: Complete Guide
According to general garage door system design principles explained on Wikipedia, wall buttons use low-voltage wiring to send signals directly to the opener, unlike remotes that rely on radio frequency.
Most Common Causes:
- Loose or damaged wiring
- Faulty wall control panel
- Lock (vacation) mode activated
- Power supply issue
- Logic board malfunction
Is the Wall Button Broken or Just Disabled?
Before assuming the worst, check if the button is simply disabled.
Check for Lock Mode (Vacation Mode)
Many Chamberlain models include a lock feature that disables wall controls.
Signs Lock Mode Is On:
- Wall button doesn’t respond
- Remote still works normally
- LED light blinking on the control panel
How to Fix:
- Press and hold the lock button for 5–10 seconds
- Wait for the LED to stop blinking
- Test the wall button again
👉 This solves the problem in many cases, especially after accidental activation.
How to Fix Chamberlain Wall Button Not Working (Step-by-Step)
Let’s go through practical fixes you can try right now.
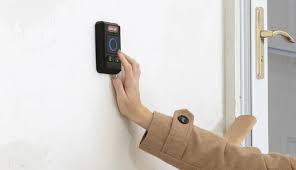
1. Check the Wiring Connections
Time needed: 5–10 minutes
Steps:
- Turn off power to the garage opener
- Locate the two low-voltage wires on the back of the opener
- Ensure wires are:
- Firmly connected
- Not frayed or broken
- Check the wall button terminals for loose screws
👉 Even a slightly loose wire can interrupt the signal.
2. Test the Wall Button with a Wire Bypass
This helps confirm if the button itself is faulty.
What You Need:
- Small insulated wire or screwdriver
Steps:
- Disconnect the wall button wires from the opener
- Briefly touch the two terminals together
- Observe the door
Result:
- Door moves → wall button is faulty
- No movement → wiring or opener issue
⚠️ Always perform this carefully to avoid short circuits.
3. Replace the Wall Control Panel
If the test confirms failure, replacing the panel is often the easiest fix.
Typical Cost:
- $20–$50
Steps:
- Turn off power
- Remove the old panel (usually 2 screws)
- Disconnect wires
- Connect new panel using the same terminals
- Restore power and test
4. Inspect for Damaged Wires Inside the Wall
Hidden wire damage is common in older homes.
Signs:
- Intermittent operation
- No response despite working connections
Fix Options:
- Replace wire entirely
- Run a new surface-mounted wire
5. Check the Garage Door Opener Logic Board
If everything else checks out, the issue might be internal.
Symptoms:
- Wall button doesn’t work
- Other wired controls also fail
Solution:
- Replace logic board (usually $80–$150)
- Or call a professional
Common Problems vs Solutions
| Problem | Symptom | Solution |
|---|---|---|
| Lock mode activated | Button unresponsive | Disable lock mode |
| Loose wiring | No signal from wall | Tighten connections |
| Faulty wall button | Works with bypass test | Replace control panel |
| Broken wire in wall | Intermittent or no response | Replace wiring |
| Bad logic board | Multiple controls fail | Replace board / call expert |
Real-World Insight: What Do Technicians Say?
Garage door technicians report that over 40% of wall button issues are caused by:
- Loose wiring
- Faulty control panels
This means most problems can be fixed without expensive repairs.
When Should You Call a Professional?
DIY fixes work most of the time, but not always.
Call a professional if:
- You suspect internal circuit damage
- The opener motor behaves abnormally
- Wiring inside walls is difficult to access
- You’re unsure about electrical safety
How to Prevent Wall Button Issues in the Future
Prevention saves time and money.
Maintenance Tips:
- Check wiring every 6 months
- Avoid pulling or stressing wall wires
- Keep control panel dry and clean
- Test system monthly
Advantages vs Disadvantages of Fixing It Yourself
Advantages:
- Saves money
- Quick fixes (under 15 minutes)
- No special tools required
Disadvantages:
- Requires basic troubleshooting skills
- Risk of misdiagnosis
- May not fix deeper electrical issues
FAQ: Chamberlain Garage Door Wall Button Not Working But Remote Works
Q1: Why does my remote work but wall button doesn’t?
Because they use different systems—remote uses radio signals, while the wall button uses wired connections.
Q2: How do I know if my wall button is bad?
Perform a bypass test. If the door works when terminals are touched, the button is faulty.
Q3: Can I use my garage door without the wall button?
Yes. The remote or mobile app can still operate the door.
Q4: How much does it cost to fix this issue?
- DIY fix: $0–$50
- Professional repair: $100–$200
Q5: Is it safe to replace the wall button myself?
Yes, as long as you turn off power before working.
Q6: Can wiring go bad over time?
Yes. Wires can degrade due to age, moisture, or physical damage.
Conclusion
Facing a Chamberlain Garage Door Wall Button Not Working But Remote Works issue doesn’t have to be stressful. In most cases, the problem comes down to simple causes like loose wiring, lock mode activation, or a faulty control panel.
By following the step-by-step fixes in this guide, you can quickly diagnose and resolve the issue—often in under 15 minutes.
👉 If this guide helped you, share it on social media so others can fix their garage door problems without unnecessary stress!
Leave a Reply