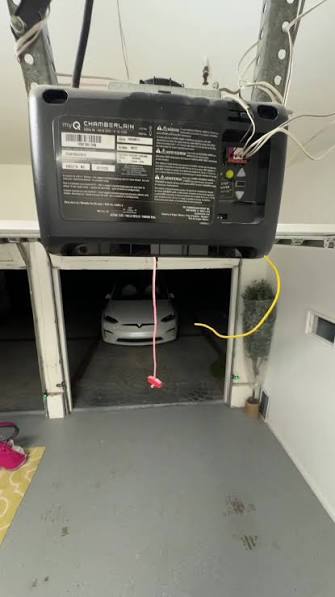
Introduction
There is nothing quite as frustrating as pressing the button to leave for work, only to watch your garage door stop halfway up, leaving you stuck or forcing you to manually lift a heavy door. If you are dealing with a Chamberlain garage door opener not opening all the way, you are not alone; this is one of the most common issues homeowners face with automated entry systems. Fortunately, in most cases, this problem isn’t caused by a broken motor but rather by simple misalignments or setting errors that you can fix yourself in under 30 minutes.
In this guide, we will walk you through the exact steps to diagnose and resolve this issue, ensuring your garage door operates smoothly, safely, and efficiently. Whether you have a newer Wi-Fi-enabled model or an older chain-drive unit, these troubleshooting steps apply to almost all Chamberlain units.
Why Won’t My Chamberlain Garage Door Open Fully?
Before diving into the tools, it is essential to understand why this happens. Garage door openers rely on a delicate balance of tension, sensors, and electronic limits. When any of these factors shift—even slightly—the opener’s safety mechanisms kick in, stopping the door to prevent damage or injury.
According to industry data from the International Door Association (IDA), nearly 60% of garage door service calls are related to maintenance issues like track alignment and limit settings rather than motor failure. Understanding the root cause saves you money and time.
Common Culprits:
- Misaligned Limit Switches: The “brain” doesn’t know where the “top” is.
- Obstructed Safety Eyes: Sensors detect a false blockage.
- Broken Torsion Springs: The motor lacks the power to lift the weight.
- Track Obstructions: Debris or bent rails physically stop the door.
Step 1: Check and Adjust the Travel Limit Settings
The most frequent reason for a Chamberlain garage door opener not opening all the way is incorrect travel limit settings. These settings tell the motor how far to move the door up and down. Over time, vibrations can cause these dials or buttons to shift.
How to Adjust Limits on Modern Chamberlain Models (MyQ Series)
Most modern Chamberlain openers use a digital interface or specific adjustment screws/knobs located on the back or side of the motor unit.
- Locate the Adjustment Controls: Look for two arrows or knobs labeled “Up” and “Down,” or a digital screen if you have a smart model.
- Enter Programming Mode: Press and hold the “Program” or “Set” button until the LED light begins to flash.
- Adjust the Up Limit:
- Use the “Up” arrow button to increase the travel distance.
- Each press typically adds a small increment of movement.
- Test the door after every 3–5 presses.
- Save the Setting: Once the door opens fully, press the “Program” button again to lock in the new setting.
Pro Tip: If your door reverses immediately after hitting the top, you may have set the limit too high. Reduce the up-limit slightly until the door stops gently at the fully open position without straining.
For Older Models with Screw-Drive Adjustments
If you have an older unit with physical screws:
- Find the two plastic screws marked “Up Travel” and “Down Travel.”
- Turn the “Up Travel” screw clockwise in small increments (quarter-turns).
- Test the door after each adjustment.
Step 2: Inspect and Clean the Safety Sensors
Chamberlain openers are equipped with photo-eye sensors near the floor on both sides of the door. If these sensors are misaligned, dirty, or blocked, the door will refuse to close or may stop mid-open as a safety precaution.
Quick Diagnostic Checklist:
- Check the LED Lights: Both sensors should have a steady green or amber light. If one is blinking or off, they are misaligned.
- Clean the Lenses: Wipe the sensor lenses with a soft, dry cloth to remove dust, spiderwebs, or dirt.
- Verify Alignment: Ensure both sensors are pointing directly at each other. Even a millimeter shift can break the beam.
If the sensors are aligned but the issue persists, check the wiring for any cuts or loose connections at the back of the motor head.
Step 3: Examine the Door Balance and Springs
A garage door opener is designed to lift the door, not carry its entire weight. The torsion springs above the door do the heavy lifting. If a spring is broken or worn out, the opener will struggle and may stop prematurely to avoid burning out the motor.
The Manual Balance Test
To determine if your springs are the issue, perform this simple test:
- Disconnect the opener by pulling the red emergency release cord.
- Manually lift the door halfway up.
- Let go of the door.
Results Interpretation:
- Balanced: The door stays in place. Your springs are fine; the issue is likely with the opener settings.
- Unbalanced: The door slams down or rises up on its own. Your springs need professional replacement.
Warning: Never attempt to replace torsion springs yourself. They are under extreme tension and can cause severe injury. Always hire a certified technician for spring repairs.
Step 4: Lubricate Moving Parts and Check Tracks
Friction is the enemy of smooth operation. If your rollers, hinges, or tracks are dry or dirty, the motor has to work harder, which can trigger safety shut-offs.
Maintenance Routine:
- Lubricate: Use a silicone-based lubricant or lithium grease on all rollers, hinges, and the chain/belt. Avoid WD-40 as it attracts dust.
- Inspect Tracks: Look for dents, bends, or debris inside the metal tracks.
- Tighten Hardware: Vibrations can loosen bolts over time. Tighten all bracket screws securing the track to the wall and ceiling.
For more detailed information on garage door mechanics and safety standards, you can refer to the general overview on Wikipedia – Garage Door.
Comparison: Chain Drive vs. Belt Drive Issues
Understanding your specific drive type can help narrow down the problem.
| Feature | Chain Drive | Belt Drive |
|---|---|---|
| Noise Level | Louder, metallic clanking | Quiet, smooth operation |
| Common Issue | Chain slack causing jerky movement | Belt stretching over time |
| Fix for “Not Opening” | Tighten chain tension (1/2 inch sag) | Check belt tension and pulleys |
| Maintenance | Requires frequent lubrication | Minimal lubrication needed |
If you have a chain drive and hear grinding noises while the door struggles to open, the chain may be too loose. Adjust the tension bolt at the end of the rail until there is about 1/2 inch of slack in the middle of the chain.
FAQ Section
Q1: Why does my Chamberlain garage door open partially and then reverse?
This is usually a sign that the force settings are too low, or the safety sensors are obstructed. The opener detects resistance (real or perceived) and reverses to prevent crushing an object. Try increasing the “Up Force” adjustment slightly, but ensure the path is clear first.
Q2: Can a weak remote battery cause the door to not open all the way?
No, a weak battery typically prevents the signal from being sent entirely, meaning the door won’t move at all. If the door moves but stops midway, the issue is mechanical or electronic within the opener unit itself, not the remote.
Q3: How often should I adjust the travel limits?
You should only adjust travel limits if you notice the door is not opening or closing completely. However, it is good practice to check the balance and lubrication of your door every six months to prevent the need for frequent adjustments.
Q4: What if resetting the limits doesn’t work?
If you have adjusted the limits, cleaned the sensors, and lubricated the tracks, but the Chamberlain garage door opener not opening all the way issue persists, there may be a faulty logic board or capacitor in the motor unit. In this case, contacting Chamberlain support or a professional technician is recommended.
Q5: Is it safe to use the garage door if it’s not opening fully?
It is not recommended. A door that doesn’t open fully can strain the motor, leading to premature failure. Additionally, it may indicate a balance issue that could cause the door to fall unexpectedly. Address the issue promptly to ensure safety.
Conclusion
Dealing with a Chamberlain garage door opener not opening all the way can be stressful, but it is rarely a catastrophic failure. By systematically checking your travel limits, cleaning your safety sensors, and ensuring your door is properly balanced, you can resolve the issue in most cases without calling a professional.
Regular maintenance is key to longevity. Take a few minutes every six months to lubricate moving parts and inspect the tracks. This proactive approach will save you from unexpected breakdowns and keep your home secure.
If you found this guide helpful, please share it with your neighbors or on social media to help others troubleshoot their garage door woes. Have you tried these steps? Let us know in the comments below if your door is back to full operation!
Leave a Reply