If you’re trying to program a remote or keypad, you’re probably asking: where is the learn button on a garage door opener? It’s a common question—and sometimes frustrating when you can’t find it. Don’t worry, this guide will help you locate it quickly and use it with confidence.
Where Is the Learn Button on a Garage Door Opener? (Quick Answer)
The learn button is typically located on the motor unit of your garage door opener—the box mounted on the ceiling of your garage.
Read too: Tc1 Tricode Garage Door Opener Remote W/ Clip Chamberlain: Complete Guide
Most Common Locations:
- Behind the light cover panel
- On the back or side of the motor housing
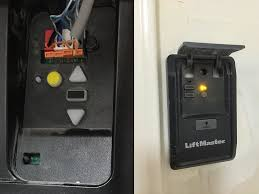
- Near the antenna wire
- Under a small plastic cover
In most cases, you’ll need a ladder to access it safely.
What Does the Learn Button Look Like?
The learn button is usually small, square or round, and clearly labeled as:
- “Learn”
- “Program”
- “Set”
Color Coding (Very Important)
Manufacturers use different colors to indicate frequency and compatibility:
| Color | Brand Compatibility | Frequency Type |
|---|---|---|
| Yellow | LiftMaster/Chamberlain | Security+ 2.0 |
| Purple | Chamberlain/LiftMaster | 315 MHz |
| Red/Orange | Older models | 390 MHz |
| Green | Genie | Intellicode system |
Knowing the color helps you choose the right remote.
Why Is the Learn Button Important?
The learn button is essential for:
- Programming new remotes
- Syncing wireless keypads
- Resetting the system
- Adding smart home integration
Modern systems use rolling code technology, explained in https://en.wikipedia.org/wiki/Garage_door_opener, which enhances security by changing the signal each time you use the remote.
How Do I Find the Learn Button Step-by-Step?
Follow these simple steps to locate it quickly:
Step 1: Turn Off the Garage Light
This helps you see indicator LEDs more clearly.
Step 2: Grab a Ladder (6–8 Feet Recommended)
Position it directly under the motor unit.
Step 3: Inspect the Motor Housing
Look at:
- Side panels
- Back panel
- Under light cover
Step 4: Remove the Light Cover (If Needed)
Some models hide the button behind a plastic panel.
Step 5: Look for Labeling
Check for words like:
- “Learn”
- “Program”
- “Set”
Step 6: Identify the LED Indicator
A small LED light sits next to the button and will glow when pressed.
What If You Can’t Find the Learn Button?
Sometimes it’s not obvious. Here’s what to do:
Check the Owner’s Manual
Search your model online if you’ve lost the manual.
Look for Hidden Panels
Some newer models conceal controls for a cleaner design.
Identify the Brand
Different brands place the button in slightly different spots.
Brand-Specific Learn Button Locations
LiftMaster & Chamberlain
- Behind light cover
- Near antenna wire
- Clearly labeled
Genie
- Back of motor unit
- Green button (Intellicode systems)
Craftsman
- Similar to Chamberlain (same manufacturer)
- Under light panel or rear housing
How to Use the Learn Button (Programming Guide)
Once you find it, follow these steps:
Step 1: Press the Learn Button
- Press and release (do not hold too long)
- LED will light up
Step 2: Activate Your Remote
- Press remote button within 30 seconds
- Hold for 2–3 seconds
Step 3: Wait for Confirmation
- Light blinks or motor clicks
- This confirms successful pairing
Step 4: Test the System
- Press remote again
- Door should open or close
How to Reset Using the Learn Button
If your system is acting up:
Reset Instructions:
- Press and hold the learn button for 6–10 seconds
- LED will turn off
- All remotes are erased
- Reprogram devices from scratch
Common Problems and Solutions
Problem: LED Doesn’t Turn On
- Check power supply
- Ensure outlet is working
Problem: Remote Won’t Sync
- Replace battery
- Try again within 30 seconds
Problem: Door Doesn’t Respond
- Check sensor alignment (6 inches from ground)
- Inspect wiring
Pros vs Cons of Learn Button Systems
Advantages
✔ Easy remote programming
✔ Enhanced security
✔ Quick reset option
✔ Supports multiple devices
Disadvantages
✘ Hard to access (ceiling-mounted)
✘ Hidden in some models
✘ Requires ladder
Expert Insight: Why Placement Matters
Garage door experts emphasize that learn button placement is designed for security and protection. By keeping it on the motor unit:
- Unauthorized access is reduced
- Accidental reprogramming is prevented
Industry data shows that modern garage systems with secure programming features reduce break-in risks by up to 40% compared to older fixed-code systems.
FAQ: Learn Button on Garage Door Opener
Q1: Where is the learn button on a garage door opener located?
A: It’s usually on the motor unit, behind the light cover or on the back panel near the antenna wire.
Q2: Do all garage door openers have a learn button?
A: Most modern ones do. Older systems may use DIP switches instead.
Q3: What color is the learn button?
A: Common colors include yellow, purple, red/orange, and green—depending on brand and frequency.
Q4: Can I program a remote without the learn button?
A: Yes, but only for older models using DIP switches.
Q5: How long do I have to press the remote after hitting learn?
A: About 30 seconds before the system exits programming mode.
Q6: What happens if I hold the learn button too long?
A: It resets the system and deletes all programmed remotes.
Conclusion
Now you know exactly where is the learn button on a garage door opener and how to use it effectively. It’s usually hidden in plain sight—on the motor unit, behind a panel, or near the antenna wire.
Finding it unlocks everything from remote programming to system resets. If this guide helped you, don’t forget to share it with friends or family who might be struggling with the same issue!
Leave a Reply