Dealing with a LiftMaster garage door will not close all the way problem can be frustrating—especially when it affects your home’s safety. Whether the door reverses, stops halfway, or refuses to close completely, the issue is usually caused by a few common factors. The good news? Most of them are easy to diagnose and fix yourself.
Why LiftMaster Garage Door Will Not Close All The Way
Understanding the cause is the first step toward fixing the issue.
Most Common Reasons:
- Misaligned safety sensors
- Dirty or blocked sensor lenses
- Incorrect travel limit settings
- Obstructions in the track
- Force setting too low
- Wiring or electrical issues
Read too: Tc1 Tricode Garage Door Opener Remote W/ Clip Chamberlain: Complete Guide
💡 According to garage door service data, sensor-related issues account for over 60% of closing problems in LiftMaster systems.
To learn more about how garage door systems function, visit:
https://en.wikipedia.org/wiki/Garage_door
How To Fix LiftMaster Garage Door That Won’t Close All The Way
Follow these step-by-step solutions, starting from the simplest.
1. Check Safety Sensors Alignment
LiftMaster systems rely heavily on safety sensors.
Symptoms:
- Door starts closing, then reverses
- LED lights blinking on sensors
Steps to fix:
- Locate sensors near the bottom of both tracks
- Ensure they face each other directly
- Adjust until both LED lights are solid (not blinking)
📏 Recommended height: 4–6 inches above the floor
2. Clean the Sensor Lenses
Dirt or dust can interrupt the infrared beam.
Steps:
- Use a soft, dry cloth
- Gently wipe both sensor lenses
- Avoid chemicals or water
👉 Even a thin layer of dust can cause malfunction.
3. Remove Track Obstructions
Small debris can block the door’s path.
Steps:
- Inspect tracks from top to bottom
- Remove dirt, leaves, or objects
- Ensure tracks are straight and undamaged
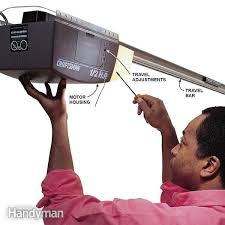
4. Adjust the Travel Limit Settings
If the door stops before reaching the ground, the limit setting may be incorrect.
Steps:
- Locate the adjustment screws on the opener motor
- Find the “Down” or “Close” limit screw
- Turn clockwise in small increments (¼ turn)
- Test after each adjustment
5. Increase the Force Setting
If the opener doesn’t apply enough force, it may stop early.
Steps:
- Locate the force adjustment dial
- Increase slightly
- Test door operation
⚠️ Avoid setting it too high—this can be unsafe.
6. Check for Wiring Issues
Loose or damaged wires can interfere with signals.
Signs:
- Intermittent operation
- Sensors not lighting up
Fix:
- Inspect visible wiring
- Tighten loose connections
- Replace damaged wires
LiftMaster Troubleshooting Quick Guide
| Problem | Likely Cause | Solution |
|---|---|---|
| Door reverses before closing | Sensor misalignment | Align sensors |
| Door stops halfway | Obstruction or limit | Clear track / adjust limit |
| Door won’t respond | Wiring issue | Inspect connections |
| Door closes partially | Force too low | Increase force setting |
| Sensors blinking | Dirty/misaligned | Clean and realign |
When Should You Call a Professional?
Some problems go beyond DIY fixes.
Call a technician if:
- Springs are broken or damaged
- Door is off-track
- Motor makes grinding noises
- Door is extremely heavy
💡 Professional repairs typically cost between $100–$300 depending on the issue.
Preventing Future LiftMaster Closing Issues
Regular maintenance can prevent most problems.
Maintenance Checklist:
- Clean sensors monthly
- Lubricate moving parts every 6 months
- Check alignment regularly
- Inspect cables and springs visually
- Test door balance annually
Advantages vs Disadvantages of DIY Fixes
Advantages:
- Saves money
- Quick troubleshooting
- Easy for minor issues
Disadvantages:
- Risk of incorrect adjustments
- Potential safety hazards
- May not solve deeper problems
Real-Life Example
A homeowner noticed their LiftMaster garage door wouldn’t close fully during the afternoon. After inspection, sunlight was directly hitting one sensor.
Solution:
- Installed a small shade over the sensor
✅ Result: Door function returned to normal immediately.
FAQ: LiftMaster Garage Door Will Not Close All The Way
1. Why does my LiftMaster garage door start closing then reverse?
This is usually caused by misaligned or blocked safety sensors detecting an obstruction.
2. Can sunlight affect LiftMaster sensors?
Yes. Direct sunlight can interfere with the infrared beam, causing the door to reverse.
3. How do I know if my sensors are faulty?
If the LED lights are off or blinking even after cleaning and alignment, they may need replacement.
4. Is it safe to adjust force settings?
Yes, but only in small increments. Setting it too high can create safety risks.
5. Why does my garage door stop before touching the ground?
This is often due to incorrect travel limit settings.
6. Should I repair or replace my LiftMaster opener?
If the opener is over 10–15 years old and frequently malfunctions, replacement may be more cost-effective.
Conclusion
If your LiftMaster garage door will not close all the way, the issue is usually caused by sensors, settings, or minor obstructions. By following the steps in this guide, you can quickly diagnose and fix the problem without unnecessary expense.
Start with simple solutions like cleaning and aligning sensors, then move on to adjusting settings if needed. For more complex issues, don’t hesitate to call a professional.
If this guide helped you, share it with others who might be facing the same LiftMaster garage door problem!
Leave a Reply