Introduction
Is your garage door opener making a terrible grinding noise, or worse, refusing to open at all? You are not alone. This is one of the most common mechanical failures in residential garage doors, often caused by worn-out internal components. The good news is that you likely do not need to replace the entire unit. By replacing the Liftmaster Garage Door Openers 41A5585 Gear And Sprocket Assembly, you can restore smooth, quiet operation to your door for a fraction of the cost of a new opener.
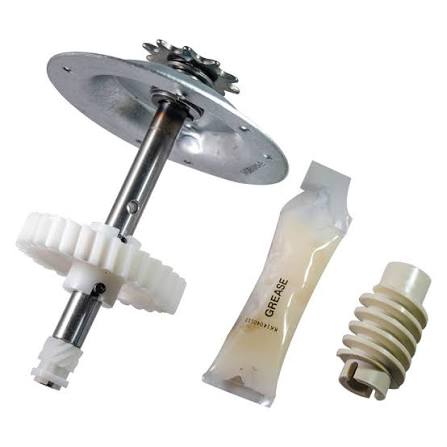
In this guide, we will walk you through everything you need to know about this critical part. We will explain why it fails, how to identify if this is your problem, and provide a clear, step-by-step process for replacement. Whether you are a seasoned DIYer or a first-time homeowner, this article is designed to help you save money and get your garage working again safely.
What Is the 41A5585 Gear and Sprocket Assembly?
Before we dive into the repair, it is essential to understand what this part actually does. The gear and sprocket assembly is the heart of your garage door opener’s drive mechanism. It translates the rotational power from the electric motor into the linear motion needed to lift your heavy garage door.
The Liftmaster Garage Door Openers 41A5585 Gear And Sprocket Assembly is specifically designed for chain-drive and belt-drive models. It consists of two main components:
- The Main Drive Gear: Usually made of nylon or plastic composite. This material is chosen because it is quieter than metal and acts as a “sacrificial” part. If the door gets stuck, the plastic gear strips instead of burning out the expensive motor.
- The Sprocket: This engages with the chain or belt to pull the trolley along the rail.
Over time, the teeth on the plastic gear wear down due to friction and regular use. When this happens, the motor spins, but the door does not move, or it makes a loud humming or grinding sound.
Why Does This Part Fail?
It might seem frustrating that a part would wear out, but this is actually by design. According to mechanical engineering principles, using a softer material for gears in high-torque applications protects the more expensive and complex components of the system. You can read more about the mechanics of gear systems on Wikipedia.
Common reasons for failure include:
- Normal Wear and Tear: Most openers last 10–15 years. The gear is expected to wear out within this timeframe.
- Lack of Lubrication: While the gear itself is often self-lubricating, the surrounding bearings and sprockets need occasional maintenance.
- Heavy Doors: If your garage door is heavier than the opener is rated for, the gear will strip faster.
- Misalignment: If the rail is not properly aligned, it puts extra stress on the sprocket.
Signs You Need to Replace the 41A5585 Assembly
How do you know if the Liftmaster Garage Door Openers 41A5585 Gear And Sprocket Assembly is the culprit? Here are the most common symptoms:
- Motor Runs, Door Doesn’t Move: You hear the motor humming, but the chain or belt does not move. This is the classic sign of stripped gears.
- Grinding or Crunching Noises: A loud metallic or plastic grinding sound coming from the motor head indicates the teeth are slipping against each other.
- Door Stops Mid-Travel: The door starts to open or close but then stops abruptly, often reversing direction.
- Visible Plastic Shavings: If you open the motor cover, you might see small white or black plastic shavings around the gear area. This is debris from the worn-out gear.
| Symptom | Likely Cause | Solution |
|---|---|---|
| Motor hums, no movement | Stripped main gear | Replace 41A5585 Assembly |
| Loud grinding noise | Worn gear teeth | Replace 41A5585 Assembly |
| Chain moves, door doesn’t | Broken trolley or cable | Inspect trolley and cables |
| Opener doesn’t turn on | Electrical issue | Check power source and capacitors |
Step-by-Step Replacement Guide
Replacing the Liftmaster Garage Door Openers 41A5585 Gear And Sprocket Assembly is a moderate DIY project. It requires some mechanical aptitude but no specialized tools beyond a basic socket set. Please prioritize safety throughout this process.
Tools You Will Need
- Phillips head screwdriver
- Socket wrench set (typically 7mm and 10mm)
- Pliers
- Clean rag
- New 41A5585 Gear and Sprocket Assembly kit
- Optional: Lithium-based grease (for re-lubricating bearings)
Safety First
Disconnect the power. Unplug the opener from the electrical outlet. If it is hardwired, turn off the circuit breaker. Also, disconnect the emergency release cord to ensure the door is manually locked in place so it does not fall during repair.
Step 1: Remove the Motor Cover
Locate the screws holding the plastic cover of the motor unit. These are usually found on the bottom and sides. Carefully remove them and set them aside. You will now see the internal components, including the motor, capacitor, and the gear assembly.
Step 2: Disconnect the Chain or Belt
You need to relieve tension on the chain or belt. Locate the tension adjustment bolt at the end of the rail (near the pulley). Loosen this bolt until the chain/belt is slack enough to slip off the sprocket. You may need to remove the retaining clip or pin that holds the chain to the trolley.
Step 3: Remove the Old Gear Assembly
The Liftmaster Garage Door Openers 41A5585 Gear And Sprocket Assembly is held in place by a few bolts and possibly a retaining clip.
- Remove the motor mounting bolts if necessary to access the gear housing.
- Unscrew the bolts securing the gear case.
- Carefully lift out the old gear and sprocket. Note the orientation of the worm gear on the motor shaft.
Step 4: Clean the Area
Use your clean rag to wipe away any old grease, plastic shavings, or dirt from the motor housing and the worm gear on the motor shaft. A clean surface ensures the new assembly fits correctly and lasts longer.
Step 5: Install the New 41A5585 Assembly
- Place the new gear and sprocket assembly into the housing. Ensure the worm gear meshes smoothly with the motor shaft.
- Reinstall the bolts and tighten them securely. Do not overtighten, as this can crack the plastic housing.
- Apply a small amount of lithium grease to the bearings if recommended by the kit instructions. Avoid getting grease on the chain or belt unless specified.
Step 6: Reattach the Chain or Belt
Loop the chain or belt back over the new sprocket. Reconnect it to the trolley. Tighten the tension adjustment bolt at the end of the rail. The chain should have about 1/4 inch of slack in the middle. For belts, follow the manufacturer’s tension guidelines.
Step 7: Test the Opener
Reattach the motor cover and plug the unit back in. Stand clear of the door and press the wall button. Watch and listen. The door should move smoothly and quietly. If it makes noise, check the tension again.
Troubleshooting Common Issues After Replacement
Even after installing the Liftmaster Garage Door Openers 41A5585 Gear And Sprocket Assembly, you might encounter minor issues. Here is how to fix them:
- Door Reverses Immediately: This is often a limit setting issue. After replacing the gear, the opener may have lost its travel limits. Refer to your manual to reset the up and down limits.
- Still Noisy: Check if the chain is too tight. A tight chain puts excessive stress on the new gear. Loosen it slightly. Also, ensure the rail is properly lubricated.
- Motor Overheats: If the motor feels hot to the touch after a few cycles, the door might be unbalanced. Disconnect the opener and manually lift the door. It should stay in place when halfway open. If it falls, you need to adjust the spring tension (call a professional for spring adjustments).
FAQ Section
Q1: Is the 41A5585 compatible with all Liftmaster models?
No. The Liftmaster Garage Door Openers 41A5585 Gear And Sprocket Assembly is designed for specific chain-drive and belt-drive models, particularly those manufactured between the late 1990s and early 2010s. Always check your model number (usually found on the back of the motor unit) against the compatibility list provided by the manufacturer before purchasing.
Q2: How long does the new gear assembly last?
With proper maintenance and normal use, a new gear and sprocket assembly can last another 10–15 years. However, this depends on the frequency of use and the weight of the garage door. Regular lubrication of the chain and rail can extend its lifespan.
Q3: Can I replace just the gear and not the sprocket?
It is highly recommended to replace the entire Liftmaster Garage Door Openers 41A5585 Gear And Sprocket Assembly as a unit. The sprocket also wears out over time, and replacing only the gear may lead to premature failure if the sprocket teeth are damaged. Kits are inexpensive compared to the labor of doing it twice.
Q4: Do I need to reprogram my remote controls after replacement?
No. Replacing the mechanical gear and sprocket assembly does not affect the electronic memory of the opener. Your remote controls and keypad codes will remain intact. You only need to reset the travel limits if the door does not open or close completely.
Q5: What if the motor shaft is stripped?
If the worm gear on the motor shaft is damaged, simply replacing the 41A5585 assembly will not fix the problem. In this case, you may need to replace the entire motor unit or consult a professional technician. Inspect the motor shaft carefully before installing the new gear.
Conclusion
Replacing the Liftmaster Garage Door Openers 41A5585 Gear And Sprocket Assembly is a cost-effective solution that can breathe new life into your garage door opener. Instead of spending hundreds on a new unit, you can restore smooth and quiet operation for a fraction of the price. By following the steps outlined in this guide, you can confidently tackle this repair yourself.
Remember, regular maintenance is key to preventing future issues. Keep your chain lubricated, check the balance of your door annually, and listen for unusual noises. If you found this guide helpful, please share it with your friends or on social media to help others save money on their home repairs. Happy fixing!
Leave a Reply