Introduction
Is your garage door stuck halfway or refusing to open? A broken or loose torsion spring is often the culprit, leaving you stranded and frustrated. Knowing how to wind a spring on a garage door can save you hundreds of dollars in service fees, but it requires precision and strict adherence to safety protocols. This guide will walk you through the process clearly and safely, ensuring you can restore functionality to your door without risking injury.
⚠️ Critical Safety Warning: Read Before Proceeding
Before we dive into the steps, we must address the elephant in the room: Garage door springs are under extreme tension.
A standard residential torsion spring can hold enough energy to lift a 200-pound door. If that energy is released uncontrollably, it can cause severe injury, property damage, or even death. According to the Consumer Product Safety Commission (CPSC), garage door-related injuries send thousands of people to emergency rooms annually, with spring failures being a primary cause.
If you are uncomfortable using heavy-duty tools or do not have a helper, please stop here and call a professional. This guide is for educational purposes and for those who are confident in their mechanical abilities. Always wear safety glasses and heavy leather gloves.
Understanding Your Garage Door Spring System
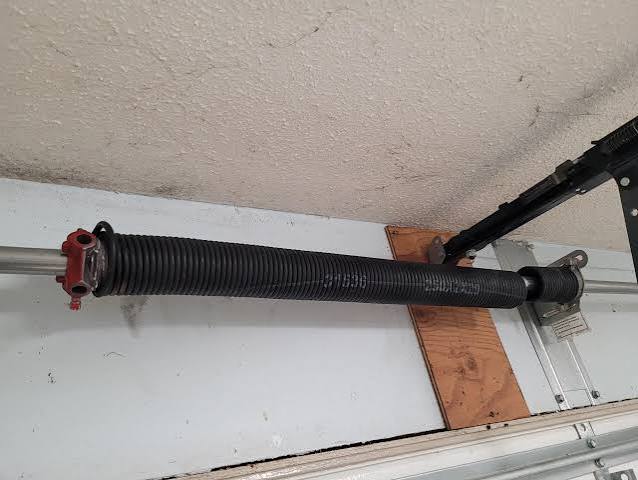
To successfully wind a spring, you must first identify what type you have. Most modern homes use torsion springs, which are mounted horizontally above the garage door opening on a metal shaft. Older homes might use extension springs, which run parallel to the horizontal tracks on either side.
This guide focuses on torsion springs, as they are the most common and the most dangerous to adjust. Winding an extension spring involves different mechanics (usually adjusting cables and pulleys) and is generally less about “winding” and more about replacing or re-hooking.
Why Do Springs Need Winding?
Springs counterbalance the weight of the door. Over time, metal fatigues, and springs can lose tension or break. Sometimes, a spring isn’t broken but has slipped off its anchor point, requiring it to be rewound to the correct number of turns.
| Feature | Torsion Spring | Extension Spring |
|---|---|---|
| Location | Above door header | Alongside horizontal tracks |
| Mechanism | Twists (torque) to store energy | Stretches to store energy |
| Difficulty | High (Requires winding bars) | Medium (Requires clamps/cables) |
| Safety Risk | Very High | High |
For more technical details on spring mechanics, you can refer to the general principles of Hooke’s Law on Wikipedia, which governs the elasticity of these components.
Tools You Will Need
You cannot improvise when working with high-tension springs. Using the wrong tools is a leading cause of accidents. Ensure you have the following:
- Two Steel Winding Bars: These are specifically designed for garage doors. They are typically 18–24 inches long and made of solid steel. Do not use screwdrivers, pry bars, or rebar. They can slip or bend, causing catastrophic failure.
- Adjustable Wrench or Socket Set: To loosen set screws on the winding cone.
- Vise Grips (Locking Pliers): To clamp the track below the roller, preventing the door from moving unexpectedly.
- Stepladder: Stable and tall enough to reach the spring assembly comfortably.
- Safety Gear: ANSI-rated safety glasses and heavy-duty work gloves.
Step-by-Step: How to Wind a Spring on a Garage Door
Follow these steps meticulously. If at any point you feel unsure, pause and reassess.
Step 1: Secure the Garage Door
Start by closing the garage door completely. If the door is open, you will need to lower it carefully. Once closed, clamp the vise grips onto the vertical track just below the bottom roller on both sides. This prevents the door from shooting up if the springs are suddenly tensioned.
Note: If the spring is broken, the door will be heavy. Have a helper support the door’s weight while you clamp the tracks.
Step 2: Identify the Winding Cone
Locate the winding cone on the end of the torsion spring. You will see two holes in the cone where the winding bars insert. There are also set screws holding the cone to the shaft.
Determine if you are winding the left or right spring.
- Left Spring: Winds clockwise (when facing the door from inside).
- Right Spring: Winds counter-clockwise (when facing the door from inside).
Tip: Most springs have paint marks indicating the direction of wind. Follow the manufacturer’s markings if visible.
Step 3: Loosen the Set Screws
Using your wrench or socket, slightly loosen the set screws on the winding cone. Do not remove them completely. Just loosen them enough so the cone can rotate independently of the shaft if necessary, but usually, you will be rotating the cone itself to add tension.
Step 4: Insert the First Winding Bar
Insert one winding bar into the top hole of the winding cone. Ensure it is fully seated. Hold the bar firmly with both hands. This bar will act as your brake and lever.
Step 5: Begin Winding (Adding Tension)
Pull the winding bar downward (or upward, depending on your spring’s orientation) to rotate the cone. One full rotation of the cone equals one “quarter turn” of tension? No, one full 360-degree rotation of the cone equals four quarter-turns.
Most residential doors require between 7 to 10 full turns (28–40 quarter-turns). Check your door’s manual or the label on the spring for the exact specification.
- Action: Rotate the cone until the second hole aligns with the horizontal plane.
- Insert Second Bar: Insert the second winding bar into the next available hole.
- Transfer Load: Carefully pull down on the second bar while slowly releasing the first bar. The tension will transfer to the second bar.
- Repeat: Remove the first bar, move it to the next hole, and repeat the process.
Crucial Safety Tip: Keep your head and body out of the line of fire (the path the bar would take if it slipped). Always maintain a firm grip.
Step 6: Count Your Turns Accurately
Accuracy is vital. If you under-wind, the door won’t stay open. If you over-wind, you risk snapping the spring or damaging the opener.
- Use a marker to mark the shaft and the cone so you can track partial turns.
- Standard rule of thumb: 30 quarter-turns is common for a 7-foot door, but verify your specific door weight.
Step 7: Tighten the Set Screws
Once you have reached the required number of turns, ensure the winding cone is aligned correctly. Tighten the set screws securely against the shaft. Use a torque wrench if possible, or tighten firmly with your socket set.
Step 8: Test the Balance
Remove the vise grips from the tracks. Lift the door manually to about waist height (3–4 feet) and let go.
- Balanced: The door should stay in place.
- Too Heavy: It falls down. You need more tension (wind more).
- Too Light: It rises up. You have too much tension (release carefully).
If adjustments are needed, repeat the winding process in small increments (one quarter-turn at a time).
Common Mistakes to Avoid
- Using Improvised Tools: As mentioned, screwdrivers shatter under torque. Stick to proper winding bars.
- Ignoring Cable Condition: Before winding, inspect the lift cables. If they are frayed or worn, replace them before tensioning the spring. A snapped cable under tension is deadly.
- Over-Winding: More tension is not better. It strains the opener and bends the tracks. Stick to the manufacturer’s specs.
- Working Alone: Having a spotter can help hand you tools and watch for signs of stress in the system.
FAQ Section
1. How many turns should I put on my garage door spring?
The number of turns depends on the height of your door. A general rule is one quarter-turn per inch of door height. For a standard 7-foot (84-inch) door, you would typically need around 21–30 quarter-turns (approx. 7–8 full turns). Always check the manufacturer’s data plate on the spring for the exact specification.
2. Can I wind a garage door spring with just one winding bar?
Technically, yes, but it is extremely dangerous and not recommended. Using two bars allows you to transfer the load safely. With one bar, if it slips, there is no backup to hold the tension, and the cone can spin violently, turning the bar into a projectile. Always use two bars.
3. What happens if I over-wind the spring?
Over-winding puts excessive stress on the spring, the cables, the drums, and the garage door opener. It can cause the spring to snap prematurely, bend the center bracket, or burn out the opener motor. If the door shoots up when you release it, you have over-wound it and must release tension carefully.
4. How do I know if my spring is broken or just loose?
If the spring has a visible gap in the coils (a separation of 2–3 inches), it is broken and needs replacement, not just winding. If the spring looks intact but the door is heavy or won’t stay open, it may have slipped off the cone and simply needs rewinding.
5. Is it legal to DIY garage door spring repair?
In most jurisdictions, it is legal for homeowners to perform their own repairs. However, some local codes or insurance policies may have specific requirements. More importantly, manufacturers may void warranties if non-professionals attempt repairs. Always check your warranty terms.
6. How often do garage door springs need winding?
Springs don’t typically need “routine” winding. They are set once during installation. If a door becomes unbalanced, it’s usually due to a broken spring, stretched cables, or worn rollers. If you find yourself needing to wind springs frequently, there is an underlying issue with the system’s alignment or component quality.
Conclusion
Learning how to wind a spring on a garage door is a valuable skill that empowers you to handle minor adjustments and understand your home’s mechanics better. However, it is a task that demands respect for the physical forces involved. By using the right tools, following the step-by-step process, and prioritizing safety, you can ensure your garage door operates smoothly and reliably.
Remember, if the spring is broken, replacement is the only option—winding a broken spring is impossible and dangerous. If you are ever in doubt, hiring a certified technician is the safest investment you can make for your home and family.
Found this guide helpful? Share it with your neighbors or on social media to help others tackle their DIY projects safely! Don’t forget to bookmark this page for future reference.
Leave a Reply