If your garage door feels heavy, uneven, or refuses to stay open, the issue might lie in the spring tension. Knowing how to tighten a spring on a garage door can save you time, money, and frustration. This guide walks you through the process safely and clearly—even if you’re a beginner.
What Does a Garage Door Spring Do?
Garage door springs are responsible for counterbalancing the weight of your door. Without them, lifting a garage door manually would require significant effort.
There are two main types:
- Torsion Springs (mounted above the door)
- Extension Springs (mounted on the sides)
Read too: Tc1 Tricode Garage Door Opener Remote W/ Clip Chamberlain: Complete Guide
According to industry estimates, garage door springs handle over 10,000 cycles (open/close actions) before wearing out. Proper tension ensures smooth operation and prevents strain on the opener.
For a deeper technical overview, you can refer to this Wikipedia resource on Torsion spring.
Signs Your Garage Door Spring Needs Tightening
Before adjusting anything, confirm that tension is the real issue.
Common warning signs:
- Door feels heavier than usual
- Door won’t stay open halfway
- Uneven or jerky movement
- Loud snapping or creaking sounds
- Gaps in torsion spring coils
👉 If you notice a broken spring, do NOT attempt to tighten it—replacement is required.
Is It Safe to Tighten a Garage Door Spring Yourself?
This is where honesty matters: garage door springs can be dangerous.
They are tightly wound and store significant energy. Improper handling can lead to serious injury.
You can DIY if:
- You have basic tools and mechanical understanding
- You follow safety precautions strictly
- The spring is not damaged or broken
You should call a professional if:
- You’re unsure about spring type
- The spring shows visible damage
- You lack proper tools
📊 Stat Insight: The U.S. Consumer Product Safety Commission reports thousands of garage door-related injuries annually—many linked to spring mishandling.
Tools You’ll Need
Before starting, gather these essentials:
- Winding bars (NOT screwdrivers)
- Adjustable wrench
- Locking pliers (vise grips)
- Ladder (stable, height-appropriate)
- Safety gloves and eye protection
How To Tighten A Torsion Spring (Step-by-Step)
This is the most common type in modern homes.
⚠️ Important Safety Step
Disconnect power to the garage door opener and ensure the door is fully closed.
Step 1: Secure the Door
Clamp locking pliers onto the track below the bottom roller.
👉 This prevents the door from suddenly moving.
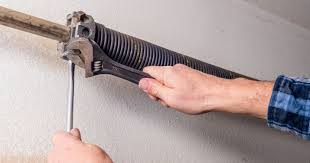
Step 2: Locate the Winding Cone
At the end of the torsion spring, you’ll see a metal cone with holes.
Insert the winding bar into one of these holes.
Step 3: Loosen the Set Screws
Use a wrench to slightly loosen the screws holding the spring in place.
⚠️ Hold the winding bar firmly—this is where tension is released.
Step 4: Add Tension
- Turn the winding bar upward (typically clockwise)
- Add ¼ turn at a time
👉 Standard guideline:
- 7-foot door → ~30 quarter turns
- 8-foot door → ~34 quarter turns
Step 5: Tighten Set Screws Again
Secure the screws firmly after adjusting tension.
Step 6: Test the Door
Manually lift the door halfway:
- If it stays → tension is correct
- If it falls → add more tension
- If it rises → reduce tension slightly
How To Tighten Extension Springs
Extension springs are less common but easier to adjust.
Steps:
- Open the garage door fully
- Clamp it in place
- Locate the spring hook at the track
- Move the hook to a higher hole to increase tension
👉 Each hole increases tension incrementally.
Torsion vs Extension Springs (Comparison Table)
| Feature | Torsion Springs | Extension Springs |
|---|---|---|
| Location | Above door | Alongside tracks |
| Safety | Safer (controlled) | Riskier if snapped |
| Adjustment Method | Winding bars | Hook repositioning |
| Lifespan | Longer | Shorter |
Common Mistakes to Avoid
Avoid these critical errors:
- ❌ Using screwdrivers instead of winding bars
- ❌ Over-tightening the spring
- ❌ Ignoring worn or damaged springs
- ❌ Skipping safety gear
- ❌ Adjusting with the door open (for torsion springs)
Pro Tips for Better Results
- Adjust both springs equally if you have a dual system
- Lubricate springs with garage door lubricant after tightening
- Check balance every 3–6 months
- Keep a maintenance log
Benefits of Proper Spring Tension
✔ Smooth operation
✔ Longer lifespan of opener
✔ Reduced noise
✔ Improved safety
👉 A properly balanced garage door reduces motor strain by up to 30%, extending its overall lifespan.
When to Replace Instead of Tighten
Sometimes tightening isn’t enough.
Replace the spring if:
- It has visible cracks or separation
- It’s stretched unevenly
- It’s older than 7–10 years
- The door still feels unbalanced after adjustment
FAQ: How To Tighten A Spring On A Garage Door
1. How many turns should I tighten a garage door spring?
Typically, 30–34 quarter turns depending on door height. Always adjust gradually and test frequently.
2. Can I tighten a garage door spring without tools?
No. Proper tools like winding bars are essential for safety and accuracy.
3. How long does it take to tighten a garage door spring?
For beginners, about 30–60 minutes. Professionals can do it in under 20 minutes.
4. What happens if I overtighten the spring?
The door may shoot upward or become difficult to close, increasing wear and safety risks.
5. Should both springs be adjusted equally?
Yes. Uneven tension can cause imbalance and damage the system.
6. Is it cheaper to DIY or hire a professional?
DIY saves money upfront, but mistakes can be costly. Professional service typically costs $100–$300.
Conclusion
Learning how to tighten a spring on a garage door is a valuable skill that can restore smooth operation and extend the life of your system. By following the correct steps and prioritizing safety, even beginners can handle basic adjustments confidently.
However, never take risks if you’re unsure—your safety comes first.
👉 If you found this guide helpful, share it with friends or family who might be dealing with garage door issues. It could save them time, money, and potential injury!
Leave a Reply