Introduction
There is nothing quite as frustrating as walking into your garage after a heavy storm to find a puddle of water creeping in from underneath the door. Not only does this create a slipping hazard, but persistent moisture can also lead to mold growth, damaged stored items, and even structural issues over time. If you are wondering how to stop rain water coming under garage door, you are not alone; this is one of the most common home maintenance challenges in the United States, particularly in regions with heavy seasonal rainfall.
The good news is that you do not always need to call a professional or replace your entire door system. Often, the solution lies in understanding why the water is entering and applying the right seal or adjustment. In this guide, we will walk you through practical, cost-effective solutions to keep your garage dry and protected.
Why Is Water Getting Under My Garage Door?
Before jumping into fixes, it is crucial to understand the root cause. Water intrusion usually happens due to one of three reasons: poor drainage, worn-out seals, or an uneven floor.
According to general building principles, water follows the path of least resistance. If your driveway slopes toward the garage rather than away from it, gravity is working against you. Additionally, standard garage doors are not designed to be watertight submarines; they have gaps at the bottom to allow for movement. When wind-driven rain hits these gaps, or when water pools on the driveway, it seeps in.
Understanding the source helps you choose the right fix. Is it a trickle during light rain? Or a flood during storms? Your answer dictates the solution.
Check and Improve Exterior Drainage First
The most effective way to stop water is to prevent it from reaching the door in the first place. This is often overlooked by homeowners who focus solely on the door itself.
1. Inspect the Driveway Slope
Your driveway should slope away from the garage entrance. A slight grade ensures that rainwater runs off into the street or yard rather than pooling at the threshold.
- The Test: Pour a bucket of water near the garage entrance. Watch where it flows. If it moves toward the door, you have a grading issue.
- The Fix: For minor issues, you can use asphalt patching compound to build up the area immediately in front of the door, creating a small “speed bump” or diverter. For severe grading issues, you may need to consult a landscaper to regrade the driveway.
2. Clean Gutters and Downspouts
Clogged gutters can cause water to overflow directly in front of your garage. Ensure your downspouts extend at least 5–6 feet away from the foundation. This simple maintenance task can reduce the volume of water hitting your garage entrance by significant margins.
Install or Replace the Bottom Weather Seal
If drainage is correct but water still enters, the culprit is likely your bottom weather seal (also known as the threshold seal). This rubber strip attaches to the bottom of the garage door and creates a barrier against the concrete.
Signs It’s Time to Replace the Seal
- The rubber is cracked, brittle, or torn.
- There are visible gaps between the seal and the floor when the door is closed.
- The seal is compressed flat and no longer bounces back.
Step-by-Step Replacement Guide
Replacing a bottom seal is a beginner-friendly DIY project that typically costs between $20 and $50.
- Measure the Width: Measure the width of your garage door. Standard single doors are 8–9 feet wide; double doors are 16–18 feet. Buy a seal that matches this length.
- Remove the Old Seal: Open the garage door halfway. Locate the retainer channel at the bottom of the door. Pull the old rubber seal out of the channel. If it is glued or screwed in, remove the fasteners carefully.
- Clean the Channel: Use a wire brush and soapy water to remove dirt, rust, and old adhesive from the channel. Let it dry completely.
- Install the New Seal: Starting from one end, push the new rubber seal into the channel. You may need a rubber mallet to tap it gently into place. Ensure it is seated evenly along the entire width.
- Trim Excess: If the seal is too long, use a utility knife to trim the excess.
Pro Tip: Look for seals made from EPDM rubber. They are more resistant to UV rays and extreme temperatures than standard vinyl, lasting longer in harsh US climates.
Add a Garage Door Threshold Seal
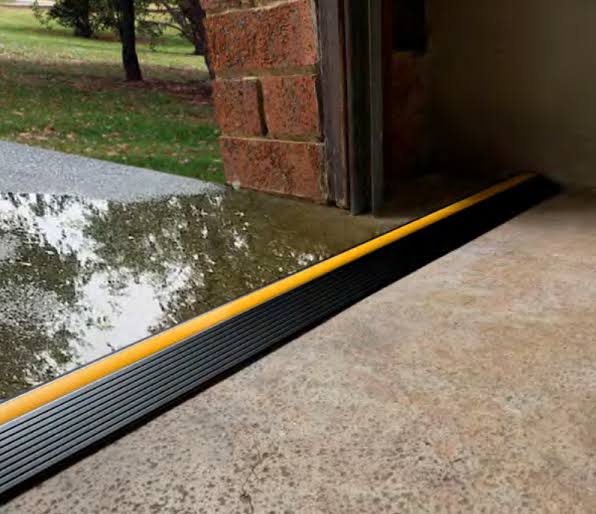
If replacing the bottom seal isn’t enough, consider adding a threshold seal. This is an additional rubber strip that adheres directly to the concrete floor, right where the garage door closes. It acts as a second line of defense.
Types of Threshold Seals
| Type | Pros | Cons | Best For |
|---|---|---|---|
| Adhesive Strip | Easy to install, inexpensive | May peel over time if not cleaned properly | Light rain, smooth concrete |
| Bulb Seal | Creates a tight compression seal | Requires precise alignment | Heavy rain, windy areas |
| Interlocking Kit | Very durable, professional look | More expensive, harder to install | Long-term solution, new construction |
For most homeowners, an adhesive bulb seal offers the best balance of performance and ease of installation. Ensure the concrete is clean and dry before applying any adhesive product.
Adjust the Door Limit Settings
Sometimes, the door simply isn’t closing all the way. Modern garage door openers have “limit settings” that determine how far the door travels down. If this setting is off, the door may stop slightly above the floor, leaving a gap for water to enter.
How to Adjust the Down Limit
- Locate the adjustment screws on your garage door opener motor unit. They are usually labeled “Up” and “Down” or have arrows.
- Turn the “Down” limit screw slightly (usually clockwise) to increase the travel distance.
- Test the door. It should close firmly against the floor without excessive force.
- Caution: Do not force the door into the ground. This can damage the opener or the door panels. The goal is a snug fit, not a crush fit.
If you are uncomfortable adjusting these settings, consult your owner’s manual or contact a professional technician. Improper adjustment can void warranties or cause safety sensor issues.
Use Concrete Crack Filler and Sealant
Even with perfect seals, water can seep through cracks in the concrete floor itself. Inspect the area just inside the garage door for hairline cracks or gaps.
- Small Cracks: Use a liquid concrete crack filler. These products penetrate deep into the crack and harden, creating a waterproof bond.
- Larger Gaps: Use a hydraulic cement patch. This material expands as it cures, making it ideal for stopping active leaks.
For added protection, consider applying a concrete sealer to the entire garage floor. This hydrophobic coating repels water and makes cleanup easier. You can learn more about concrete properties and maintenance on Wikipedia’s Concrete page.
FAQ: Common Questions About Garage Door Leaks
1. Can I use expanding foam to stop water under my garage door?
While expanding foam can fill gaps, it is not recommended for the bottom of a moving garage door. The foam is rigid and will crack or crumble as the door moves up and down, potentially damaging the door or the floor. Use flexible rubber seals instead.
2. How often should I replace my garage door weather seal?
Typically, every 3–5 years. However, in areas with extreme sun exposure or temperature fluctuations, you may need to replace it every 2 years. Inspect it annually for signs of wear.
3. Will a heavier garage door help stop water?
No. The weight of the door does not affect its ability to seal against water. In fact, a heavier door requires a stronger opener and may wear out components faster. Focus on the seal quality, not the door weight.
4. What if my garage floor is uneven?
An uneven floor makes sealing difficult. In this case, a flexible threshold seal with a high-profile bulb is your best option. It can compress and expand to accommodate minor irregularities in the concrete surface.
5. Is it normal for some water to get in during a hurricane?
Yes. During extreme weather events like hurricanes or tropical storms, wind pressure can force water past even the best seals. This is considered force majeure. However, for typical rainstorms, your garage should remain dry.
6. Can I install a drain inside the garage?
Installing an interior drain is a major renovation project requiring breaking up the concrete floor. It is generally only recommended for garages that are frequently used as workshops with water access or in areas prone to severe flooding. For most homeowners, exterior drainage improvements are more cost-effective.
Conclusion
Learning how to stop rain water coming under garage door is a vital skill for any homeowner. By addressing exterior drainage, upgrading your weather seals, and ensuring your door closes properly, you can protect your belongings and maintain a dry, safe garage environment.
Remember, prevention is cheaper than cure. A $30 seal replacement today can save you hundreds in water damage repairs tomorrow. Don’t wait for the next storm to take action. Inspect your garage door this weekend, and share this guide with friends or neighbors who might be battling the same issue. Stay dry!
Leave a Reply