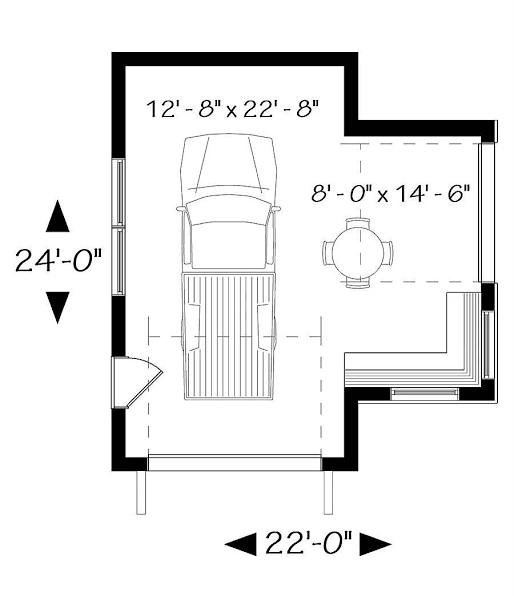
Designing your dream home or planning a major renovation can feel incredibly overwhelming, especially when you are staring at a blank sheet of drafting paper. If you are struggling to figure out exactly how to show a garage door on a floor plan, you are definitely not alone in this architectural puzzle! Let’s break down the standard drafting symbols, measurements, and simple steps you need to bring your layout to life accurately.
Understanding How To Show A Garage Door On A Floor Plan
A garage door is not just a simple rectangle on a blueprint; it dictates traffic flow, structural headers, and exterior aesthetics.
Because over 80% of new single-family homes in the US feature an attached or detached garage, this symbol is arguably one of the most critical elements on your entire drawing.
Failing to represent it correctly can lead to costly framing errors, poor driveway alignment, and mechanical clearance issues down the road.
When studying standard floor plans, you will quickly notice that strict consistency in line weights and symbols is key to avoiding these costly construction errors.
The Core Architectural Symbols
Before you pick up your pencil, you need to understand the visual language of residential drafting.
An overhead garage door is typically represented by a solid line across a wall gap, accompanied by specific indicators for the mechanical tracks.
Here is a quick breakdown of the standard symbols you will use:
- Solid Line: Represents the physical face of the door when it is in the fully closed position.
- Dashed Lines: Used to represent the overhead tracks, mechanical clearances, and the path of the door as it opens.
- X Mark or “H”: Often used by structural engineers to denote a reinforced load-bearing header located just above the door opening.
Step-by-Step Guide to Drawing the Garage Door
Ready to start drawing? Grab your T-square, an architectural scale ruler, and some tracing paper.
Follow these concrete steps to draft a professional-grade overhead door layout.
Step 1: Set Your Scale Always begin by setting your scale. The industry standard for residential blueprints in the US is 1/4″ = 1′-0″. This ensures your measurements translate perfectly to the job site.
Step 2: Mark the Rough Opening Determine the size of your door. A standard single garage door requires an 8-foot wide rough opening, while a standard double door requires a 16-foot wide opening. Draw a gap in your exterior wall that matches these exact dimensions.
Step 3: Draw the Wall Thickness Exterior garage walls are typically framed with 2×6 studs to support heavy roof loads and provide insulation. Therefore, draw your exterior walls exactly 5.5 to 6 inches thick to scale.
Step 4: Indicate the Tracks This is where most beginners make a mistake. Draw two parallel dashed lines extending roughly 18 inches inside the garage from the door threshold. This shows the builder exactly where the vertical tracks and mechanical springs will hang.
Step 5: Label Everything Clearly Never rely on symbols alone. Use a leader line (a line with an arrow) pointing to the door and write “OVERHEAD DOOR” or the abbreviation “O.H.D.” followed by the dimensions (e.g., O.H.D. 16′ x 7′).
Overhead vs. Carriage House: A Quick Comparison
Not all garage doors operate the same way. Your floor plan must reflect the specific mechanics of the door you intend to install.
Here is a comparison table to help you choose the right symbol:
| Feature | Standard Overhead Door | Carriage House (Swing-Out) |
|---|---|---|
| Operation | Rolls up on tracks into the ceiling. | Swings outward manually or via motor. |
| Symbol Style | Solid line with interior dashed tracks. | Solid line with a 90-degree exterior arc. |
| Space Required | Needs 18″ interior track clearance. | Needs exterior clearance equal to door width. |
| Best For | Standard driveways and tight yards. | Large estates with deep driveway setbacks. |
Avoiding Common Blueprint Mistakes
Even seasoned DIYers can overlook crucial structural details when drafting a garage layout.
Sarah Jenkins, a licensed residential architect with over 15 years of experience, notes: “Ambiguous door symbols and missing header specifications are the number one cause of framing delays on modern residential job sites.”
Mistake 1: Forgetting the Header Space You must leave at least 12 to 18 inches of solid wall space above the garage door opening to accommodate the structural header and the torsion spring mechanism.
Mistake 2: Ignoring the Driveway Slope If your driveway slopes sharply upward toward the garage, a standard overhead door might scrape the concrete. In these cases, you must note a custom bottom panel on your plan.
Mistake 3: Missing Pedestrian Doors If you are adding a standard 36-inch pedestrian door next to the garage door, remember to draw a 90-degree swing arc indicating which way the door opens (inward or outward) to avoid blocking interior walkways.
Digital Drafting vs. Hand Drawing
Today, many homeowners and professionals use software like AutoCAD, SketchUp, or Chief Architect to draft floor plans.
Digital software automatically generates standard overhead door symbols and calculates structural headers for you. However, learning to draw them by hand first deeply improves your spatial awareness and blueprint reading skills.
Whether you use a mouse or a pencil, the underlying architectural principles remain exactly the same.
Frequently Asked Questions
Q1: What is the standard symbol for an overhead garage door? The standard symbol is a solid straight line spanning the width of the wall opening, usually accompanied by two parallel dashed lines projecting inward to represent the overhead tracks and mechanical clearances.
Q2: How thick should garage walls be on a floor plan? Garage exterior walls are typically drawn at 5.5 to 6 inches thick to represent standard 2×6 wood framing. This thicker framing is required to support the heavy roof loads and wide spans associated with garage door headers.
Q3: Do I need to show the garage door opener on the plan? Generally, no. The physical motor of the garage door opener is not drawn on the architectural floor plan. However, an electrician will use the plan to place a 120-volt electrical outlet on the ceiling, centered directly above the door, to power the motor.
Q4: How do I indicate the slope of the garage floor? Floor slopes are indicated using a directional arrow pointing toward the main garage door or a floor drain. Next to the arrow, drafters will write the slope ratio, such as “1/8″ SLOPE PER FOOT”, to ensure water drains out of the garage.
Q5: Can I use a solid line for a garage door without dashed tracks? While a solid line technically shows where the door sits when closed, omitting the dashed track lines is considered poor drafting practice. Builders need to see the dashed lines to ensure no HVAC ducts, plumbing stacks, or storage cabinets block the door’s vertical path.
Final Thoughts on Perfecting Your Blueprint
Mastering how to show a garage door on a floor plan is a massive milestone in your home design journey. By utilizing standard architectural symbols, adhering to proper scales, and clearly labeling your rough openings, you bridge the gap between your creative vision and the builder’s execution.
A well-drafted blueprint saves you time, money, and countless headaches during the construction phase.
Did you find this drafting guide helpful? Don’t keep these architectural secrets to yourself! Share this article on your favorite social media platforms to help your fellow DIYers and home design enthusiasts build their dream garages with confidence.
Leave a Reply