Introduction
There is nothing quite as frustrating as pulling into your driveway in the rain, only to realize you cannot remember where you placed your handheld remote. If you are searching for how to set up LiftMaster garage door opener to car, you are likely ready to ditch the clutter and enjoy the seamless convenience of an integrated vehicle button. We understand that syncing technology can sometimes feel intimidating, but rest assured that connecting your car’s built-in system to your LiftMaster unit is a straightforward process designed for everyday homeowners.
This guide will walk you through every step with empathy and precision, ensuring you get back to enjoying the comfort of your home without the hassle of fumbling for devices. Whether you drive a newer model with integrated tech or an older vehicle requiring a simple clip-on solution, we have the specific instructions you need to succeed safely and correctly.
Understanding Your Compatibility Options
Before grabbing a ladder, it is vital to identify which connection method applies to your specific vehicle and LiftMaster model. Not all setups are identical, and knowing your hardware prevents wasted effort. According to industry standards, most modern vehicles utilize HomeLink, a wireless control system that communicates directly with garage door openers via radio frequency.
Integrated HomeLink vs. Visor Clip Remotes
| Feature | Integrated HomeLink | Universal Visor Clip Remote |
|---|---|---|
| Installation | Built-in factory buttons | Clips onto sun visor |
| Power Source | Vehicle electrical system | Internal battery (CR2032) |
| Range | Typically 100+ feet | Typically 50–75 feet |
| Best For | Vehicles 2000+ models | Older cars or rental vehicles |
| Security | Rolling code encryption | Fixed or rolling code dependent |
Note: Always verify your LiftMaster model number located on the motor head before purchasing accessories.
How To Program HomeLink Buttons in Modern Vehicles
For the majority of US drivers, this is the primary answer to how to set up LiftMaster garage door opener to car. Most LiftMaster openers manufactured after 1996 use Security+ 2.0 or MyQ technology, which pairs seamlessly with HomeLink.
Step-by-Step Programming Instructions
- Clear Previous Codes: Press and hold the two outer HomeLink buttons in your car simultaneously for 10 seconds until the indicator light flashes rapidly. This ensures no old frequencies interfere.
- Position Your Vehicle: Park outside the garage with the ignition in the “ON” or “ACC” position. Keep at least 20 feet of clearance from the door for safety during testing.
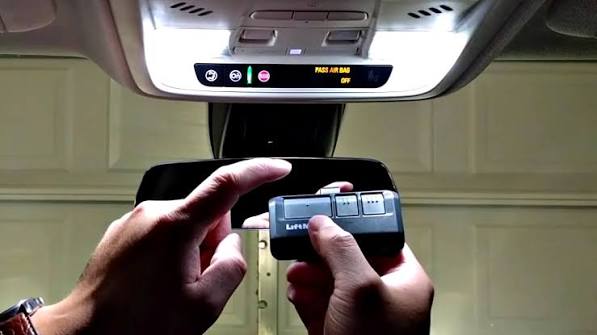
- Initiate Pairing Mode: Press and hold your desired HomeLink button and your original LiftMaster handheld remote simultaneously. Hold them 1–3 inches apart. Watch the HomeLink indicator; it should transition from a slow blink to a rapid flash (approximately 10–20 seconds).
- Activate the Learn Button: Locate the yellow, purple, or orange “Learn” button on your LiftMaster motor unit. Press and release it firmly. You now have exactly 30 seconds to complete the next step.
- Finalize the Sync: Return to your car and press the programmed HomeLink button three times, holding each press for 2 seconds. The garage door should activate on the third press, confirming successful synchronization.
Safety Expert Tip: Never attempt programming while the garage door is moving. Always ensure the path is clear of pets, children, and obstacles before testing the connection.
Setting Up Universal Visor Clip Remotes for Older Cars
If your vehicle lacks built-in integration, do not worry. LiftMaster offers universal visor clips that function identically to factory systems. This remains a valid solution for how to set up LiftMaster garage door opener to car when OEM options are unavailable.
Detailed Installation Process
- Insert Fresh Batteries: Open the battery compartment and install a new CR2032 lithium coin cell. Weak batteries cause 80% of pairing failures in clip-on units.
- Reset the Clip Unit: Use a paperclip to press the reset pinhole on the back of the visor clip until the LED blinks red.
- Pair with Handheld Remote: Place the visor clip and your existing LiftMaster remote flat on a table. Press the transmit button on the clip and the main button on your handheld simultaneously for 5 seconds.
- Sync to Motor Unit: Press the “Learn” button on the garage ceiling unit. Within 30 seconds, press the visor clip button three times. Test operation from inside the vehicle with the engine running to ensure adequate signal strength.
Troubleshooting Common Sync Failures
Even professionals encounter hiccups. If your initial attempt fails, consult this diagnostic checklist before calling a technician.
- LED Flashes But Door Does Not Move: This usually indicates a frequency mismatch. Verify your LiftMaster operates on 315 MHz or 390 MHz, matching your vehicle’s specifications.
- Works Outside But Not Inside Garage: Signal interference from LED bulbs is common. Replace garage light fixtures with LiftMaster-approved LED bulbs rated for RF compatibility.
- Door Reverses Immediately After Closing: Safety sensor alignment may have shifted during programming. Check that both photo-eye sensors show solid green/amber lights with no obstructions.
- HomeLink Light Stays Solid: The memory buffer may be full. Perform a hard reset by disconnecting the vehicle battery for 5 minutes or following manufacturer-specific clearing procedures.
Essential Safety and Maintenance Best Practices
Programming convenience should never compromise security. Following these protocols protects both your property and your family.
Monthly Testing Protocol
Test your auto-reverse safety feature monthly by placing a 2×4 board on the floor under the door. The door must reverse immediately upon contact. Additionally, inspect wiring connections on the motor unit for fraying or corrosion, especially in humid climates.
Battery Replacement Schedule
- Handheld Remotes: Replace annually or when range decreases below 20 feet.
- Visor Clip Units: Replace CR2032 batteries every 18 months proactively.
- Backup Batteries: If your LiftMaster has battery backup, test discharge cycles biannually per manufacturer guidelines.
Frequently Asked Questions (FAQ)
Q1: Can I program multiple cars to the same LiftMaster opener?
Yes, most LiftMaster units support up to 30 remote transmitters and 5 keyless entry pads. Each vehicle requires individual programming using the Learn button sequence. There is no limit to the number of cars, only total transmitter capacity.
Q2: Why does my HomeLink work intermittently after working perfectly?
Intermittent failure typically stems from dying vehicle batteries, LED bulb interference, or weakened remote batteries. Start by replacing the CR2032 in your visor clip or checking your car’s 12V battery health. Also, ensure no new electronic devices were installed near the garage that could emit RF noise.
Q3: Do I need a special adapter for Security+ 2.0 openers?
Most vehicles manufactured after 2015 are natively compatible with Security+ 2.0. However, some European and Asian imports from 2006–2014 may require the HomeLink Compatibility Bridge (model 880LM). Check your vehicle owner’s manual or LiftMaster’s compatibility tool online before purchasing adapters.
Q4: Is it safe to program the opener myself, or should I hire a professional?
DIY programming is completely safe and intended for homeowners. Professional installation is only necessary if you are replacing the entire motor unit, adjusting spring tension, or repairing damaged tracks. Programming existing hardware carries zero risk when following safety guidelines.
Q5: What happens if I lose my original handheld remote?
You can still program HomeLink using the Learn button on the motor unit alone. Simply press Learn, then hold your desired HomeLink button until the door activates. However, keeping at least one physical remote as backup is strongly recommended for emergencies.
Q6: Can renters program their car to a landlord’s LiftMaster opener?
Absolutely, provided you have permission. Programming does not alter the opener’s settings permanently; it simply adds another authorized transmitter. When moving out, simply clear your vehicle’s HomeLink memory to revoke access. No changes remain on the garage unit itself.
Conclusion
Mastering how to set up LiftMaster garage door opener to car transforms daily routines from minor annoyances into effortless experiences. By following these structured steps, you gain reliable, secure access while maintaining full compliance with safety standards. Remember that patience during the 30-second Learn window and proper battery maintenance are the true secrets to long-term success.
We hope this comprehensive guide has empowered you to take control of your home automation with confidence. If you found these instructions helpful, please share this article on Facebook, X (Twitter), or Pinterest to help fellow homeowners achieve the same convenience. Your share might save someone else from getting stuck in the rain tonight! Stay safe, stay connected, and enjoy the seamless entry you deserve.
Leave a Reply