Introduction
There is nothing quite as frustrating as sitting in your driveway, fumbling for a clunky plastic remote while the rain pours down or the temperature drops below freezing. If you have recently upgraded your vehicle and are wondering how to set up garage door opener in Hyundai Sonata, you are not alone; this is one of the most common questions new owners ask when transitioning to modern vehicle tech. Fortunately, the process is simpler than it appears, and mastering it will transform your daily arrival home into a seamless, hands-free experience that prioritizes both convenience and safety.
Understanding HomeLink Technology in Your Sonata
Before diving into the buttons, it is crucial to understand what you are actually programming. Most Hyundai Sonata models from 2015 onward come equipped with the HomeLink Wireless Control System. This is an integrated transceiver that replaces your handheld garage door remote.
Unlike older universal remotes that simply copied a radio frequency, modern HomeLink systems use two distinct technologies:
- Fixed Code: Older technology used in gates and doors manufactured before 1996.
- Rolling Code: The current industry standard for security. Rolling code technology changes the access code every time the button is pressed, preventing “code grabbers” from intercepting your signal. According to Wikipedia, this rolling code encryption is essential for modern residential security, ensuring that only your specific vehicle can trigger your specific door.
Knowing which system your home uses dictates the programming path you must take. If your garage door opener was installed after 1996, assume you have a rolling code system.
Pre-Programming Checklist: Safety and Preparation
To ensure the setup goes smoothly and safely, complete these three steps before touching any buttons in your car:
- Clear the Area: Ensure no people, pets, or objects are in the path of the garage door. The door will move during testing.
- Locate Your Learn Button: Find the “Learn,” “Smart,” or “Program” button on your actual garage door motor unit (usually hanging from the ceiling). It is typically yellow, orange, red, or purple.
- Check Battery Health: While HomeLink is powered by the car, having a fresh battery in your original handheld remote can sometimes help if you need to reference it during troubleshooting.
Expert Tip: Always keep your original handheld remote nearby during the initial setup. Some newer Hyundai Sonatas require the original remote to act as a “bridge” during the handshake process between the car and the motor.
Step-by-Step: How To Set Up Garage Door Opener In Hyundai Sonata (Rolling Code)
This is the standard procedure for 90% of Hyundai Sonata owners. Follow these instructions precisely. Rushing through the timing is the most common cause of failure.
Step 1: Clear Previous Memory (Recommended)
If this is a used Sonata or you are unsure of its history, reset the HomeLink buttons first.
- Press and hold the two outer HomeLink buttons simultaneously.
- Hold for approximately 10–20 seconds until the indicator light flashes rapidly.
- Release both buttons. Do not skip this step, as old codes can interfere with new programming.
Step 2: Initiate Training Mode
- Turn your Sonata’s ignition to the ACC/ON position. The engine does not need to be running, but the electrical system must be active.
- Press and hold the desired HomeLink button (e.g., Button 1).
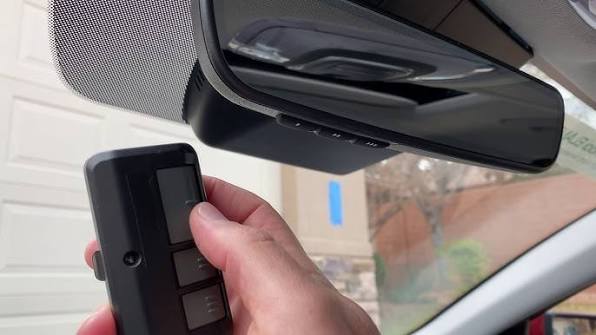
- Simultaneously press and hold the button on your handheld garage remote. Hold it 1–3 inches away from the HomeLink surface.
- Watch the HomeLink indicator light. It will flash slowly at first, then rapidly. Once it flashes rapidly, release both buttons. This indicates the car has learned the signal.
Step 3: Program the Garage Motor (The Critical Link)
This step syncs the car to the house, not just the remote to the car.
- Go to your garage door motor unit.
- Press and release the “Learn” or “Smart” button. You typically have 30 seconds to complete the next action before the motor exits learning mode.
- Return to your Sonata immediately.
- Firmly press and hold the programmed HomeLink button for 2 seconds, then release.
- Repeat this press-hold-release cycle up to three times.
Step 4: Test and Verify
Press the HomeLink button once. The garage door should activate. If it moves, congratulations! You have successfully completed the setup.
Troubleshooting: What If It Doesn’t Work?
Even professionals encounter hiccups. Use this comparison table to diagnose your issue quickly without guessing.
| Symptom | Likely Cause | Recommended Solution |
|---|---|---|
| Light never flashes rapidly | Weak remote battery or wrong distance | Replace remote battery; hold remote 1–3 inches from button |
| Light flashes rapidly but door won’t open | Rolling code sync failed | Repeat Step 3 within 30-second window; try pressing faster |
| Works intermittently | Signal interference or range issue | Reposition car during programming; check for LED bulb interference |
| Light stays solid, no response | Fixed code vs. Rolling code mismatch | Verify opener age; consult manual for fixed-code specific steps |
| Buttons unresponsive | System lockout or fuse issue | Reset HomeLink (Step 1); check vehicle fuse panel |
The LED Bulb Interference Factor
A surprisingly common issue in modern homes is LED light bulb interference. Certain LED bulbs emit radio frequencies that clash with HomeLink signals. If your setup works perfectly outside the garage but fails when parked inside, try temporarily unscrewing the LED bulbs in your garage opener fixture. If functionality returns, replace them with RF-shielded LED bulbs specifically rated for garage door openers.
FAQ Section
1. Can I program my Hyundai Sonata garage opener without the original remote?
Yes, but it depends on your garage door opener model. Many newer Chamberlain, LiftMaster, and Genie units allow direct-to-motor programming where you press the Learn button and then press the HomeLink button in the car without needing the handheld remote. However, older units strictly require the original remote as a cloning source. Check your motor’s manual for “Direct Programming” capabilities.
2. How many devices can my Hyundai Sonata HomeLink store?
Most Hyundai Sonata HomeLink systems offer three programmable buttons. This allows you to store your primary garage door, a secondary garage or gate, and even home lighting or security systems. Each button operates independently and can be reprogrammed at any time without affecting the others.
3. Will disconnecting my car battery erase my HomeLink settings?
Generally, no. HomeLink memory is stored in non-volatile memory, meaning it persists even when the vehicle loses power. However, some aftermarket installations or specific model year quirks may behave differently. As a best practice, note down your programming steps before any major electrical work, just in case a reset becomes necessary.
4. My Sonata has a touchscreen interface instead of overhead buttons. Is the process different?
The underlying technology is identical, but the user interface differs. On touchscreen-equipped Sonatas, navigate to Setup > Vehicle > HomeLink on the infotainment screen. The screen will provide visual prompts that mirror the physical button steps outlined above. The timing requirements and Learn button synchronization remain exactly the same regardless of whether you use physical buttons or a digital interface.
5. Why does my garage door open but not close via HomeLink?
This is almost always a safety sensor alignment issue, not a programming problem. Modern garage doors have infrared sensors near the floor that prevent closing if the beam is broken. When operating manually, you might override this; HomeLink cannot. Clean the sensor lenses, ensure they are perfectly aligned (both should show steady lights, not blinking), and remove any debris blocking the beam path.
6. Is HomeLink compatible with all garage door brands?
HomeLink is compatible with virtually all major North American garage door opener manufacturers, including Chamberlain, LiftMaster, Craftsman, Genie, Overhead Door, and Stanley. Compatibility issues typically arise only with extremely vintage pre-1990s units or certain European/Asian imports that use non-standard frequencies. For rare incompatibilities, a HomeLink Compatibility Bridge (sold separately) can translate the signal.
Advanced Tips for Optimal Performance
Once your basic setup is complete, consider these enhancements to maximize your system’s reliability:
- Update Firmware: Some newer Hyundai Sonatas receive HomeLink firmware updates through dealership service visits or OTA updates. If you experience persistent issues, ask your dealer about available updates during your next oil change.
- Seasonal Re-testing: Temperature extremes can affect electronic components. Test your HomeLink system at the start of each season to catch degradation early. A system that works perfectly in July may struggle in January due to battery voltage changes in the remote or motor capacitor aging.
- Security Audit: Periodically review who has access to your garage. If you sell your Sonata, always perform the factory reset (Step 1) to prevent the new owner from accessing your home. Similarly, if you lose your handheld remote, reprogram both the motor and your HomeLink to invalidate the lost credential.
Conclusion
Learning how to set up garage door opener in Hyundai Sonata is a small investment of time that pays dividends every single day. By following the rolling code procedure, respecting the 30-second learning window, and understanding the troubleshooting basics, you eliminate the frustration of fumbling for remotes and gain the confidence of modern vehicle integration. Remember, patience during the initial sync is far more efficient than repeatedly restarting the process due to rushed timing.
Now that your garage opens effortlessly at the touch of a button, why keep this convenience to yourself? Share this guide on Facebook, X (Twitter), or Pinterest to help fellow Hyundai owners reclaim their evenings from cluttered consoles and dead remote batteries. Your friends will thank you, and your own daily routine will never feel the same again. Safe driving and happy parking!
Leave a Reply