If you’re dealing with cold drafts, dust, or pests entering your garage, sealing it from the inside is a smart solution. Many homeowners search for how to seal a garage door from the inside to improve comfort and energy efficiency. The good news is that with the right materials and steps, you can achieve a tight seal without replacing the entire door.
Why Sealing a Garage Door from the Inside Matters
Sealing your garage door isn’t just about comfort—it directly impacts your home’s efficiency and protection.
Key Benefits:
- Reduces energy loss
- Keeps out dust, rain, and pests
- Improves temperature control
- Protects stored items
- Enhances overall home efficiency
Read too: Tc1 Tricode Garage Door Opener Remote W/ Clip Chamberlain: Complete Guide
💡 Studies show that air leaks in garages can increase energy costs by up to 10–20% in connected homes.
To better understand garage door structures, visit:
https://en.wikipedia.org/wiki/Garage_door
Where Do Garage Doors Leak Air From?
Before sealing, identify the problem areas.
Common Leak Points:
- Bottom gap (floor unevenness)
- Side edges of the door
- Top frame area
- Between door panels
- Around weather stripping
👉 Identifying these spots ensures a more effective seal.
Best Materials for Sealing a Garage Door from the Inside
Choosing the right materials is crucial.
Top Options:
| Material | Best Use | Cost Range |
|---|---|---|
| Weatherstripping tape | Side and top gaps | $10–$30 |
| Foam seal strips | Small cracks and edges | $10–$25 |
| Door sweep or seal | Bottom gap | $20–$50 |
| Insulation panels | Door panels | $50–$150 |
| Silicone caulk | Small cracks | $5–$15 |
How To Seal A Garage Door From The Inside (Step-by-Step)
Follow these steps for a complete and effective seal.
Step 1: Inspect and Clean the Door Area
Preparation is key.
Steps:
- Close the garage door completely
- Inspect all edges for gaps
- Clean surfaces with a dry cloth
👉 Dirt can prevent materials from sticking properly.
Step 2: Seal the Bottom Gap
This is usually the biggest source of air leaks.
Steps:
- Install a door sweep or bottom seal
- Ensure it touches the floor evenly
- Adjust for uneven surfaces if needed
📏 Ideal contact: firm but not too tight to restrict movement.
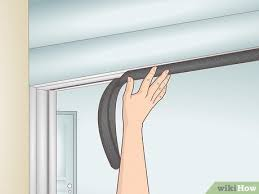
Step 3: Apply Weatherstripping on Sides and Top
This blocks air from entering around the frame.
Steps:
- Measure door frame height and width
- Cut weatherstripping to size
- Attach along edges using adhesive or nails
- Press firmly for proper sealing
Step 4: Seal Small Gaps with Foam or Caulk
For tiny cracks and openings:
Steps:
- Apply foam strips to narrow gaps
- Use silicone caulk for cracks
- Smooth caulk for a clean finish
Step 5: Add Insulation Panels (Optional but Recommended)
This improves thermal efficiency significantly.
Steps:
- Measure each door panel
- Cut insulation boards accordingly
- Insert into panel frames
- Secure if necessary
💡 Insulation can reduce heat transfer by up to 30%.
Step 6: Test the Seal
After installation:
Steps:
- Close the door
- Check for visible light gaps
- Feel for air leaks
👉 If you feel air, reapply or adjust sealing materials.
Quick Sealing Checklist
| Area | Solution | Priority |
|---|---|---|
| Bottom gap | Door sweep/seal | High |
| Side edges | Weatherstripping | High |
| Top frame | Foam or stripping | Medium |
| Small cracks | Caulk | Medium |
| Door panels | Insulation | Optional |
DIY vs Professional Sealing
DIY Sealing
Pros:
- Affordable ($30–$150 total)
- Easy for beginners
- Quick completion (1–3 hours)
Cons:
- May require adjustments
- Limited to minor issues
Professional Sealing
Pros:
- Expert installation
- Long-lasting results
Cons:
- Costs $200–$500
- Requires scheduling
Common Mistakes to Avoid
Avoid these errors for better results.
Mistakes:
- Using wrong seal size
- Ignoring uneven floors
- Skipping cleaning before installation
- Applying too much caulk
- Not testing after installation
How to Maintain Your Garage Door Seal
Keep your seal effective over time.
Maintenance Tips:
- Inspect seals every 3–6 months
- Replace worn weatherstripping
- Clean edges regularly
- Reapply caulk when cracks appear
Real-Life Example
A homeowner noticed cold air entering their garage during winter.
Solution:
- Installed weatherstripping on sides
- Added bottom seal
- Inserted insulation panels
✅ Result: Garage temperature improved noticeably, and energy bills dropped.
FAQ: How To Seal A Garage Door From The Inside
1. Can I seal my garage door completely from the inside?
Yes, you can significantly reduce air leaks, though a completely airtight seal is difficult.
2. What is the best material for sealing gaps?
Weatherstripping and foam seals are the most effective for most situations.
3. How much does it cost to seal a garage door?
DIY sealing costs around $30–$150, while professional services can cost $200–$500.
4. Will sealing my garage door reduce energy bills?
Yes. Proper sealing can reduce energy loss by up to 10–20% in attached garages.
5. How long does sealing last?
Most seals last 3–5 years, depending on usage and climate.
6. Do I need insulation as well?
Not always, but insulation greatly improves temperature control and efficiency.
Conclusion
Learning how to seal a garage door from the inside is a simple yet powerful way to improve comfort, reduce energy costs, and protect your space. By sealing gaps, adding weatherstripping, and insulating panels, you can transform your garage into a cleaner and more efficient area.
Start with the most critical areas like the bottom and sides, then enhance your setup with insulation for maximum benefits. With just a few hours of work, you’ll enjoy long-term savings and comfort.
If this guide helped you, share it with others who want to improve their garage insulation and efficiency!
Leave a Reply