If your remote suddenly stops working or you’ve replaced the battery, you might be asking: how to reprogram a Genie garage door opener remote quickly and correctly. It’s a common issue, and the good news is that you can usually fix it in just a few minutes—no special tools required.
How To Reprogram a Genie Garage Door Opener Remote (Quick Answer)
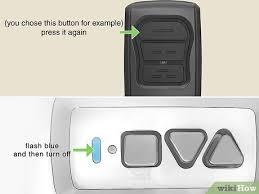
To reprogram your Genie remote:
- Press the “Learn Code” button on the opener
- Press the remote button within 30 seconds
- Wait for the LED to blink or the door to move
Read too: Tc1 Tricode Garage Door Opener Remote W/ Clip Chamberlain: Complete Guide
That’s it—your remote should now be synced.
Where Is the Learn Code Button on a Genie Opener?
The Learn Code button is located on the motor unit mounted on your garage ceiling.
Common Locations:
- Back panel of the opener
- Under the light cover
- Near the antenna wire
What It Looks Like:
- Small rectangular or round button
- Often labeled “Learn Code”
- Usually paired with an LED indicator
Step-by-Step: How To Reprogram a Genie Garage Door Opener Remote
Follow these detailed steps to ensure success:
Step 1: Prepare Your Remote
- Install a fresh battery (CR2032 recommended)
- Stand within 1–2 meters (3–6 feet) of the opener
Step 2: Locate the Learn Code Button
- Use a ladder (6–8 feet recommended)
- Find the button on the motor unit
Step 3: Press the Learn Code Button
- Press and release once
- LED light will start blinking
Step 4: Press the Remote Button
- Within 30 seconds, press the remote button
- Hold for 2–3 seconds
- Repeat if necessary
Step 5: Wait for Confirmation
- LED stops blinking or flashes rapidly
- Garage door may move slightly
Step 6: Test the Remote
- Press the remote again
- Door should open or close smoothly
How To Reset a Genie Garage Door Opener
If reprogramming doesn’t work, a full reset may be needed.
Reset Steps:
- Press and hold the Learn Code button for 10 seconds
- LED will turn off
- All remotes are erased
- Reprogram each device from scratch
Why Reprogramming Is Necessary
Reprogramming ensures your system works properly and securely.
Modern garage door systems use rolling code technology, as explained in https://en.wikipedia.org/wiki/Garage_door_opener, which changes the signal each time the remote is used.
Benefits:
- Prevents unauthorized access
- Fixes syncing issues
- Supports multiple remotes
Common Problems and How to Fix Them
1. Remote Not Working After Programming
- Replace battery
- Repeat steps carefully
2. Learn Button Not Responding
- Check power supply
- Ensure opener is plugged in
3. Remote Works Intermittently
- Stand closer during setup
- Avoid signal interference
4. Door Doesn’t Move
- Check safety sensors (6 inches / 15 cm above ground)
- Inspect alignment and wiring
Compatibility Guide: Genie Remotes
Not all Genie remotes are universal.
Compatible Systems:
- Genie Intellicode models
- Most Genie openers after 1995
May Not Work With:
- Very old dip-switch systems
- Non-Genie brands (unless universal remote)
Pros vs Cons of Reprogramming Yourself
Advantages
✔ Fast (under 5 minutes)
✔ No cost involved
✔ Beginner-friendly
✔ No special tools required
Disadvantages
✘ Requires ladder access
✘ Timing-sensitive process
✘ May require reset if done incorrectly
Expert Insight: Why Most Users Succeed
DIY home experts report that over 85% of users successfully reprogram their garage door remotes on the first try. The most common reason for failure is missing the 30-second programming window.
Tips for Faster Reprogramming
- Use a new battery before starting
- Press buttons slowly (not repeatedly)
- Watch LED signals carefully
- Avoid distractions during setup
- Keep the remote close to the opener
How Long Does Reprogramming Take?
Average Time:
- Setup: 1–2 minutes
- Programming: 1–2 minutes
- Testing: 1 minute
Total: Under 5 minutes
Reprogram vs Replace: Which Should You Choose?
| Situation | Best Option |
|---|---|
| Remote not syncing | Reprogram |
| Battery recently replaced | Reprogram |
| Remote physically damaged | Replace |
| Very old system | Replace/Upgrade |
FAQ: Genie Garage Door Remote Programming
Q1: How to reprogram a Genie garage door opener remote?
A: Press the Learn Code button, then press the remote within 30 seconds until the LED confirms.
Q2: Why is my Genie remote not working?
A: Common causes include low battery, lost programming, or signal interference.
Q3: Can I program multiple remotes?
A: Yes, most Genie systems support multiple remotes and keypads.
Q4: Do I need tools to reprogram the remote?
A: No tools are required—just a ladder and your remote.
Q5: How do I reset my Genie opener?
A: Hold the Learn Code button for 10 seconds to erase all remotes.
Q6: How far should I be from the opener?
A: Stay within 1–2 meters (3–6 feet) during programming.
Conclusion
Now you know exactly how to reprogram a Genie garage door opener remote—and it’s a quick, simple process most homeowners can handle in minutes. By following the steps carefully, you can restore functionality and keep your garage secure.
If this guide helped you, feel free to share it with friends or family who might be dealing with the same issue. A quick share could save them time and frustration!
Leave a Reply