Introduction
Is your Genie garage door making a loud grinding noise or struggling to open smoothly? You are likely dealing with a worn-out carriage, and learning how to replace Genie garage door opener screw drive carriage is the most effective solution to restore quiet, reliable operation. This common wear part eventually strips or cracks after years of use, but fortunately, it is a manageable DIY project that can save you hundreds of dollars in service calls. In this comprehensive guide, we will walk you through every step with empathy and precision, ensuring you get your garage door back on track safely and efficiently.
What Is a Genie Screw Drive Carriage and Why Does It Fail?
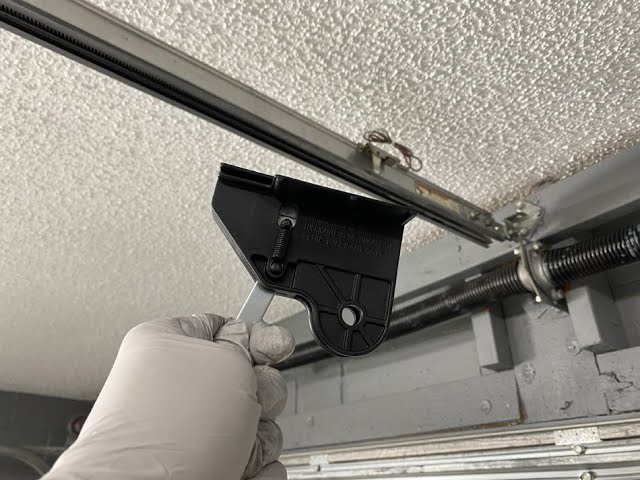
Before grabbing your wrenches, it is vital to understand what you are actually fixing. The carriage (also known as the trolley) is the component that travels along the threaded steel rod (the screw drive) to physically push or pull your garage door up and down. Unlike chain or belt drives, the screw drive system relies entirely on the direct engagement between the carriage’s internal nut and the external threads of the rod.
Common Signs of Carriage Failure
Identifying the exact problem prevents unnecessary part replacements. Look for these specific symptoms:
- Grinding or Stripping Noises: A distinct metal-on-plastic screech indicates the internal drive nut has stripped.
- Motor Runs but Door Doesn’t Move: The motor spins the rod, but the carriage stays stationary because it can no longer grip the threads.
- Visible Plastic Shards: Finding white or black plastic debris near the opener rail is a definitive sign of internal carriage failure.
- Jerky Movement: The door stutters or binds at specific points along the rail.
According to general mechanical engineering principles found on Wikipedia, screw drive systems utilize fewer moving parts than chain drives, which reduces potential failure points but places significantly higher stress on the single carriage assembly. This concentrated stress is exactly why the carriage is typically the first component to require replacement in Genie screw drive models like the SD9500, ISD950, or CM8600.
Essential Tools and Safety Precautions Before Starting
Safety must be your absolute priority. Garage doors are heavy, and torsion springs store dangerous amounts of energy. While replacing the carriage does not involve touching the springs directly, working overhead requires caution.
Required Tool List
Gather these items before beginning to avoid mid-project trips to the hardware store:
- Stepladder: Stable, non-conductive fiberglass preferred.
- Socket Set & Wrenches: Typically 7/16” and 1/2” for Genie mounting bolts.
- Screwdrivers: Phillips #2 and flathead.
- Vise Grips/Locking Pliers: Crucial for holding the screw rod in place.
- Lithium-Based Grease: Specifically formulated for Genie screw drives (do not use WD-40).
- Replacement Carriage Assembly: Verify compatibility with your specific Genie model number.
- Safety Glasses: Protect eyes from falling debris and old grease.
- Work Gloves: Prevent cuts from sharp metal edges.
Critical Safety Warning
Never attempt to adjust, loosen, or repair garage door springs yourself. Spring tension adjustment requires specialized training and tools. If your spring system appears damaged or unbalanced, stop immediately and call a certified professional. For carriage replacement, simply ensure the door is fully closed and disconnected from power before proceeding.
Step-by-Step: How To Replace Genie Garage Door Opener Screw Drive Carriage
Follow this detailed tutorial precisely. Rushing through steps is the most common cause of post-repair issues.
Step 1: Disconnect Power and Secure the Door
Unplug the garage door opener from the electrical outlet or turn off the dedicated circuit breaker. Pull the emergency release cord on the existing carriage to disengage it from the door arm. Manually lower the door until it is completely closed and resting on the floor. Place locking pliers on the track just below a roller to prevent accidental upward movement while you work overhead.
Step 2: Remove the Opener Rail End Cap
Locate the end cap at the header bracket side (the end furthest from the motor). Using your socket wrench, remove the two bolts securing the end cap to the rail. Carefully slide the end cap off the screw rod. Pro Tip: Take a photo of the orientation before removal; reassembly is much easier with visual reference.
Step 3: Extract the Old Carriage Assembly
With the end cap removed, slide the old carriage assembly off the threaded rod. Inspect the screw rod closely at this stage. Run your fingers along the threads (wearing gloves) to check for burrs, flat spots, or excessive wear. If the rod itself is damaged, replacing only the carriage will result in premature failure of the new part. Clean the rod thoroughly with a rag and mineral spirits to remove old, hardened grease and metal particles.
Step 4: Lubricate the New Carriage and Rod
Apply a generous amount of lithium-based screw drive grease to the entire length of the cleaned rod. Also apply grease to the internal threads of the new carriage assembly before installation. Proper lubrication during installation reduces initial wear and ensures quiet operation from the first cycle. Avoid petroleum-based greases, as they can degrade the nylon components inside the carriage.
Step 5: Install the New Carriage and Reassemble
Slide the new greased carriage onto the rod, ensuring it faces the correct direction (most carriages have an arrow indicating “door side” or “motor side”). Reinstall the end cap and tighten the mounting bolts securely but do not overtighten, as this can warp the rail alignment. Remove the locking pliers from the track.
Step 6: Reconnect and Test Operation
Reattach the door arm to the new carriage following the manufacturer’s specified hole position. Plug the opener back in. Operate the door manually one full cycle using the wall button to verify smooth travel without binding. Then test the safety reversal sensors by placing a 2×4 board on the floor in the door’s path; the door should reverse immediately upon contact. Finally, test the auto-reverse force setting according to your Genie manual specifications.
Maintenance Tips to Extend Your New Carriage’s Lifespan
After mastering how to replace Genie garage door opener screw drive carriage, proper maintenance ensures your investment lasts another decade or more.
| Maintenance Task | Frequency | Purpose |
|---|---|---|
| Apply lithium grease to rod | Every 6 months | Reduces friction and wear on carriage nut |
| Inspect carriage for cracks | Annually | Catches early signs of fatigue |
| Check rail alignment | Annually | Prevents binding and uneven wear |
| Test safety sensors | Monthly | Ensures safe operation and prevents damage |
| Tighten mounting hardware | Every 2 years | Vibration loosens bolts over time |
Expert Insight: Most premature carriage failures result from inadequate lubrication or misaligned rails. Taking 10 minutes twice yearly to properly grease the system is far cheaper than another replacement. Always use Genie-approved lubricant; generic alternatives often lack the necessary viscosity for screw drive applications.
Frequently Asked Questions (FAQ)
How long does a Genie screw drive carriage typically last?
Under normal residential use (3–5 cycles daily), a quality replacement carriage typically lasts 10–15 years. Heavy commercial use, extreme temperatures, or poor lubrication can reduce lifespan to 5–7 years. Regular maintenance significantly extends service life.
Can I use a universal carriage instead of an OEM Genie part?
While universal carriages exist, we strongly recommend OEM Genie replacement parts. Universal components often have slight dimensional variances that cause binding, excess noise, or premature wear. The $15–$20 savings rarely justifies the risk of improper fitment or voided warranty.
Do I need to reprogram my remote after replacing the carriage?
No. Carriage replacement is purely mechanical and does not affect the opener’s electronic programming. Your remotes, keypads, and smart home integrations will continue functioning normally. Only motor unit replacement or logic board changes require reprogramming.
My new carriage still makes noise—what’s wrong?
First, verify adequate lubrication; dry operation causes immediate noise. Second, check rail alignment; even slight misalignment creates binding. Third, inspect the screw rod for damage; a worn rod destroys new carriages quickly. If all three check out, the issue may be unrelated (worn rollers, loose hardware, or motor bearings).
Is it worth repairing vs. replacing the entire opener?
If your Genie screw drive opener is less than 15 years old and otherwise functional, carriage replacement is absolutely cost-effective ($40–$80 vs. $300–$500 for a new unit). However, if the opener lacks modern safety features, has a damaged motor, or is over 20 years old, investing in a new belt-drive opener provides better long-term value, quieter operation, and current safety compliance.
How do I know which carriage model fits my Genie opener?
Check the model number sticker located on the back or side of the motor housing. Cross-reference this number with Genie’s official parts compatibility chart. Common compatible models include 36179R.S, 36179A.S, and 26179S. When in doubt, contact Genie customer support with your model number for verified compatibility.
Conclusion
Learning how to replace Genie garage door opener screw drive carriage empowers you to maintain one of your home’s most-used mechanical systems confidently and safely. By following this step-by-step guide, you’ve not only solved an immediate problem but also gained valuable knowledge for future maintenance. Remember that patience during installation and commitment to regular lubrication are the true secrets to long-lasting performance.
Found this guide helpful? Share it with fellow homeowners on Facebook, Pinterest, or your neighborhood Nextdoor group! Someone else is probably listening to that awful grinding sound right now and could really use your expertise. Together, we can keep garages running smoothly and safely across the community. Happy DIY-ing!
Leave a Reply