Introduction
Is your garage door opener humming loudly but failing to lift the door? That grinding noise usually indicates stripped internal components, and learning how to replace garage door opener gear and sprocket assembly is often the most cost-effective solution. Instead of spending hundreds on a new unit, this guide will walk you through restoring your opener’s torque and silence in just an afternoon. We understand that opening up a motor housing can feel intimidating, but with the right steps, you can safely extend your opener’s lifespan by another decade.
Why Do Garage Door Opener Gears Strip?
Before grabbing a wrench, it helps to understand why this failure occurs. The gear and sprocket assembly is designed as a “sacrificial component.” Manufacturers intentionally use nylon or plastic composite gears rather than steel so that if the door jams or hits an obstacle, the gear strips instead of the motor burning out or the chain snapping.
According to industry service data, the average lifespan of a nylon gear set is 10 to 15 years. However, premature wear can occur due to:
- Improper Door Balance: If your springs are weak, the motor works twice as hard, accelerating gear wear.
- Lack of Lubrication: Dry chains increase drag on the sprocket.
- Misaligned Safety Sensors: Repeated reversing cycles put unnecessary stress on the drivetrain.
- Extreme Temperatures: Cold garages can make nylon brittle over time.
Expert Insight: “Never replace the gear without checking the door balance first. A properly balanced door should stay in place when lifted halfway manually. If it falls, fix the springs before installing new gears, or you’ll be doing this repair again in six months.” — Certified Garage Door Technician
Signs You Need a New Gear and Sprocket Kit
Not every opener issue points to stripped gears. Use this checklist to confirm your diagnosis before purchasing parts:
| Symptom | Likely Cause | Action Required |
|---|---|---|
| Motor hums, door doesn’t move | Stripped nylon gear | Replace gear & sprocket |
| Loud grinding/screeching | Worn bearings or gear teeth | Inspect and likely replace assembly |
| Door reverses mid-cycle | Sensor alignment or force setting | Adjust sensors/force limits |
| Chain is loose/sagging | Worn sprocket or stretched chain | Replace sprocket; check chain tension |
| Motor runs continuously | Limit switch failure | Adjust travel limits |
If your symptoms match the first two rows, proceed with the replacement tutorial below.
Tools and Parts You Will Need
Preparation prevents frustration. Gather these items before starting:
- Replacement Gear and Sprocket Kit (Verify model number; e.g., LiftMaster 41A2817 or Genie 36179R)
- Socket wrench set (standard and metric)
- Phillips and flathead screwdrivers
- Needle-nose pliers
- Hammer and punch (for roll pins)
- White lithium grease (specifically for garage door openers)
- Safety glasses and work gloves
- Stepladder
- Vice grips or locking pliers
Safety Warning: Always disconnect power to the opener before beginning. Capacitors can hold a charge even when unplugged. For detailed electrical safety standards regarding garage door systems, refer to Wikipedia’s Garage Door Opener safety guidelines.
Step-by-Step: How To Replace Garage Door Opener Gear And Sprocket Assembly
Follow these precise steps to ensure a safe, lasting repair.
1. Disconnect Power and Release Tension
Unplug the opener from the ceiling outlet. Pull the emergency release cord to disengage the trolley from the chain/belt. Manually lower the door to the fully closed position. This removes tension from the sprocket and prevents the door from crashing during disassembly.
2. Remove the Motor Housing Cover
Using your socket wrench, remove the screws securing the outer cover. Set them aside in a magnetic tray. Carefully lift the cover off—some models have wiring harnesses attached; do not yank. Disconnect any wire connectors linking the cover to the main board.
3. Extract the Old Gear and Sprocket Assembly
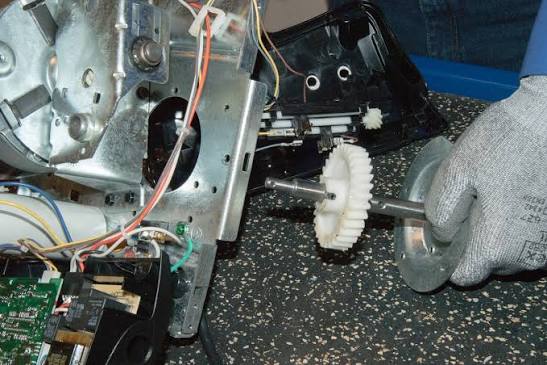
Locate the three bolts securing the gear plate to the motor shaft housing. Support the assembly with one hand while removing the final bolt to prevent it from dropping. Slide the old assembly straight off the motor shaft. Note the orientation of the washer and spacer behind the gear plate—you must replicate this exactly.
4. Clean and Inspect the Motor Shaft
Use a clean rag to wipe away old grease and metal shavings from the motor shaft. Inspect the shaft for burrs or scoring. If damaged, the motor itself may need replacement. Apply a thin layer of white lithium grease to the shaft before installing the new assembly.
5. Install the New Gear and Sprocket Assembly
Slide the new assembly onto the motor shaft, ensuring the keyway aligns perfectly. Reinstall the washer and spacer in their original positions. Hand-tighten the three mounting bolts first, then torque them evenly to manufacturer specifications (typically 8–10 ft-lbs). Do not overtighten, as this can warp the gear plate and cause premature binding.
6. Lubricate and Reassemble
Apply a generous amount of white lithium grease to the new nylon gear teeth and sprocket. Avoid petroleum-based greases, which degrade nylon. Reconnect all wiring harnesses and secure the motor housing cover. Plug the opener back in.
7. Test and Recalibrate
Re-engage the trolley using the emergency release lever. Operate the opener through 3–5 complete cycles. Listen for smooth, quiet operation. You will likely need to reset the travel limits and force settings, as the new gear changes the mechanical reference point. Consult your owner’s manual for recalibration procedures specific to your model.
Common Mistakes to Avoid
- Skipping Door Balance Check: As noted above, unbalanced doors destroy new gears rapidly.
- Using Wrong Grease: WD-40 or automotive grease damages nylon. Use only white lithium or manufacturer-approved lubricant.
- Forgetting Roll Pin Alignment: Misaligned roll pins cause wobble and noise. Tap gently with a hammer and punch until flush.
- Ignoring Chain Tension: After reassembly, adjust chain tension so it sits ¼ inch above the rail at midpoint. Too tight strains the new sprocket; too loose causes skipping.
Frequently Asked Questions (FAQ)
Q1: How long does it take to replace a garage door opener gear and sprocket?
Most DIYers complete the job in 60 to 90 minutes. Professionals typically finish in 30–45 minutes. First-timers should budget extra time for troubleshooting and recalibration.
Q2: Can I replace just the gear without the sprocket?
Technically yes, but it’s strongly discouraged. The sprocket wears simultaneously with the gear, and mismatched wear patterns cause rapid failure. Kits include both components for under $30, making separate replacement economically illogical.
Q3: What is the best brand for replacement gear kits?
OEM (Original Equipment Manufacturer) kits are always recommended. For Chamberlain/LiftMaster/Craftsman units, use genuine 41A2817 or 41A3625 kits. Genie owners should use 36179R or 24914S. Aftermarket kits vary wildly in nylon quality and often lack proper tolerances.
Q4: My opener still hums after replacing the gear. What’s wrong?
This usually indicates either improper installation (gear not fully seated), a seized motor bearing, or incorrect limit settings causing the motor to stall against the hard stop. Double-check assembly alignment and recalibrate limits before assuming motor failure.
Q5: Should I upgrade to a belt-drive opener instead of repairing my chain-drive?
If your opener is over 15 years old or has had multiple repairs, replacement may be more economical. Belt-drive units are significantly quieter and have fewer wear points. However, if the rest of the system is sound, a $25 gear kit extends life affordably.
Q6: Is this repair dangerous for beginners?
The primary risks are electrical shock and door movement. By unplugging the unit and closing the door before starting, you eliminate both hazards. The mechanical work involves basic hand tools and no high-tension springs. If you’re comfortable changing a car battery, you can handle this repair.
Conclusion
Learning how to replace garage door opener gear and sprocket assembly empowers you to save money, reduce waste, and maintain your home’s security. With roughly an hour of focused work and a modest investment in parts, you can restore reliable, quiet operation to your garage door. Remember to prioritize door balance, use correct lubricants, and never skip safety precautions.
Found this guide helpful? Share it with fellow homeowners on Facebook, Pinterest, or Nextdoor who might be struggling with a noisy garage door. Tag us in your repair photos—we love seeing successful DIY wins! Your share could save someone an unnecessary $300 service call today. 🔧🏠
Leave a Reply