If you’re noticing drafts, water leaks, or pests sneaking into your garage, it’s likely time for How To Replace Bottom Weather Stripping On Garage Door. This small component plays a big role in protecting your home. The good news? Replacing it is a simple DIY project that most homeowners can complete in under an hour.
How To Replace Bottom Weather Stripping On Garage Door (Step-by-Step Guide)
Replacing your garage door’s bottom seal is easier than you think. Follow these steps carefully to ensure a proper fit and long-lasting results.
Read too: Tc1 Tricode Garage Door Opener Remote W/ Clip Chamberlain: Complete Guide
What Tools and Materials Do You Need?
Before starting, gather the following:
Tools:
- Flathead screwdriver
- Utility knife
- Tape measure
- Pliers
- Clean cloth
Materials:
- Replacement weather stripping (vinyl or rubber)
- Mild soap + 2 liters of water (temperature 22–28°C for cleaning)
👉 Tip: Always measure your garage door width accurately—most standard doors are 8–16 feet wide.
Step 1: Disconnect the Garage Door Opener
Safety first.
- Unplug the automatic opener
- Pull the emergency release cord
- Ensure the door stays fully closed
This prevents accidental movement while working.
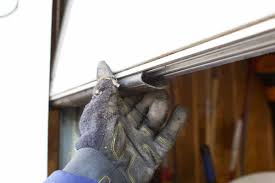
Step 2: Remove the Old Weather Stripping
Most garage doors use a track system at the bottom.
How to remove:
- Locate the metal or aluminum track
- Use pliers to pull out the old seal
- If stuck, cut it into sections using a utility knife
👉 If the seal is brittle or cracked, that confirms replacement is necessary.
Step 3: Clean the Track Thoroughly
A clean track ensures smooth installation.
- Mix mild soap with water (22–28°C)
- Wipe inside the track with a cloth
- Remove dirt, rust, and debris
Why it matters: Dirt buildup can cause the new seal to jam or wear out faster.
Step 4: Measure and Cut the New Seal
- Measure the exact width of your garage door
- Add 1–2 inches extra length for adjustment
- Cut using a sharp utility knife
👉 Precision here prevents gaps that allow air or water inside.
Step 5: Install the New Weather Stripping
Now the key step:
- Insert one end of the seal into the track
- Slide it across slowly
- Pull evenly from the other side
💡 If it feels tight, apply a small amount of dish soap as lubricant.
Step 6: Secure and Test the Door
- Trim any excess material
- Close the door completely
- Check for gaps along the bottom
A properly installed seal should sit flush against the ground.
What Type of Weather Stripping Is Best?
Choosing the right material matters for durability and performance.
Common Types Compared
| Type | Pros | Cons |
|---|---|---|
| Vinyl | Affordable, easy to install | Less durable |
| Rubber | Flexible, weather-resistant | Slightly more expensive |
| Silicone | Long-lasting, extreme weather | Higher cost |
👉 Experts recommend rubber seals for most climates due to flexibility and durability.
How Do You Know It’s Time to Replace Weather Stripping?
Watch for these signs:
- Visible cracks or brittleness
- Water entering during rain
- Cold air drafts
- Increased energy bills
According to home efficiency studies, air leaks can increase energy costs by up to 20%, especially in attached garages.
Benefits of Replacing Bottom Weather Stripping
Replacing your seal offers immediate improvements:
Key Advantages
- ✅ Keeps out pests and insects
- ✅ Prevents water damage
- ✅ Improves insulation
- ✅ Reduces dust and debris
- ✅ Enhances energy efficiency
Common Mistakes to Avoid
Avoid these pitfalls for best results:
- ❌ Buying the wrong seal size
- ❌ Skipping track cleaning
- ❌ Forcing the seal into place
- ❌ Cutting too short
- ❌ Ignoring door alignment issues
These mistakes can reduce the lifespan of your new weather stripping.
Can You Replace Weather Stripping Without Removing the Door?
Yes—you do not need to remove the garage door.
The entire process happens at the bottom track, making it a beginner-friendly DIY task.
How Long Does Weather Stripping Last?
Most bottom seals last 2–5 years, depending on:
- Weather conditions
- Frequency of use
- Material quality
👉 Regular inspection every 6 months is recommended.
Additional Tip: Improve Garage Insulation
If you want to go further, consider upgrading your overall garage insulation. Learn more here:
https://en.wikipedia.org/wiki/Weatherstripping
Proper sealing can significantly reduce heat loss and improve comfort.
FAQ: How To Replace Bottom Weather Stripping On Garage Door
1. Can I replace garage door weather stripping myself?
Yes. It’s a simple DIY project requiring basic tools and about 30–60 minutes.
2. How much does it cost to replace weather stripping?
Typically between $10–$40, depending on material and door size.
3. Why is my new seal not sliding into the track?
The track may be dirty or bent. Clean it thoroughly or apply light lubrication.
4. Do all garage doors use the same type of seal?
No. Some use T-style, U-style, or bead-type seals. Always match your existing track design.
5. Can weather stripping reduce energy bills?
Yes. Proper sealing can lower energy loss and reduce heating/cooling costs.
6. What if my track is damaged?
You may need to replace the track or consult a professional for repair.
Conclusion
Learning How To Replace Bottom Weather Stripping On Garage Door is a simple yet powerful way to protect your home. With just a few tools and steps, you can block drafts, prevent water leaks, and improve energy efficiency.
This quick DIY fix not only saves money but also extends the life of your garage door system. Take action today—and enjoy a cleaner, more secure garage.
If you found this guide helpful, share it on social media to help others improve their home too!
Leave a Reply