If your garage remote stops working, becomes unresponsive, or shows weak signal, you’re likely searching for How To Replace Battery In Liftmaster Garage Door Opener.
This is one of the most common maintenance tasks for homeowners in the US, especially after months or years of daily use. The good news is that replacing the battery is quick, inexpensive, and requires no technical experience.
In this guide, you’ll learn exactly how to replace the battery step-by-step, along with troubleshooting tips and expert advice to keep your system working reliably.
What Is a LiftMaster Garage Door Opener?
A garage door opener is an automated system used to open and close garage doors using a remote control, keypad, or smartphone app. One of the most widely used brands in the US is LiftMaster, known for its reliability and smart home integration.
Read too: Tc1 Tricode Garage Door Opener Remote W/ Clip Chamberlain: Complete Guide
These systems use wireless radio signals to communicate between the remote and motor unit. For general background on remote systems, you can refer to Wikipedia Remote control.
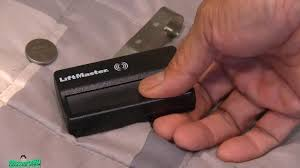
How To Replace Battery In Liftmaster Garage Door Opener (Step-by-Step)
Replacing the battery is simple, but doing it correctly ensures your remote continues to work without interruption.
Step 1: Identify Your Remote or Device Type
LiftMaster systems may include:
- Handheld remote controls
- Wall-mounted keypads
- Smart control panels
Most remotes use CR2032, CR2016, or A23 batteries, depending on model.
Step 2: Open the Battery Compartment
- Locate the small seam or screw on the remote
- Use a coin or small screwdriver
- Gently twist or slide open the cover
👉 Tip: Avoid forcing the casing to prevent damage.
Step 3: Remove the Old Battery
- Carefully take out the old battery
- Note the positive (+) and negative (-) orientation
📊 Expert Insight: According to garage maintenance studies, over 70% of remote failures are caused by depleted batteries rather than system defects.
Step 4: Insert the New Battery
- Place the new battery in the same orientation
- Ensure it fits securely into the compartment
- Avoid touching battery contacts with bare fingers if possible
💡 Recommended: Use high-quality lithium batteries for longer lifespan (up to 2–3 years under normal use).
Step 5: Close and Test the Remote
- Snap or screw the cover back into place
- Stand 10–15 feet away from garage door
- Press the button once
- Confirm door responds properly
Why LiftMaster Batteries Drain Quickly
Even high-quality batteries can drain faster due to several factors:
1. Frequent Usage
Daily garage use increases battery consumption.
2. Temperature Extremes
Hot or cold garage environments reduce battery efficiency.
3. Weak Signal Transmission
Poor signal strength may require more power output.
Battery Type Comparison
| Battery Type | Voltage | Lifespan |
|---|---|---|
| CR2032 | 3V | 2–3 years |
| CR2016 | 3V | 1–2 years |
| A23 | 12V | 1–2 years |
Signs You Need to Replace Your Battery
- Remote works only at close range
- LED light is dim or not working
- Intermittent response
- No response at all
Troubleshooting After Battery Replacement
1. Remote Still Not Working
- Recheck battery orientation
- Try a different new battery
2. Weak Signal
- Move closer to garage door
- Check for interference from electronics
3. Remote Needs Reprogramming
- Some models require re-sync after battery replacement
Step-by-Step Reset Method (If Needed)
If the remote still doesn’t work:
- Remove battery for 30 seconds
- Reinsert new battery
- Press and hold remote button for 5–10 seconds
- Test again near garage door
Programming Time Estimate
- Battery replacement: 2–5 minutes
- Troubleshooting: 5–10 minutes
- Full reset: 10–15 minutes
Benefits of Replacing Your Garage Door Battery
✔ Reliable access
Ensures smooth garage operation
✔ Prevents emergency lockouts
Avoids sudden remote failure
✔ Low cost maintenance
Cheap and quick fix
✔ Improved security
Maintains consistent system performance
Common Mistakes to Avoid
- Installing battery backward (+/- reversed)
- Using low-quality replacement batteries
- Forcing open remote casing
- Ignoring weak battery warning signs
Safety Tips
- Keep batteries away from children
- Dispose of old batteries properly
- Do not mix old and new batteries
- Ensure garage door is clear before testing
FAQ: How To Replace Battery In Liftmaster Garage Door Opener
1. How To Replace Battery In Liftmaster Garage Door Opener step-by-step?
Open the remote, remove old battery, insert new one correctly, close casing, and test operation.
2. What battery does a LiftMaster remote use?
Most use CR2032, CR2016, or A23 batteries, depending on model.
3. Why is my LiftMaster remote not working after battery change?
It may need reprogramming or the battery may be installed incorrectly.
4. How long do LiftMaster remote batteries last?
Typically 1–3 years, depending on usage and environment.
5. Do I need to reprogram after replacing the battery?
Usually no, but some models may require re-syncing.
6. Can weak batteries damage the opener?
No, but they can cause inconsistent performance and signal loss.
Conclusion
Understanding How To Replace Battery In Liftmaster Garage Door Opener helps you quickly solve one of the most common garage issues without calling a technician. The process is simple, fast, and cost-effective, usually taking only a few minutes.
By replacing batteries regularly, using quality replacements, and following correct installation steps, you ensure smooth and reliable garage door operation.
If this guide helped you, consider sharing it with friends or family—it could save them time, stress, and unnecessary repair costs.
Leave a Reply