Introduction
There are few things more frustrating than pressing your remote and hearing nothing but silence from your garage. If you are wondering how to replace batteries in a LiftMaster garage door opener, you are likely dealing with a dead remote or a failing backup system that is compromising your home’s security and convenience. This comprehensive guide will walk you through the exact steps to restore functionality safely, ensuring you get back to your daily routine without unnecessary service calls.
Replacing these power sources is a simple DIY task, but using the wrong type or installing them incorrectly can damage sensitive electronics. Below, we break down everything you need to know about maintaining your LiftMaster system with confidence and precision.
Why Is My LiftMaster Remote Not Working After Battery Change?
Before grabbing a screwdriver, it is vital to diagnose whether the issue is truly power-related. According to industry data, approximately 70% of garage door opener “failures” are simply depleted batteries or poor contact corrosion. However, if you have already swapped the cells and the unit remains unresponsive, consider these factors:
- Signal Interference: New LED bulbs in nearby fixtures can sometimes block RF signals.
- Contact Corrosion: Acid leakage from old batteries may have damaged the metal terminals.
- Remote Desynchronization: The rolling code may need reprogramming after a complete power loss.
- Internal Circuit Failure: The remote itself may have reached the end of its lifespan (typically 5–7 years).
Expert Insight: Always test new batteries with a multimeter before installation. Even brand-new CR2032 cells can occasionally be defective or drained during storage. A healthy 3V lithium cell should read between 3.0V and 3.3V.
What Type of Battery Does a LiftMaster Garage Door Opener Use?
Using the correct specification is non-negotiable for safety and performance. LiftMaster systems typically utilize two distinct battery categories depending on the component.
Remote Controls and Keyless Entry Pads
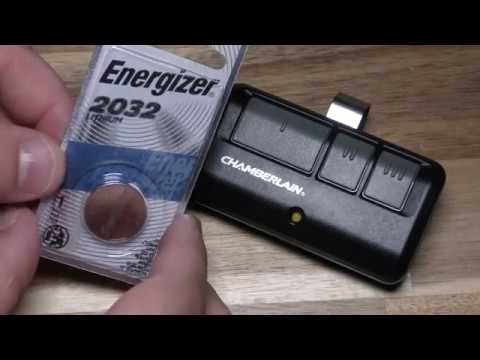
Most modern LiftMaster remotes (including Security+ 2.0 models) require a 3V Lithium Coin Cell CR2032. Older models may use CR2016 or alkaline AAA/9V batteries, so always verify via the compartment label.
Battery Backup Systems
For openers with integrated backup (e.g., Model 8550WLB), the unit uses a sealed 12V 4.5Ah or 5Ah SLA (Sealed Lead Acid) battery. These are significantly heavier and require different handling protocols than coin cells.
| Component | Battery Type | Voltage | Avg. Lifespan | Replacement Difficulty |
|---|---|---|---|---|
| Standard Remote | CR2032 Lithium | 3V | 2–3 Years | Easy (No Tools) |
| Keyless Pad | CR2032 / 9V | 3V / 9V | 1–2 Years | Easy (Screwdriver) |
| Backup System | SLA Gel Cell | 12V | 2–4 Years | Moderate (Panel Removal) |
| Wall Control | None (Wired) | N/A | N/A | N/A |
Note: For detailed technical specifications on lithium coin cell chemistry and safety standards, refer to the Wikipedia entry on Lithium coin batteries, which provides authoritative background on why these specific cells are chosen for low-drain RF devices.
Step-by-Step: How To Replace Batteries In A LiftMaster Remote
This tutorial focuses on the most common scenario: replacing the CR2032 in a standard visor remote. Always work on a clean, well-lit surface to prevent losing small components.
Step 1: Open the Battery Compartment
Locate the small notch or screw on the back of the remote. For newer Security+ 2.0 remotes, insert a flathead screwdriver into the side slot and gently twist to pop the case open. Do not force the casing, as plastic tabs can snap easily in cold weather.
Step 2: Remove the Old Battery
Carefully lift the depleted CR2032 out of its housing. Inspect the metal contacts for white or green corrosion. If present, clean gently with a cotton swab dipped in isopropyl alcohol and allow to dry completely before proceeding.
Step 3: Insert the New Battery Correctly
Place the fresh CR2032 into the compartment with the positive (+) side facing up (flat side visible). Press down firmly until it seats snugly. Installing it backwards will not damage the remote but will prevent operation.
Step 4: Reassemble and Test
Snap the two halves of the remote back together until you hear an audible click. Stand within 10 feet of the garage door and press the button. The LED on the remote should illuminate brightly, and the door should respond within 1–2 seconds.
Step 5: Reprogram If Necessary
If the light works but the door does not move, locate the “Learn” button on the motor head (usually yellow, red, or purple). Press and release it, then immediately press and hold the remote button until the opener lights flash or you hear a click. This resyncs the rolling code.
How Do I Replace the Battery Backup in a LiftMaster Opener?
For units with emergency battery backup, the process requires more caution due to higher voltage and weight.
- Disconnect Power: Unplug the opener from the ceiling outlet AND disconnect the backup battery harness to prevent accidental activation.
- Remove the Cover: Unscrew the lens cover or main housing panel (model dependent) to access the battery bay.
- Swap the Unit: Disconnect the red/black wire harness, remove the old SLA battery, and install the identical replacement. Never mix old and new batteries.
- Reconnect and Charge: Reattach the harness, replace the cover, and plug the unit back in. Allow 24–48 hours for a full charge cycle before testing backup functionality.
Safety Warning: SLA batteries contain lead and sulfuric acid. Always wear gloves and eye protection. Dispose of old units at designated recycling centers—never in household trash.
Signs Your LiftMaster Battery Needs Immediate Replacement
Don’t wait for total failure. Watch for these early indicators:
- Reduced Range: You must stand closer than usual for the remote to work.
- Dim LED: The remote light appears noticeably weaker.
- Intermittent Operation: Door responds only every other press.
- Beeping Alert: Many LiftMaster units emit periodic beeps when backup battery voltage drops below threshold.
- Age Marker: If it has been over 2 years since last change, replace proactively.
FAQ: Common Questions About LiftMaster Battery Replacement
Q1: Can I use rechargeable CR2032 batteries in my LiftMaster remote?
No. Rechargeable lithium coin cells typically output 2.8V–3.0V nominal but have different discharge curves and higher self-discharge rates. LiftMaster engineers design circuits for primary (non-rechargeable) lithium chemistry. Using rechargeables may cause unreliable range or premature failure. Stick to quality brands like Panasonic, Energizer, or Duracell.
Q2: How often should I replace the battery backup in my garage door opener?
Manufacturers recommend testing monthly and replacing every 2–4 years, depending on usage frequency and ambient temperature. Extreme heat or cold accelerates degradation. Set a calendar reminder to test backup function quarterly by unplugging the opener and operating the door.
Q3: Why does my new battery drain so quickly?
Rapid drain usually indicates one of three issues: (1) a stuck button causing continuous transmission, (2) internal circuit board failure drawing parasitic current, or (3) extreme cold exposure reducing effective capacity. If a fresh CR2032 lasts less than 3 months, replace the remote entirely.
Q4: Do I need to reprogram my remote after changing the battery?
Usually no. Standard battery swaps preserve memory. However, if the battery was completely dead for an extended period or if you replaced the backup battery while the unit was unplugged, reprogramming may be necessary. Always test operation before assuming reprogramming is required.
Q5: Can I use a CR2025 instead of a CR2032?
While physically similar, the CR2025 has lower capacity (150mAh vs. 225mAh) and may not provide adequate voltage stability for reliable operation. Always use the exact specification listed in your manual. Substituting thinner cells can also cause poor contact pressure.
Q6: Where can I buy genuine LiftMaster replacement batteries?
Authorized dealers, major home improvement stores, and reputable online retailers carry compatible cells. Avoid ultra-cheap generic brands from unknown sellers, as they often have inconsistent voltage output and shorter shelf life. Investing $2–$3 more in a quality battery prevents future headaches.
Conclusion: Restore Your Garage Door Confidence Today
Knowing how to replace batteries in a LiftMaster garage door opener empowers you to maintain home security and avoid costly service visits. Whether you are swapping a simple CR2032 in your visor remote or servicing a 12V backup system, following these precise steps ensures safe, reliable operation for years to come. Remember to use quality batteries, inspect contacts regularly, and test your system monthly.
Found this guide helpful? Share it on Facebook, X (Twitter), or Pinterest to help fellow homeowners avoid garage door frustration! Tag a friend who’s been battling a stubborn remote—they’ll thank you later. Safe lifting! 🏠🔧
Leave a Reply