If you’re tired of carrying a separate garage remote or constantly forgetting it inside the house, learning How To Program Your Garage Door Opener In Your Car can make your daily routine much easier. Many drivers struggle with the setup process, especially when syncing their vehicle buttons for the first time.
This guide will walk you through a simple, step-by-step method so you can connect your garage door opener directly to your car in just a few minutes.
What Does It Mean to Program a Garage Door Opener in Your Car?
Programming your garage door opener in your car means linking your vehicle’s built-in wireless system (usually HomeLink) to your garage motor unit. Once connected, you can open and close your garage door directly from your dashboard.
Read too: Tc1 Tricode Garage Door Opener Remote W/ Clip Chamberlain: Complete Guide
Modern vehicles use radio frequency technology to communicate with garage systems securely. According to general wireless communication principles described by Wikipedia, these systems rely on encrypted signals to prevent unauthorized access and duplication.
Why Should You Program Your Garage Door Opener in Your Car?
Before learning How To Program Your Garage Door Opener In Your Car, here are the main benefits:
Key Advantages:
- No need for a separate remote
- Faster garage access while driving
- Reduced chance of losing remotes
- Cleaner and more organized vehicle interior
- Increased convenience in daily use
How To Program Your Garage Door Opener In Your Car (Step-by-Step)
This is the core section. Follow carefully for best results.
Step 1: Turn On Your Vehicle
- Insert key or press start button
- Turn ignition ON (engine not always required)
- Close garage door for safety
Step 2: Reset HomeLink Memory (Optional)
If this is your first setup:
- Hold the two outer HomeLink buttons for 10–20 seconds
- Wait until indicator light flashes
👉 This clears old programming.
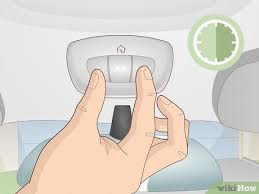
Step 3: Select a HomeLink Button
- Choose one button in your car (1, 2, or 3)
- Hold it for 2–3 seconds
- The light will start blinking slowly
Step 4: Activate Garage Door Opener Learn Button
Go to your garage motor unit:
- Locate the Learn button
- Press and release it once
- You now have 30 seconds to complete pairing
Step 5: Sync Your Car With Garage System
Back in your car:
- Press and hold the selected HomeLink button
- Hold for 2–5 seconds
- Wait for garage light to blink or click
This confirms successful pairing.
Step 6: Test the System
- Wait 10 seconds
- Press the HomeLink button again
- Confirm garage door opens or closes
How Long Does It Take to Program a Garage Door Opener in a Car?
On average:
- First-time setup: 10–15 minutes
- Basic sync: 5–10 minutes
- Troubleshooting cases: up to 20 minutes
Most users complete setup quickly once timing is understood.
Compatibility: Which Cars Support Garage Programming?
Most modern vehicles support HomeLink, including:
- Toyota
- Honda
- Ford
- BMW
- Mercedes-Benz
- Chevrolet
Newer models often include built-in systems without additional hardware.
Car System vs Traditional Remote
| Feature | Car Integration | Handheld Remote |
|---|---|---|
| Convenience | Very High | Medium |
| Battery Needed | No | Yes |
| Risk of Loss | None | High |
| Setup Difficulty | Medium | Easy |
Common Problems When Programming Garage Opener in Car
1. HomeLink Not Syncing
- Incorrect timing with Learn button
- Old memory interference
2. Garage Door Not Responding
- Weak signal alignment
- Incomplete pairing process
3. Intermittent Operation
- Low system battery
- Signal interference
Expert Insight: Why Integrated Car Systems Matter
Automotive experts highlight that built-in garage control systems reduce driver distraction by eliminating the need for handheld devices. This improves safety and convenience, especially during daily commuting.
Security Benefits of Modern Garage Systems
Most garage door openers today use rolling code technology. This means the access code changes every time the system is used, preventing code copying or replay attacks.
This makes garage systems significantly more secure than older fixed-code remotes.
How To Reset Garage Programming in Your Car
If setup fails:
Reset Steps:
- Hold outer HomeLink buttons for 10–20 seconds
- Wait for indicator light reset
- Release buttons
- Reprogram from beginning
Maintenance Tips for Smooth Operation
To ensure long-term performance:
- Test system monthly
- Replace garage remote batteries yearly
- Keep HomeLink buttons clean
- Ensure garage sensors are aligned
FAQ: How To Program Your Garage Door Opener In Your Car
1. How do I program my garage door opener in my car?
Press the HomeLink button, activate the Learn button on your garage opener, and sync within 30 seconds.
2. Why is my car not connecting to the garage door opener?
Most likely due to timing errors, incompatible system, or incomplete reset.
3. Do all cars support garage door programming?
No, only vehicles with HomeLink or similar integrated systems support this feature.
4. Do I need Wi-Fi to connect my car to garage opener?
No, it uses radio frequency signals, not internet.
5. How many garage doors can I program in my car?
Most systems support up to three garage doors.
6. How do I know if programming worked?
If the garage door responds when pressing the car button, setup is successful.
Conclusion
Learning How To Program Your Garage Door Opener In Your Car is a simple upgrade that improves convenience, safety, and daily efficiency. With just a few steps, you can eliminate the need for a handheld remote and control your garage directly from your vehicle.
This modern integration saves time and makes everyday access smoother and more secure.
If this guide helped you, consider sharing it with friends or family who want an easier way to manage their garage systems.
Leave a Reply