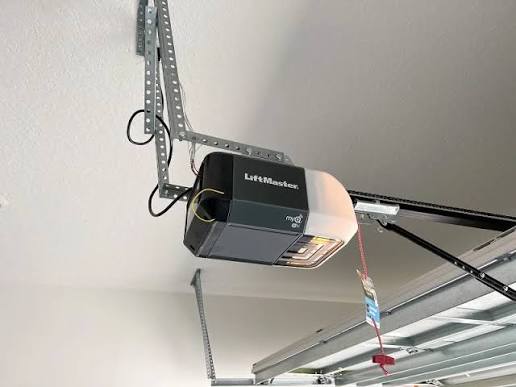
Struggling with a new or replacement remote? Learning how to program a remote for Liftmaster garage door opener doesn’t have to be a frustrating experience. In this comprehensive guide, we will walk you through a simple, step-by-step process to get your garage door working smoothly and securely in just minutes.
How To Program A Remote For Liftmaster Garage Door Opener: Step-by-Step
Programming your garage door remote is a straightforward process if you follow the correct sequence. Most modern Liftmaster openers use a simple “Learn” button system. Follow these exact steps to ensure a successful sync.
Step 1: Locate the Motor Unit
Stand on a sturdy stepladder to safely reach the garage door opener motor unit mounted on your ceiling. You will need clear access to the back or side panel of the device.
Step 2: Clear Old Codes (Optional but Recommended)
If you are replacing a lost remote or suspect a security breach, clear the existing memory. Press and hold the Learn button for about 6 seconds until the indicator LED turns off. This erases all previously programmed remotes and keypads.
Step 3: Activate Programming Mode
Press and quickly release the Learn button. The indicator LED will illuminate steadily (or blink, depending on the model), signaling that the opener is ready to receive a new signal. You have exactly 30 seconds to complete the next step.
Step 4: Sync the Remote
While holding the remote, stand exactly 3 feet (1 meter) away from the motor unit. Press and hold the desired button on your remote control for 3 seconds, then release. You should see the motor unit’s LED blink or hear a distinct click, confirming the code has been accepted.
Step 5: Test the Connection
Step back and press the remote button again. The garage door should activate immediately. If it does not, repeat Steps 3 and 4, ensuring you are within the 30-second window.
Where Is the Learn Button on My Liftmaster Opener?
Finding the Learn button is the most critical part of the process. Its location and color vary based on the manufacturing year and technology of your Liftmaster model.
Typically, the Learn button is located on the back panel of the motor unit, near the hanging antenna wire. In some wall-mounted models (like the Liftmaster 8500), it is found on the side of the unit.
To help you identify your system, refer to this quick compatibility guide:
| Learn Button Color | Technology Era | Key Features |
|---|---|---|
| Yellow | 2011 – Present | Security+ 2.0®; highest encryption; compatible with MyQ® smart devices. |
| Purple | 2005 – 2010 | Security+®; rolling code technology; highly secure against code grabbing. |
| Red | 1997 – 2005 | Security+®; early rolling code; may require specific universal remotes. |
| Green | Pre-1997 | DIP switches; fixed-code technology; considered outdated and less secure. |
Note: If your opener uses green DIP switches, you must manually match the physical switches inside the remote to the switches on the motor unit.
Universal Remotes vs. OEM Liftmaster Remotes
When replacing a remote, homeowners often debate between buying an Original Equipment Manufacturer (OEM) Liftmaster remote or a third-party universal remote. Here is a breakdown to help you decide.
| Feature | OEM Liftmaster Remote | Universal Garage Remote |
|---|---|---|
| Compatibility | Guaranteed for all Liftmaster models. | Varies; check packaging for Liftmaster compatibility. |
| Setup Ease | Plug-and-play with the Learn button. | May require additional dip-switch matching or specific code entry. |
| Smart Features | Often includes MyQ® or HomeLink® integration. | Rarely supports advanced smart home ecosystems. |
| Price Point | Higher ($30–$50). | Budget-friendly ($15–$25). |
For maximum reliability and seamless integration with modern smart home systems, an OEM remote is highly recommended. Modern Liftmaster openers utilize advanced rolling code technology to change the access code every time the remote is used, preventing thieves from intercepting and replaying your signal.
Why Won’t My Liftmaster Remote Program? (Troubleshooting)
Even with careful steps, programming can occasionally fail. According to garage door industry experts, over 60% of programming failures are simply due to depleted remote batteries or local signal interference.
Before calling a technician, check these common culprits:
- Dead Batteries: Replace the remote’s battery with a fresh CR2032 or 12V battery (depending on the model). Ensure the positive (+) side is facing up.
- Distance Issues: Standing too far away weakens the signal. Always program the remote within 3 to 5 feet of the motor unit.
- LED Light Bulb Interference: Some energy-efficient LED bulbs emit electromagnetic frequency (EMF) noise that blocks the remote’s signal. If your opener has LED bulbs, try turning them off or removing them temporarily during programming.
- Opener Lock Mode: Check your wall control panel. If the “Lock” or “Vacation” button is activated, the opener will ignore all remote signals. Press and hold the Lock button for 2 seconds to disable it.
Frequently Asked Questions (FAQ)
Q1: How do I reset my Liftmaster garage door opener before programming?
To reset the opener’s memory, locate the Learn button on the motor unit. Press and hold it for approximately 6 seconds until the indicator light turns off. This wipes all paired remotes and keypads, allowing you to start with a clean slate.
Q2: Can I program a universal remote to a Liftmaster garage door?
Yes, most universal remotes manufactured after 2005 are compatible with Liftmaster openers that feature a colored Learn button (Yellow, Purple, or Red). Always verify the packaging states compatibility with “Security+” or “Security+ 2.0” systems.
Q3: What do the different colored Learn buttons mean on Liftmaster?
The color indicates the security technology and manufacturing era. Yellow means Security+ 2.0 (2011+), Purple means Security+ (2005-2010), Red means early Security+ (1997-2005), and Green indicates obsolete DIP-switch technology (pre-1997).
Q4: How many remotes can I program to one Liftmaster opener?
Most modern Liftmaster garage door openers can store up to 8 different remote controls and wireless keypads simultaneously. Older models may have a lower limit, so consult your specific owner’s manual for exact capacity.
Conclusion
Knowing how to program a remote for Liftmaster garage door opener empowers you to maintain your home’s security and convenience without relying on costly professional services. By identifying your Learn button color, following the precise 30-second programming window, and troubleshooting common interference issues, you can ensure your garage door operates flawlessly.
Did you find this guide helpful? Share this article with your friends and family on social media to help them master their garage door setup too! Don’t forget to bookmark this page for future reference.
Leave a Reply