Introduction
Upgrading your home’s curb appeal or replacing a damaged entry can feel overwhelming when your garage is constructed of solid masonry rather than standard wood framing. Many US homeowners struggle with how to install a garage door in a brick wall because traditional nailing methods simply do not work on stone or clay surfaces. This guide provides an empathetic, safety-first approach to help you navigate masonry anchoring, proper framing, and structural integrity without compromising your home’s foundation.
Whether you are tackling this as an advanced DIY project or preparing to hire a contractor, understanding the unique challenges of brick installations ensures your new door operates smoothly and safely for decades. Let’s break down the process into manageable, code-compliant steps tailored specifically for American residential construction standards.
Why Is Installing a Garage Door in Brick Different?
Before picking up a hammer drill, it is crucial to understand why masonry requires specialized techniques. Unlike wood stud walls where nails provide shear strength, brick relies entirely on mechanical friction and chemical adhesion through masonry anchors.
According to structural engineering principles documented on Wikipedia, brickwork has high compressive strength but significantly lower tensile strength. This means that while the wall can support immense weight from above, it can crack or spall if lateral forces from garage door springs and tracks are not properly distributed.
Key Differences at a Glance
| Feature | Wood Frame Wall | Brick/Masonry Wall |
|---|---|---|
| Fastener Type | Nails/Screws | Sleeve Anchors/Tapcons/Epoxy |
| Load Distribution | Studs & Plates | Buck Frames & Spreaders |
| Drilling Required | Minimal | Extensive (Hammer Drill) |
| Sealing Method | Caulk/Flashing | Mortar Sealant/Foam Backer |
| Risk Factor | Low | High (Cracking/Spalling) |
What Tools and Materials Do You Need for Brick Installation?
Success depends heavily on having the correct masonry-specific gear. Standard carpentry tools will fail or create unsafe conditions.
- Rotary Hammer Drill: Not a standard drill; you need impact energy to penetrate mortar and brick without shattering them.
- Carbide-Tipped Masonry Bits: Sized precisely to match your anchor specifications (typically 3/16” to 5/8”).
- Masonry Anchors: Use sleeve anchors or epoxy-set anchors rated for dynamic loads. Avoid plastic plugs for overhead doors.
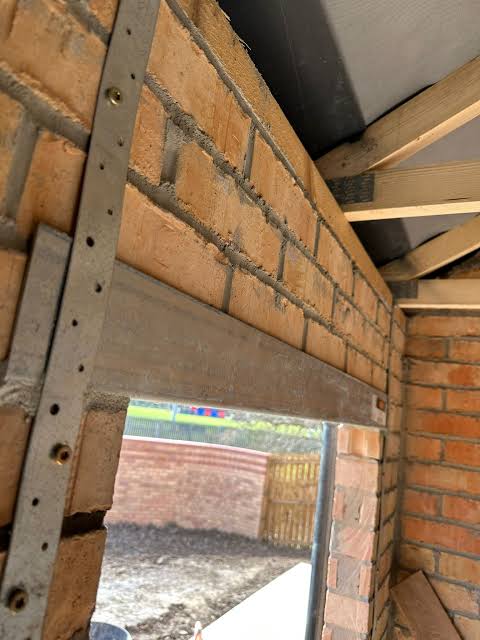
- Steel Buck Frame or Treated Lumber: Creates a nailable surface inside the brick opening.
- Non-Shrink Grout or Polyurethane Sealant: For weatherproofing gaps between steel/wood and masonry.
- Level and Laser Measure: Brick openings are rarely perfectly square; precision measurement prevents binding.
- Safety Gear: ANSI-rated eye protection, N95 respirator (silica dust hazard), and hearing protection.
Expert Note: Always verify anchor pull-out ratings against your specific door manufacturer’s wind load requirements. The International Residential Code (IRC) Section R309 mandates that garage doors withstand positive and negative pressure loads based on your regional wind zone.
How To Install A Garage Door In A Brick Wall: Step-by-Step
This tutorial assumes you have already removed the old door and verified the structural header above the opening is sound. If the lintel shows cracks or deflection, stop immediately and consult a structural engineer.
Step 1: Assess and Square the Opening
Brick openings often settle over time. Measure the width at the top, middle, and bottom, plus both diagonals. Record all measurements to the nearest 1/16 inch. If the opening is out of square by more than 1/4 inch, you must build out the frame asymmetrically to compensate before installing tracks.
Step 2: Install the Buck Frame or Nailers
You cannot bolt door tracks directly to brick reliably. Instead, install a perimeter frame:
- Cut pressure-treated 2×6 lumber or steel buck jambs to fit the opening height minus 1/2 inch for shim space.
- Position the jamb plumb using a level. Mark anchor locations every 16 inches vertically, avoiding mortar joints where possible.
- Drill pilot holes through the wood and into brick using your rotary hammer. Depth should exceed anchor length by 1/2 inch.
- Clean holes thoroughly with compressed air and wire brush—dust reduces anchor holding capacity by up to 50%.
- Insert epoxy or sleeve anchors and torque to manufacturer specs (typically 25–40 ft-lbs). Over-torquing cracks brick.
Step 3: Flash and Seal the Perimeter
Water intrusion is the #1 failure point in brick garage installations. Apply a continuous bead of polyurethane sealant behind the buck frame before final tightening. After anchoring, fill any voids between the frame and brick with non-shrink grout or closed-cell backer rod topped with elastomeric sealant. This creates both a thermal break and moisture barrier compliant with IECC energy codes.
Step 4: Mount Tracks and Hardware to the Frame
Now treat the installed buck frame like a standard wood opening. Attach vertical tracks using lag screws into the treated lumber—not into brick. Ensure track brackets align within 1/8 inch tolerance across both sides to prevent roller bind. Install torsion spring system per manufacturer instructions, noting that spring tension calculations differ slightly when mounted to masonry-backed frames due to reduced flex.
Step 5: Test Balance and Safety Reversal
Before declaring victory, perform mandatory safety checks:
- Balance Test: Disconnect opener and manually lift door halfway. It should stay in place. If it rises or falls, adjust spring tension.
- Reversal Test: Place a 2×4 flat on the floor under the door center. Close via opener; door must reverse upon contact within 2 seconds per CPSC standards.
- Photo-Eye Alignment: Verify sensors detect obstructions at 6 inches above grade.
Common Mistakes When Mounting to Masonry
Avoid these costly errors that compromise safety and longevity:
- Anchoring Into Mortar Joints Only: Mortar is weaker than brick and deteriorates faster. Alternate between brick and joint when possible, prioritizing brick for primary load points.
- Skipping Hole Cleaning: Silica dust acts as lubricant, preventing anchor expansion. Always blow out holes.
- Using Undersized Anchors: Garage doors exert cyclic loading. Minimum 3/8” diameter wedge or sleeve anchors are recommended for residential sectional doors.
- Ignoring Thermal Expansion: Steel frames expand/contract differently than brick. Leave 1/8” gap filled with flexible sealant to prevent cracking during temperature swings.
- DIY Beyond Skill Level: If you lack rotary hammer experience or structural assessment skills, budget $400–$800 for professional masonry prep. The cost pales compared to repairing a collapsed header or injured person.
Frequently Asked Questions (FAQ)
Can I install a garage door directly into brick without a wood frame?
Technically yes, but it is strongly discouraged for residential sectional doors. Direct-to-brick mounting concentrates stress on individual anchors, risking pull-out under wind load or spring tension. A buck frame distributes force across multiple attachment points and provides a serviceable nailing surface for future adjustments.
What size masonry anchor should I use for a standard 16×7 garage door?
For typical residential doors, use 3/8” x 3” sleeve anchors or epoxy-set anchors spaced no more than 16 inches apart on vertical jambs. Header connections may require 1/2” anchors depending on door weight and local wind codes. Always defer to your door manufacturer’s installation manual for exact specifications.
How do I know if my brick wall can support a heavier insulated door?
Inspect the existing lintel (steel angle or concrete beam above the opening). Signs of distress include stepped cracking, rust staining, or sagging. If upgrading from single-layer to double-insulated steel (+50 lbs), have a structural engineer verify lintel capacity. Most modern US homes built post-1980 accommodate standard upgrades, but historic masonry may need reinforcement.
Is silicone or polyurethane sealant better for brick-to-frame gaps?
Polyurethane sealant is superior for garage door applications. It offers higher movement capability (±25% vs ±12%), better UV resistance, and stronger adhesion to porous masonry. Silicone tends to fail prematurely on dusty brick surfaces and lacks paintability for aesthetic matching.
Do I need a permit to replace a garage door in a brick wall?
In most US jurisdictions, yes—especially when modifying masonry anchorage or altering the opening size. Permits ensure compliance with IRC wind load and egress requirements. Check with your local building department; unpermitted work can void insurance claims and complicate future home sales.
Conclusion
Learning how to install a garage door in a brick wall empowers you to enhance your home’s security, efficiency, and value—but only when done with respect for masonry’s unique properties. By using proper anchors, installing a dedicated buck frame, sealing meticulously, and adhering to safety testing protocols, you achieve results rivaling professional installations. Remember: patience and precision always outweigh speed when working with brick.
If this guide helped you navigate your masonry garage door project, please share it on social media to assist fellow homeowners facing similar challenges. Tag us in your progress photos—we’d love to celebrate your safe, successful installation! Your next upgrade deserves the same careful attention to detail. Stay safe, build smart, and enjoy the confidence of a job done right.
Leave a Reply