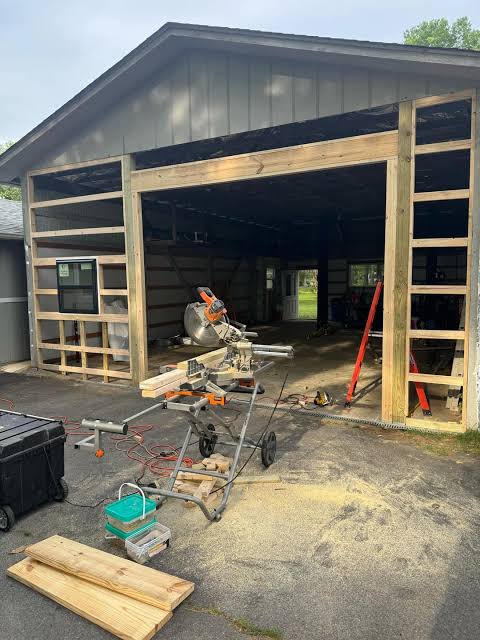
Introduction
Building a post-frame structure is an exciting milestone, but figuring out how to frame a garage door in a pole barn often causes significant anxiety for first-time builders. You need a rough opening that is perfectly square, structurally sound, and capable of supporting the massive weight of modern overhead doors without compromising the building’s integrity. This guide breaks down the exact framing process into manageable steps so you can install your door with confidence and avoid costly structural mistakes.
Understanding Pole Barn Door Framing Basics
Before picking up a hammer, it is vital to understand why pole barn framing differs from traditional stick-built construction. In standard residential framing, doors are placed between studs on a flat concrete foundation. In post-frame construction, the door opening interrupts the primary load-bearing columns.
According to industry standards referenced in Wikipedia’s overview of post-frame construction, these buildings rely on large, spaced columns rather than continuous stud walls. This means your garage door header must transfer roof and wind loads laterally to the adjacent columns. If this load path is interrupted or undersized, you risk sagging headers, door binding, or even partial collapse during heavy snow loads.
Key Terminology for Beginners
- Rough Opening (RO): The framed space before drywall or steel liners; typically 2–3 inches wider and taller than the actual door size.
- Header: The horizontal beam spanning the top of the door that carries structural loads.
- Jamb Post: The vertical members on either side of the door opening.
- Wind Bracing: Diagonal or horizontal members preventing lateral movement around the large opening.
What Size Header Do I Need for a Pole Barn Garage Door?
This is the most critical question in the planning phase. There is no universal “one-size-fits-all” answer because header sizing depends on span, roof pitch, snow load, and column spacing. However, general engineering guidelines for US climates provide a reliable starting point.
| Door Width | Typical Snow Load | Recommended Header Size | Notes |
|---|---|---|---|
| 8′ – 10′ | 20–30 PSF | Double 2×10 or LVL | Suitable for light storage |
| 10′ – 14′ | 30–40 PSF | Double 2×12 or 1-3/4″ LVL | Standard residential shop |
| 14′ – 18′ | 40+ PSF | Engineered LVL or Glulam | Requires engineer stamp |
| 18’+ | Variable | Steel I-Beam or Truss Header | Commercial/agricultural use |
Expert Insight: Always consult your local building department or a structural engineer. Soil conditions and regional wind codes in the US vary dramatically. A header adequate for Texas may fail catastrophically in Minnesota. Investing $300 in engineered drawings saves thousands in repairs.
For most DIYers learning how to frame a garage door in a pole barn, using Laminated Veneer Lumber (LVL) is superior to dimensional lumber. LVLs resist warping, shrinking, and twisting, ensuring your expensive garage door tracks remain aligned for decades.
Step-by-Step: How To Frame A Garage Door In A Pole Barn
Follow this precise sequence to ensure structural safety and operational smoothness.
Step 1: Verify Your Rough Opening Dimensions
Never assume your door size equals your frame size. Check the manufacturer’s installation manual. For a standard 9’x7’ residential door, the rough opening is typically 9’3” wide by 7’3” tall. Mark these dimensions clearly on your posts using a lumber crayon. Measure diagonally to confirm squareness; both diagonal measurements must be identical within 1/8 inch.
Step 2: Install Temporary Support Bracing
Before cutting any existing girts or modifying columns, install temporary 2×4 braces across the intended opening. Secure them to adjacent posts at 45-degree angles. This prevents wall racking while you work. Safety Warning: Never remove structural members without temporary support. Collapse risk is real and immediate.
Step 3: Set the Jamb Posts
Install pressure-treated 4×6 or 6×6 jamb posts (depending on your building’s column spec) at each side of the opening. These must be:
- Perfectly plumb (check on two faces)
- Set at the correct depth to align with exterior steel siding
- Bolted through to the main truss-bearing columns using 1/2” galvanized carriage bolts
Use shims as needed. A 1/4” error here translates to significant track misalignment later.
Step 4: Install the Structural Header
Cut your header material to length, allowing 1.5” bearing on each jamb post minimum. For double dimensional lumber, nail together with 16d nails in a staggered pattern every 12”. Lift the header into position and secure with structural screws or through-bolts. Critical Detail: Install metal hurricane ties or joist hangers rated for post-frame use at each header-to-post connection. Nails alone do not meet code for uplift resistance in most US jurisdictions.
Step 5: Add Cripple Studs and Blocking
Install vertical cripple studs between the header and the top plate/truss chord at 16” or 24” centers, matching your building’s girt spacing. Add horizontal blocking at mid-height for attaching interior liner panels and providing nailing surfaces for weather sealing. This step is frequently skipped by novices but is essential for preventing air infiltration and supporting insulation.
Step 6: Integrate Wind Bracing
Large openings weaken the shear capacity of pole barn walls. Install diagonal steel cable bracing or let-in wood braces from the header corners to adjacent posts. Follow your engineered plans precisely. In high-wind zones (Florida, Gulf Coast, Midwest tornado alleys), this bracing is non-negotiable and must pass inspection.
Step 7: Flashing and Weather Integration
Frame the exterior sill with pressure-treated lumber sloped slightly outward. Install self-adhering flashing tape at all corners and seams before applying exterior steel. Water management at the door threshold is where most pole barn leaks originate. Use closure strips compatible with your siding profile to seal gaps between steel and framing.
Common Mistakes When Framing Pole Barn Garage Doors
Avoiding errors is as important as following correct procedures. Here are frequent pitfalls observed in field inspections:
- Undersizing Headers: Using single 2x10s for 12’ spans. Always err toward over-engineering.
- Ignoring Uplift Connections: Relying solely on gravity. Wind can lift unsecured headers off posts.
- Framing Out of Square: Causing door panels to bind and motors to burn out prematurely.
- Skipping Pressure Treatment: Using untreated lumber at grade-level sills invites rot within 3–5 years.
- Neglecting Insulation Gaps: Failing to plan for spray foam or batt insulation around the header creates thermal bridges and condensation issues.
FAQ: Pole Barn Garage Door Framing Questions
Can I frame a garage door myself, or do I need a contractor?
You can frame it yourself if you have intermediate carpentry skills and access to engineered plans. However, if your span exceeds 14’, involves complex roof intersections, or is in a high-seismic/high-wind zone, hire a licensed post-frame contractor. Building permits and inspections are mandatory in most US counties.
How much does it cost to frame a garage door opening in a pole barn?
Material costs for a standard 9’x7’ opening range from $250–$600 depending on header type and hardware. Labor adds $400–$1,200 if hired. Engineered stamps add $200–$500. Budget approximately $800–$1,500 total for a code-compliant, professionally verified installation excluding the door itself.
Should I use wood or steel headers for my pole barn garage door?
For spans under 14’, LVL wood headers offer excellent strength-to-cost ratios and easy field modification. For spans over 16’ or commercial applications, steel tube headers or open-web trusses provide superior deflection control. Steel requires welding or specialized bolting but eliminates shrinkage concerns entirely.
How do I ensure my framed opening stays square over time?
Use properly sized, fastened headers with adequate bearing. Install permanent wind bracing per engineering specs. Allow green lumber to dry before installing door tracks, or use kiln-dried/LVL materials exclusively. Re-check squareness after roof sheathing is installed, as truss settlement can shift openings slightly.
What permits are required for framing a garage door in a pole barn?
Most US jurisdictions require a building permit for any structural modification, including new door openings. You’ll typically need site plans, engineered header calculations, and possibly energy compliance documentation. Processing times average 2–6 weeks. Starting without permits risks fines, forced demolition, and insurance claim denials.
How close can a garage door be to a pole barn corner?
Maintain a minimum 24-inch setback from corner posts to allow for proper jamb post installation, bracing, and trim clearance. Closer placements compromise structural integrity and make weather sealing nearly impossible. Always verify against your specific engineered drawings, as some designs require greater setbacks based on wind load calculations.
Conclusion: Build It Right the First Time
Mastering how to frame a garage door in a pole barn comes down to respecting structural physics, following engineered specifications, and executing precise craftsmanship. The right header, proper connections, and meticulous squaring transform a vulnerable opening into a durable, functional asset that serves your property for decades. Cutting corners here guarantees expensive callbacks; doing it correctly delivers peace of mind and lasting value.
Found this guide helpful? Share it with fellow builders on Facebook, Pinterest, or your favorite woodworking forum! Tag us in your pole barn build photos—we love seeing your projects come to life safely and successfully. Happy building! 🏗️
Leave a Reply