If your garage door won’t close or suddenly reverses, faulty sensors are often the reason. Many homeowners search for how to fix the sensors on a garage door when faced with this frustrating and potentially unsafe issue. The good news is that most sensor problems are easy to diagnose and fix without calling a professional.
What Do Garage Door Sensors Do?
Garage door sensors, also known as photo-eye sensors, are safety devices that prevent the door from closing if something is in its path.
Read too: How Do You Change Code On Garage Door Keypad Fast?
How They Work:
- One sensor sends an infrared beam
- The other receives it
- If the beam is interrupted, the door stops or reverses
This system became mandatory in the U.S. after safety regulations introduced in the 1990s to prevent injuries.
For more about sensor technology, see:
https://en.wikipedia.org/wiki/Photoelectric_sensor
How To Fix The Sensors On A Garage Door (Step-by-Step)
Step 1: Check for Obstructions
Before doing anything technical:
- Look for objects blocking the sensor beam
- Remove dirt, leaves, or debris
- Ensure nothing is between the sensors
✔️ This is the most common and easiest fix.
Step 2: Clean the Sensor Lenses
Dust and grime can block the infrared signal.
How to clean properly:
- Use a soft microfiber cloth
- Gently wipe both sensor lenses
- Avoid water or harsh chemicals
💡 Even a thin layer of dust can disrupt the signal.
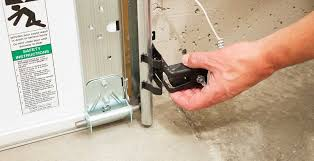
Step 3: Inspect Sensor Alignment
Misaligned sensors are a leading cause of failure.
Signs of Misalignment:
- Blinking LED lights
- Door won’t close fully
- Intermittent operation
Fix alignment:
- Loosen the mounting brackets slightly
- Adjust sensors until both LEDs are solid (not blinking)
- Tighten screws securely
📏 Sensors should face each other directly at the same height (usually 4–6 inches above ground).
Step 4: Check Wiring Connections
Loose or damaged wires can interrupt the signal.
What to look for:
- Frayed wires
- Loose terminals
- Disconnected cables
Fix:
- Reconnect loose wires
- Replace damaged sections if needed
⚠️ Always disconnect power before handling wires.
Step 5: Test the Sensors
After adjustments:
- Close the garage door
- Wave an object in front of the sensors
- Ensure the door reverses immediately
✔️ This confirms the safety system is working.
Step 6: Reset the Garage Door Opener
Sometimes a simple reset solves the issue.
How to reset:
- Unplug the opener
- Wait 30–60 seconds
- Plug it back in
Common Problems and Quick Fixes
| Problem | Cause | Solution |
|---|---|---|
| Blinking sensor lights | Misalignment | Adjust sensor position |
| Door won’t close | Blocked beam | Remove obstruction |
| No LED light | Power issue | Check wiring or power source |
| Intermittent closing | Dirty lenses | Clean sensors |
Why Garage Door Sensors Fail
Understanding the root cause helps prevent future issues.
Top Reasons:
- Dirt and debris buildup
- Accidental bumps or movement
- Aging components (5–10 years lifespan)
- Electrical issues or moisture exposure
🔧 Expert Insight: Regular maintenance can reduce sensor failures by up to 40%.
Safety Tips When Fixing Garage Door Sensors
Working with garage doors involves some risk.
Follow These Guidelines:
- Always disconnect power before repairs
- Never bypass sensors permanently
- Keep children and pets away during testing
- Use proper tools and stable ladders
🚫 Disabling sensors can lead to serious injury or property damage.
Advantages vs Disadvantages of DIY Sensor Repair
Advantages:
- Saves money on service calls
- Quick and easy fixes
- No special tools required
Disadvantages:
- Limited to minor issues
- Risk of improper alignment
- May not fix deeper electrical problems
When Should You Replace Garage Door Sensors?
Sometimes repair isn’t enough.
Replace sensors if:
- LED lights don’t turn on at all
- Wiring is severely damaged
- Sensors are older than 8–10 years
- Repeated issues despite fixing
💡 Replacement sensors typically cost $20–$80, making them an affordable solution.
Preventive Maintenance Tips
Keep your sensors working longer with simple habits:
- Clean lenses every 1–2 months
- Check alignment quarterly
- Inspect wiring annually
- Avoid hitting sensors with objects
Consistency prevents unexpected failures.
FAQ: How To Fix The Sensors On A Garage Door
1. Why is my garage door sensor blinking?
Blinking usually indicates misalignment or obstruction between the sensors.
2. Can I bypass garage door sensors?
You can temporarily override them, but it’s unsafe and not recommended as a permanent solution.
3. How do I know if my sensors are aligned?
Both sensor LED lights should be solid (not blinking) when properly aligned.
4. What causes garage door sensors to stop working suddenly?
Common causes include dirt, wiring issues, or accidental misalignment.
5. How much does it cost to fix garage door sensors?
DIY fixes are often free, while professional repairs range from $75–$150.
6. How long do garage door sensors last?
Typically 5–10 years, depending on usage and maintenance.
Conclusion
Learning how to fix the sensors on a garage door can save you time, money, and frustration. Most issues—like misalignment, dirt, or loose wiring—can be resolved in just a few minutes with simple tools.
By maintaining your sensors regularly, you ensure your garage door operates safely and efficiently. If you found this guide helpful, share it on social media and help others keep their garage doors running smoothly and safely!
Leave a Reply