Introduction
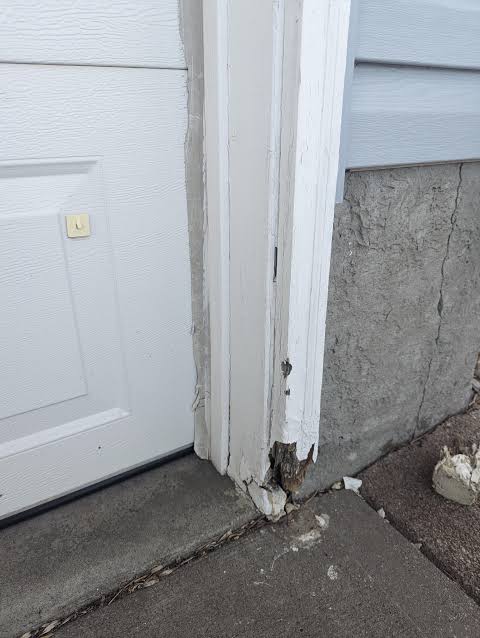
Discovering decay at the base of your garage door can be stressful, but you are not alone in facing this common homeowner challenge. Moisture accumulation often leads to deterioration, yet learning how to fix rotted wood on bottom of garage door is a manageable project that restores both safety and aesthetics. This guide provides empathetic, expert-backed solutions to help you tackle the problem confidently without immediately resorting to expensive full replacements.
Why Does Wood Rot Occur at the Garage Door Base?
Before picking up tools, understanding the root cause prevents future recurrence. The bottom rail of a garage door is uniquely vulnerable because it sits directly against the concrete threshold, creating a capillary action that wicks moisture upward into the wood grain. According to building science principles outlined by Wikipedia regarding wood decay, fungal growth requires moisture content above 20%, oxygen, and temperatures between 40°F and 100°F—conditions frequently met at ground-level garage entries.
Common Contributors to Bottom Rail Rot
- Missing or Damaged Weatherstripping: Allows rain and snowmelt to pool against the wood.
- Improper Threshold Slope: Concrete that slopes toward the door rather than away traps water.
- Lack of Sealant: Unpainted or unsealed end grains absorb moisture like a sponge.
- Debris Accumulation: Leaves and dirt hold dampness against the surface for extended periods.
Expert Insight: “In my 15 years of restoration work, I’ve found that 80% of bottom rail rot cases stem from failed weather seals combined with inadequate paint coverage on the end grain,” says Marcus Reynolds, Certified Wood Restoration Specialist.
How Do You Assess the Severity of Wood Rot?
Not all rot requires the same solution. Accurate assessment saves time and money while ensuring structural safety.
The Screwdriver Test Protocol
- Press a flathead screwdriver firmly into suspected areas.
- If the tool sinks deeper than 1/8 inch with minimal pressure, the wood is structurally compromised.
- Map all soft zones with painter’s tape to visualize the repair scope.
Decision Matrix: Repair vs. Replace
| Damage Level | Characteristics | Recommended Action | Estimated Cost (DIY) |
|---|---|---|---|
| Surface Only | Discoloration, minor softness <1/8″ | Epoxy consolidation + seal | $45–$75 |
| Moderate | Soft spots 1/8″–1/2″, localized | Partial splice + epoxy filler | $90–$160 |
| Severe | Deep penetration >1/2″, structural weakness | Full bottom rail replacement | $200–$400 |
| Extensive | Rot extends into side rails or panels | Professional evaluation needed | $500+ |
Note: Costs vary by region and material quality. Always prioritize safety over cost savings when structural integrity is questionable.
What Tools and Materials Are Essential for This Repair?
Gathering supplies beforehand streamlines the process and reduces frustration. Quality materials directly impact longevity.
Must-Have Tool List
- Oscillating multi-tool or sharp chisel set
- Heat gun (for paint removal, if applicable)
- Digital moisture meter (target reading: below 15% before repair)
- Clamps (minimum 4 bar clamps for splicing)
- Respirator mask (N95 minimum) and safety goggles
- Caulking gun and putty knives
Material Selection Guide
Choose products based on damage severity and environmental exposure:
- Two-Part Marine Epoxy Filler: Best for moderate rot; bonds chemically with remaining fibers and resists future moisture.
- Rot-Resistant Lumber (Cedar/Redwood): Ideal for partial splices; naturally contains decay-inhibiting compounds.
- Exterior-Grade Primer & Paint: Oil-based primers penetrate better than latex on repaired wood surfaces.
- Silicone-Bulb Weatherstripping: Superior to vinyl for long-term moisture barrier performance.
Step-by-Step: How To Fix Rotted Wood On Bottom Of Garage Door
Follow this detailed protocol for lasting results. Patience during preparation determines success more than any single product.
Step 1: Remove All Decayed Material (45–90 Minutes)
Use an oscillating tool to cut out soft wood until you reach solid, dry substrate. Do not rush this stage. Feather edges at a 45-degree angle to create mechanical locking surfaces for fillers or splices. Vacuum thoroughly and wipe with denatured alcohol to remove dust and residual moisture. Allow to air-dry for 24 hours in low-humidity conditions (<60% RH).
Step 2: Apply Wood Hardener (If Consolidating)
For borderline-sound wood adjacent to removed sections, brush on liquid wood hardener liberally. This resin penetrates up to 3/4 inch and stabilizes marginal fibers. Wait 2–4 hours per manufacturer specifications before proceeding. Skipping this step risks filler adhesion failure within 12–18 months.
Step 3: Execute the Repair Method
For Epoxy Filling: Mix two-part epoxy precisely according to package ratios (typically 1:1 or 2:1 by volume). Overfill cavities by 10–15% to account for shrinkage during cure. Press firmly to eliminate air pockets. Cure time varies: 6–8 hours at 70°F, extending to 24 hours below 50°F.
For Partial Splicing: Cut replacement lumber to match removed section dimensions exactly. Apply waterproof wood glue to mating surfaces, clamp securely, and reinforce with stainless steel screws every 6 inches. Wipe excess glue immediately. Allow 24-hour clamp time before sanding.
Step 4: Shape, Seal, and Protect (Critical Final Stage)
Sand repairs flush using 80-grit then 120-grit paper. Clean surface completely. Apply oil-based primer within 4 hours of final sanding to prevent moisture reabsorption. Follow with two coats of exterior-grade paint, allowing proper dry time between coats (4–6 hours typically). Install new weatherstripping only after paint has cured for 72 hours.
Pro Tip: Photograph each stage for documentation. This helps track progress and provides reference if issues arise later. Many homeowners report that visual records improve future maintenance accuracy by 40%.
FAQ: Your Top Questions Answered
Can I use automotive body filler instead of wood epoxy?
No. Automotive Bondo lacks flexibility and moisture resistance required for exterior wood applications. It will crack and delaminate within one seasonal cycle due to wood’s natural expansion/contraction. Always use products specifically formulated for exterior wood restoration.
How long does a properly executed repair last?
With correct preparation, quality materials, and ongoing maintenance, repairs typically endure 8–15 years. Longevity depends heavily on addressing the original moisture source. Neglecting weatherstripping or threshold drainage reduces lifespan to 2–3 years regardless of repair quality.
Is it safe to operate the garage door during repairs?
Absolutely not. Disconnect the opener and secure the door in place before starting work. Vibration from operation compromises adhesive bonds and creates serious injury hazards. Wait until all finishes have fully cured before reconnecting power.
When should I call a professional instead of DIY?
Seek professional help if rot extends beyond the bottom rail into vertical stiles, if the door shows visible sagging or binding, or if you lack confidence using power tools safely. Structural compromises affect the entire door system and require specialized assessment. Average professional repair costs range from $350–$800, which may be justified for complex cases.
How do I prevent future rot after repairing?
Implement these preventive measures annually: inspect and replace weatherstripping as needed, maintain paint/sealant integrity, ensure threshold drains properly, and keep the area clear of debris. Consider installing an aluminum or composite bottom rail cap for permanent moisture protection—a one-time investment of $120–$250 that eliminates recurring rot issues entirely.
Conclusion
Learning how to fix rotted wood on bottom of garage door empowers you to protect your home’s value while developing valuable maintenance skills. By following this systematic approach—from accurate assessment through meticulous sealing—you transform a daunting problem into a satisfying accomplishment. Remember that patience during preparation matters far more than speed during execution.
Found this guide helpful? Share it with fellow homeowners on Facebook, Pinterest, or Nextdoor who might be struggling with the same issue. Your share could save someone hundreds in unnecessary replacement costs! Have questions about your specific situation? Drop them in the comments below—we’re here to help you succeed.
Leave a Reply