Garage doors are heavy—often weighing hundreds of pounds—and the springs are the unsung heroes that make lifting them feel effortless. When one snaps, it’s not just an inconvenience; it can be dangerous and leave your car trapped inside. If you are wondering how to fix a broken spring on a garage door, you are likely looking for a solution that is both safe and effective. While some minor adjustments can be DIY-friendly, spring replacement is widely considered one of the most hazardous home repairs due to the extreme tension involved.
In this guide, we will walk you through identifying the type of spring you have, understanding the risks, and deciding whether to tackle the repair yourself or call a professional. We prioritize your safety above all else, providing clear, actionable advice based on industry standards.
Identifying Your Garage Door Spring Type
Before you can address the issue, you must know what you are dealing with. Garage doors typically use one of two types of springs: torsion springs or extension springs. The repair process differs significantly between the two.
Torsion Springs
Torsion springs are mounted horizontally above the closed garage door, on a metal shaft. They work by twisting (torque) to store energy. These are common in modern homes because they are more durable and provide smoother operation.
- Location: Above the door opening.
- Appearance: A tight coil of thick wire on a central bar.
- Risk Level: Extremely High. These springs are under immense tension even when the door is closed.
Extension Springs
Extension springs are located on either side of the door, parallel to the horizontal tracks. They stretch out to lift the door.
- Location: Alongside the upper tracks.
- Appearance: Long coils that expand and contract.
- Risk Level: High. If they snap, they can fly across the room if not contained by a safety cable.
Pro Tip: Look for a safety cable running through the center of extension springs. If yours don’t have one, installing them is a critical safety upgrade before any repair work begins.
Why Do Garage Door Springs Break?
Understanding why a spring fails can help you prevent future issues. According to industry data, the average garage door spring is rated for approximately 10,000 cycles. One cycle equals one opening and one closing.
| Factor | Impact on Spring Life |
|---|---|
| Usage Frequency | Heavy daily use accelerates wear. A family with multiple cars may hit 10,000 cycles in 5–7 years. |
| Lack of Lubrication | Friction causes metal fatigue. Unlubricated springs wear out faster. |
| Temperature Fluctuations | Extreme cold makes metal brittle; heat can weaken tension. |
| Poor Installation | Incorrect winding or sizing puts undue stress on the spring. |
If your door is older than 7 years and sees frequent use, a break is statistically likely. For more detailed mechanical principles of torsion systems, you can refer to general engineering resources such as Wikipedia’s entry on torsion mechanics.
Safety First: Critical Warnings Before You Start
Stop and read this section carefully. Fixing a broken spring is not like changing a lightbulb. The potential energy stored in a wound torsion spring is enough to cause severe injury or death if released uncontrollably.
- Never attempt to repair a torsion spring without proper tools. You need specific winding bars designed for this task. Using screwdrivers or pry bars is extremely dangerous as they can slip.
- Disconnect the opener. Always unplug the garage door opener to prevent accidental activation.
- Secure the door. Use locking pliers or C-clamps on the track below the bottom roller to keep the door from falling while you work.
- Wear protective gear. Safety glasses and heavy-duty gloves are non-negotiable.
If you feel unsure at any point, do not proceed. There is no shame in calling a professional. In fact, most manufacturers’ warranties become void if an untrained individual attempts the repair.
Step-by-Step: How to Fix a Broken Extension Spring
If you have extension springs, the repair is slightly less complex but still requires caution. Here is a general overview of the process.
- Release Tension Safely: Open the door fully and secure it with clamps. This releases the tension on the extension springs.
- Remove the Old Spring: Unhook the spring from the pulley system and the rear track hanger. Be careful of any remaining tension.
- Install the New Spring: Ensure the new spring matches the old one in length, wire diameter, and color code (which indicates tension strength). Hook it into place.
- Reconnect Safety Cables: Thread the safety cable through the new spring and secure it at both ends. This is vital to contain the spring if it breaks again.
- Test the Balance: Remove the clamps and manually lift the door halfway. It should stay in place. If it falls or rises, the tension is incorrect.
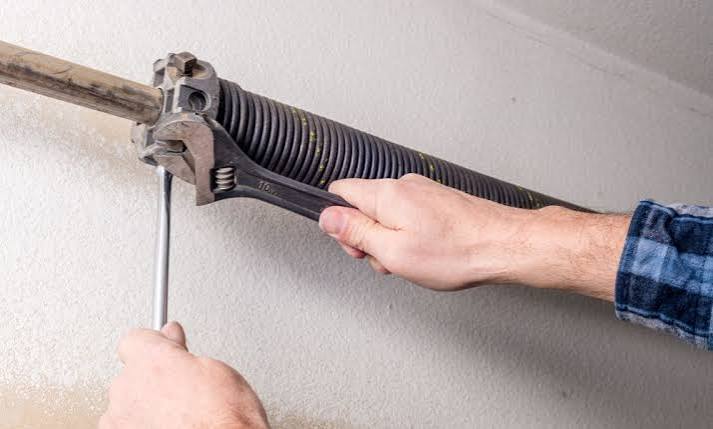
Step-by-Step: How to Fix a Broken Torsion Spring
Warning: This procedure is for informational purposes only. Due to the high risk, we strongly recommend hiring a certified technician for torsion spring replacement. If you are a skilled DIYer with the right tools, here is the general workflow.
- Gather Tools: You will need two steel winding bars (usually 1/2 inch diameter), a socket set, and locking pliers.
- Secure the Door: Close the door and clamp the tracks securely below the bottom rollers.
- Unwind the Old Spring: Insert a winding bar into the hole of the winding cone. Slowly release the tension by moving the bar downward. Keep a firm grip. Repeat until all tension is released.
- Remove the Spring: Loosen the set screws on the winding cone and the stationary cone. Slide the old spring off the shaft.
- Install the New Spring: Slide the new spring onto the shaft. Align the winding cone and stationary cone. Tighten the set screws securely.
- Wind the New Spring: This is the most critical step. You must wind the spring the correct number of quarter-turns. This is calculated based on the door’s height. For example, a 7-foot door typically requires 30 quarter-turns (7.5 full turns). Use your winding bars to apply tension evenly.
- Lubricate: Apply a silicone-based lubricant to the spring. Avoid WD-40 as it attracts dust.
Cost Comparison: DIY vs. Professional Repair
Deciding whether to fix it yourself often comes down to cost versus risk. Here is a breakdown of typical expenses in the US market.
| Item | DIY Cost | Professional Cost |
|---|---|---|
| Spring(s) | $30 – $80 | Included in service |
| Tools (Winding Bars) | $15 – $30 | Included |
| Labor | $0 | $150 – $300 |
| Total Estimated Cost | $45 – $110 | $200 – $400 |
While DIY is cheaper, consider the value of your time and the warranty. Professionals often offer a 1–2 year warranty on parts and labor, giving you peace of mind.
Frequently Asked Questions (FAQ)
1. Can I open my garage door if the spring is broken?
Technically, yes, but it is very difficult and dangerous. The door will weigh hundreds of pounds without the spring’s assistance. You could injure your back or damage the door panels. It is best to keep it closed until repaired.
2. How do I know if my garage door spring is broken?
Look for a visible gap in the coil of the spring. For torsion springs, you might see a separation in the middle. For extension springs, the two halves may hang loosely. Another sign is that the door feels extremely heavy when you try to lift it manually.
3. Should I replace one spring or both?
If you have two torsion springs, it is highly recommended to replace both. Since they were installed at the same time, the second spring is likely near the end of its life as well. Replacing both ensures balanced lifting and prevents another breakdown soon.
4. How long do garage door springs last?
Standard springs are rated for 10,000 cycles. With average use (2–3 times a day), this translates to 7–10 years. High-cycle springs can last up to 25,000 cycles but are more expensive.
5. Is it illegal to fix my own garage door spring?
It is not illegal, but it may violate local building codes or homeowner insurance policies if done improperly. Additionally, it will almost certainly void any existing warranty on the door or opener.
Conclusion
Learning how to fix a broken spring on a garage door is valuable knowledge, but it must be paired with respect for the dangers involved. For extension springs, a careful DIY approach with safety cables is feasible for many homeowners. However, for torsion springs, the risk of severe injury is significant.
Weigh the cost savings against the potential hazards. If you choose to hire a professional, ensure they are licensed and insured. If you proceed with DIY, never skip the safety steps: secure the door, use the right tools, and wear protection.
Did you find this guide helpful? Share it with your neighbors or on social media to help others stay safe around their garage doors. Remember, a functioning garage door is key to home security and convenience—don’t let a broken spring leave you stranded!
Leave a Reply