Introduction
There are few feelings more unsettling than realizing your home’s first line of defense might be compromised. Whether you have moved into a new house, lost a key fob, or simply want to update your security after a contractor visit, knowing how to change the keypad code for garage door opener is an essential homeowner skill. This guide will walk you through the process with empathy and clarity, ensuring you can secure your property without frustration or expensive service calls.
Changing your access code is not just about maintenance; it is about peace of mind. Below, we break down the exact steps for major brands, safety protocols, and troubleshooting tips so you can get back to feeling safe in your own home.
Why Should You Regularly Change Your Garage Door Keypad Code?
Before diving into the technical steps, it is vital to understand why this task matters. Many homeowners treat their garage keypad like a static lock, but it functions more like a digital password.
According to home security experts, the garage is one of the most common entry points for burglars because it is often left unmonitored. Changing your code mitigates several risks:
- Previous Occupant Access: If you recently purchased a home, previous owners, real estate agents, or neighbors may still have the old code.
- Contractor & Service Worker Security: Landscapers, cleaners, and repair technicians are often given temporary codes. Revoking access after work is completed prevents unauthorized re-entry.
- Code Fatigue & Sharing: Teens sharing codes with friends or family members writing codes on visible notes creates vulnerability.
- Technological Obsolescence: Older fixed-code openers are susceptible to “code grabbing.” Upgrading to rolling code technology (and changing PINs) adds a layer of encryption.
Expert Insight: “Your garage door keypad is the digital front door to your largest asset. Treat code rotation with the same seriousness as changing your online banking passwords,” advises the National Crime Prevention Council.
For a deeper understanding of how these mechanical and electronic systems integrate with residential architecture, refer to the comprehensive overview on Garage Door Openers at Wikipedia.org. Understanding the underlying mechanism helps explain why specific reset procedures vary by manufacturer.
How To Change The Keypad Code For Garage Door Opener: Universal Steps
While every brand has nuances, the fundamental logic of how to change the keypad code for garage door opener systems remains consistent. Most modern units use a “Learn Button” system.
Step 1: Locate the Learn Button on the Motor Unit
The motor unit is typically mounted on the ceiling of your garage. Look for a button labeled “Learn,” “Program,” or “Smart.” It is usually located on the back or side panel near the antenna wire.
- Color Coding Matters: Note the color of the Learn button (Yellow, Purple, Red/Orange, or Green). This indicates the frequency and security protocol of your opener.
- Safety First: Use a sturdy stepladder. Do not stand on chairs or unstable surfaces. Ensure the garage door area is clear of people and pets before testing.
Step 2: Clear the Old Code (Optional but Recommended)
If you suspect unauthorized access, perform a factory reset on the keypad itself.
- Press and hold the
*and#buttons simultaneously until the lights stop blinking (usually 3–5 seconds). - Enter your new 4-digit PIN.
- Press and hold the
ENTERbutton until the motor unit lights flash or you hear a click.
Step 3: Program the New PIN
- Press the Learn Button on the motor unit. The LED indicator will light up or begin blinking. You typically have 30 seconds to complete the next step.
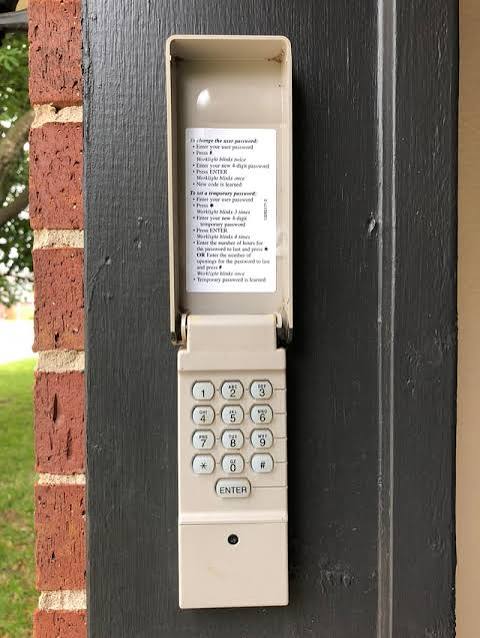
- Go to the exterior keypad.
- Enter your desired 4-digit PIN. Avoid sequential numbers (1234) or birth years.
- Press and hold the
ENTERbutton. - Watch the motor unit lights. They should flash twice or emit a distinct click sound, confirming the new code is synced.
- Test the new code immediately from outside while standing clear of the door’s path.
Brand-Specific Programming Instructions
Because manufacturers use proprietary protocols, generic instructions sometimes fail. Here is a comparison table for the top US brands:
| Brand | Learn Button Color | Unique Programming Note | Reset Time Window |
|---|---|---|---|
| LiftMaster / Chamberlain | Yellow, Purple, Red, or Green | Yellow = Security+ 2.0; Requires holding ENTER until light flashes | 30 Seconds |
| Genie | Square (Intellicode) or Round | Press Learn once, then enter PIN + UP/DOWN button | 30 Seconds |
| Craftsman | Orange, Red, or Purple | Older models may require DIP switch matching instead of Learn button | 30 Seconds |
| Overhead Door | Red or Blue | CodeDodger technology; Press Learn, then PIN + OPEN/CLOSE | 30 Seconds |
| Marantec | Digital Display | Uses numeric menu navigation rather than single Learn button | Varies by Model |
Critical Detail for LiftMaster/Chamberlain Users
If your Learn button is Yellow, you are using Security+ 2.0 technology. When programming, you must press the ENTER button on the keypad firmly and continuously. A quick tap will not register. Hold it for a full 4–6 seconds until the opener confirms.
Critical Detail for Genie Intellicode Users
Genie keypads often do not have a dedicated “Enter” button for programming. Instead, after entering your PIN, you must press the UP/DOWN arrow button to send the signal. Confusion here is the #1 reason users think their keypad is broken.
Troubleshooting: What If The New Code Doesn’t Work?
Even when following instructions perfectly, issues arise. Before calling a professional, run through this diagnostic checklist:
- Battery Check: This accounts for over 70% of keypad failures. Replace with a fresh 9V or CR2032 lithium battery. Even if the light turns on, voltage may be too low to transmit the RF signal.
- Signal Interference: LED bulbs in nearby fixtures can emit radio frequency interference that blocks keypad signals. Temporarily unscrew nearby garage lights and retry.
- Antenna Position: Ensure the antenna wire hanging from the motor unit is fully extended and not coiled, cut, or touching metal.
- Memory Full: Some openers limit the number of stored remotes/keypads (usually 8–15). Perform a full memory clear by holding the Learn button for 10 seconds until the LED goes out, then reprogram all devices.
- Weather Damage: Inspect the keypad for water intrusion, corrosion, or cracked housing. Extreme temperature swings can degrade internal circuit boards over time.
FAQ: Common Questions About Garage Door Keypad Codes
1. Can I change my garage door keypad code without the original PIN?
Yes. You do not need the old code to program a new one. The Learn button on the motor unit overrides existing codes. Simply follow the standard programming steps above. However, if you cannot access the motor unit (e.g., locked inside), you will need to gain interior access first.
2. How often should I change my garage door keypad code?
Security professionals recommend changing your code every 6 months or immediately after any life event that compromises security: moving in/out, ending a relationship, losing a remote, or completing contractor work. Set a calendar reminder to make this habitual.
3. Is there a master code that opens all garage doors?
No. Modern rolling-code technology generates billions of unique combinations. There is no universal master code. Anyone claiming to sell or share a “master code” is likely promoting a scam or illegal device. Always use manufacturer-approved programming methods.
4. Will changing the keypad code erase my car remotes?
Typically, no. Adding a new keypad does not delete existing remotes. However, performing a factory reset (holding the Learn button for 10+ seconds) WILL erase all paired devices. Only perform a full reset if you intend to reprogram every remote and keypad from scratch.
5. My keypad works intermittently. Should I replace it or reprogram?
Reprogram first. Intermittent failure often indicates weak batteries or signal interference. If fresh batteries and reprogramming don’t resolve the issue, and the keypad is over 5 years old, replacement is likely necessary. UV exposure and moisture degrade rubber seals and circuitry over time.
6. Can smart home integration affect my keypad code?
Smart hubs (MyQ, Aladdin Connect) manage connectivity but do not override local keypad programming. Your physical keypad operates independently via RF signal directly to the motor unit. Smart features add convenience but do not replace the need for secure local codes.
Conclusion: Secure Your Home With Confidence
Learning how to change the keypad code for garage door opener systems empowers you to take direct control of your home’s security. By following the brand-specific steps outlined above, replacing batteries proactively, and maintaining a regular code rotation schedule, you significantly reduce vulnerability to unauthorized access.
Remember: security is not a one-time setup but an ongoing practice. Your garage protects your vehicles, tools, and often serves as a secondary entrance to your living space. Treating its access code with diligence reflects your commitment to your family’s safety.
Found this guide helpful? Share it on Facebook, Pinterest, or Nextdoor to help neighbors secure their homes too. Tag a friend who just moved into a new house—they’ll thank you later. Stay safe, stay secure, and never hesitate to consult a certified technician if something feels beyond your comfort zone. Your peace of mind is worth the extra caution.
Leave a Reply