A garage door that suddenly stops working can be frustrating—especially when you’re in a hurry. If you’re searching for how to change the battery in garage door opener, you’re likely dealing with a weak or dead battery. The good news is that replacing it is simple, quick, and something most homeowners can handle without professional help.
Why Battery Replacement Matters for Garage Door Openers
Your garage door opener depends on batteries for two key functions:
- Backup power during outages
- Wireless control via remotes and keypads
Read too: How Do You Change Code On Garage Door Keypad Fast?
When the battery fails, your garage door may not respond at all—or only work intermittently.
📊 Industry Insight: Studies show that over 60% of garage door issues related to remotes are caused by battery failure rather than mechanical faults.
For more technical details about batteries, visit:
https://en.wikipedia.org/wiki/Battery_(electricity)
How To Change The Battery In Garage Door Opener (Step-by-Step)
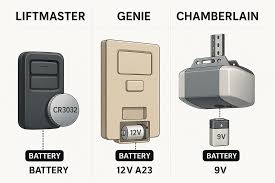
Step 1: Identify the Battery Type
Garage door systems typically use:
- 12V sealed lead-acid battery (motor unit backup)
- CR2032 coin battery (remote controls)
- 9V or AA batteries (keypads)
💡 Tip: Check your owner’s manual or open the compartment to confirm the exact type.
Step 2: Turn Off Power to the Opener
Before starting:
- Unplug the opener from the wall outlet
- Ensure the garage door is fully closed
This prevents accidental movement and improves safety.
Step 3: Locate the Battery Compartment
Depending on your setup:
- Motor Unit: Usually behind a small panel on the back or side
- Remote: Slide open the back cover
- Keypad: Remove screws or snap-open panel
Step 4: Remove the Old Battery
- Disconnect terminals carefully
- Note the positive (+) and negative (-) positions
- Remove the battery slowly
⚠️ Avoid using metal tools that could cause a short circuit.
Step 5: Install the New Battery
- Insert the new battery in the correct orientation
- Secure it firmly
- Reconnect wires or clips if applicable
📌 Example: Most openers use a 12V 4.5Ah battery, which fits standard compartments.
Step 6: Restore Power and Test the System
- Plug the opener back in
- Test the remote and keypad
- Open and close the door fully
✔️ If everything works smoothly, your replacement was successful.
Signs Your Garage Door Opener Battery Needs Replacement
Recognizing early warning signs can save you time and stress.
Common Indicators:
- Delayed or slow door response
- Remote works only at short distances
- Beeping sounds from the opener
- Flashing warning lights
Ignoring these signs can lead to total failure during critical moments.
Battery Types and Lifespan Comparison
| Battery Type | Usage Area | Average Lifespan | Cost Range |
|---|---|---|---|
| 12V SLA Battery | Backup system | 1–2 years | $20–$40 |
| CR2032 Coin Cell | Remote control | 2–3 years | $3–$10 |
| 9V Battery | Keypad | 1–2 years | $5–$15 |
| AA/AAA Batteries | Some remotes | 1–2 years | $5–$12 |
Troubleshooting After Battery Replacement
If your garage door still doesn’t work, check these:
1. Incorrect Battery Orientation
Ensure positive and negative terminals are correctly aligned.
2. Dirty Contacts
Clean terminals with a dry cloth to ensure proper connection.
3. Programming Issues
You may need to reprogram your remote or keypad.
4. Faulty Battery
Try another new battery if the issue persists.
Pro Tips to Extend Battery Life
Simple Ways to Make Batteries Last Longer:
- Replace batteries every 12–18 months proactively
- Store remotes in moderate temperatures (avoid heat/cold extremes)
- Use high-quality branded batteries
- Avoid unnecessary button presses
🔋 Expert Tip: Premium batteries can last up to 30% longer than generic options.
Advantages vs Disadvantages of DIY Battery Replacement
Advantages:
- Quick and easy (5–10 minutes)
- Low cost solution
- No professional assistance required
Disadvantages:
- Temporary fix (batteries degrade over time)
- Incorrect installation can cause issues
- Requires regular maintenance
When Should You Replace the Battery?
You should replace your garage door opener battery if:
- It’s been over 1–2 years
- Performance becomes inconsistent
- After a power outage failure
- Manufacturer recommends replacement
Regular maintenance ensures reliability and safety.
Common Mistakes to Avoid
Even simple tasks can go wrong without care.
Avoid These Errors:
- Installing the battery backward
- Using the wrong battery type
- Forgetting to reconnect terminals
- Skipping system testing
FAQ: How To Change The Battery In Garage Door Opener
1. How long does it take to replace a garage door opener battery?
Usually 5–10 minutes, depending on the model.
2. Can I use any battery brand?
Yes, but high-quality brands are recommended for better performance and lifespan.
3. Why is my garage door still not working after changing the battery?
It could be due to incorrect installation, programming issues, or a faulty opener.
4. Is it safe to replace the battery myself?
Yes, as long as you disconnect power and follow safety precautions.
5. Do all garage door openers have batteries?
Not all models include backup batteries, but most modern systems do.
6. What happens if the battery dies completely?
The opener won’t function during power outages, but manual operation is still possible.
Conclusion
Learning how to change the battery in garage door opener is a simple yet essential skill for homeowners. With just a few steps, you can restore your garage door’s functionality and avoid inconvenient breakdowns.
Regular battery maintenance not only improves performance but also ensures safety during emergencies. If this guide helped you, share it on social media and help others keep their garage doors running smoothly!
Leave a Reply