Introduction
Is your garage door stuck, making loud noises, or refusing to open smoothly? You’re not alone—broken springs are one of the most common garage door issues homeowners face. Knowing how to change a spring on a garage door can save you hundreds of dollars in repair costs, but it requires careful attention to safety and precision. In this comprehensive guide, we’ll walk you through everything you need to know, from identifying the type of spring you have to completing the replacement safely and effectively.
Understanding Garage Door Springs: Torsion vs. Extension
Before diving into the replacement process, it’s crucial to understand which type of spring your garage door uses. There are two main types:
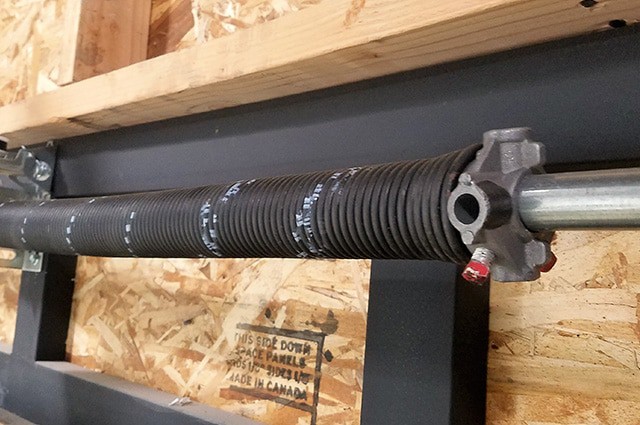
Torsion Springs
- Located above the garage door opening
- Mounted on a metal shaft (torsion bar)
- Provide smoother operation and longer lifespan
- Typically last 10,000–20,000 cycles
Extension Springs
- Installed on both sides of the door, parallel to the tracks
- Stretch and contract as the door moves
- Generally less expensive but require more maintenance
- Usually last 7,000–10,000 cycles
Why does this matter? The replacement process differs significantly between these two types. Torsion springs are under extreme tension and require specialized tools, while extension springs are somewhat easier to handle but still dangerous if mishandled.
According to the International Door Association, improper spring handling accounts for nearly 30% of garage door-related injuries. This is why understanding your system is the first critical step.
Safety First: Essential Precautions Before You Begin
Changing a garage door spring is not a typical DIY project. The tension stored in these springs can cause severe injury or even death if released improperly. Before attempting any work, follow these non-negotiable safety rules:
- Disconnect the garage door opener to prevent accidental activation
- Wear safety goggles and heavy-duty gloves at all times
- Use proper winding bars (never use screwdrivers or makeshift tools)
- Have a helper present in case of emergencies
- Ensure the door is fully closed and secured before starting
- Keep children and pets away from the work area
If you feel uncomfortable at any point, stop immediately and call a professional. No cost savings are worth risking your safety.
Tools and Materials You’ll Need
Gather these items before beginning:
| Tool/Material | Purpose |
|---|---|
| Winding bars (2) | Safely release and apply tension |
| Socket wrench set | Remove and install hardware |
| Vice grips or locking pliers | Secure the torsion bar |
| Ladder | Access overhead components |
| Replacement spring(s) | Match exact specifications |
| Safety glasses | Eye protection |
| Work gloves | Hand protection |
| Tape measure | Verify spring dimensions |
Pro Tip: Take photos of your existing spring setup before removal. This helps ensure correct reinstallation and provides reference for purchasing the right replacement.
Step-by-Step: How To Change A Spring On A Garage Door (Torsion System)
Step 1: Release Tension from the Old Spring
- Insert a winding bar into one of the holes on the winding cone
- Hold the bar firmly and insert a second bar into the next hole
- Slowly release tension by moving the first bar counterclockwise
- Continue alternating bars until all tension is released
- Repeat for the second spring if your system has two
Warning: Never remove the winding bars until you’re certain all tension is gone. The stored energy can cause the bars to fly out violently.
Step 2: Remove the Old Spring
- Once tension is fully released, loosen the set screws on the winding cone
- Carefully slide the spring off the torsion bar
- Remove the stationary cone and any associated hardware
- Inspect cables, drums, and brackets for wear
Step 3: Install the New Spring
- Slide the new spring onto the torsion bar, ensuring correct orientation
- Attach the stationary cone and secure with set screws
- Wind the spring using winding bars (typically ¼ turn increments)
- Follow manufacturer specifications for the number of turns
- Tighten all set screws securely
Important: Most residential doors require 7–8 full turns, but always check your specific door’s requirements. Over-winding can damage the spring; under-winding won’t provide enough lift.
Step 4: Test and Adjust
- Reconnect the garage door opener
- Operate the door manually first to check balance
- The door should stay in place when opened halfway
- Make minor tension adjustments if needed
- Test automatic operation several times
Changing Extension Springs: A Simpler Process
If you have extension springs, the process is slightly different:
- Secure the door in the open position using C-clamps on the tracks
- Disconnect the safety cable running through the spring
- Unhook the spring from the pulley and bracket
- Install the new spring, matching the exact length and weight rating
- Reattach the safety cable (critical for preventing injury if the spring breaks)
- Remove clamps and test operation
Extension springs typically come with color-coded ends indicating weight capacity. Ensure your replacement matches exactly.
Common Mistakes to Avoid
- Using incorrect spring specifications: Even small differences in wire size or length can cause failure
- Skipping safety cables on extension springs: These prevent dangerous snap-back if the spring breaks
- Over-tightening set screws: This can strip threads and compromise security
- Ignoring worn cables or rollers: Replace these components simultaneously for optimal performance
- Attempting solo work on torsion springs: Always have assistance available
When to Call a Professional
While knowing how to change a spring on a garage door is valuable, certain situations demand expert help:
- You have a high-lift or custom door system
- The torsion bar appears bent or damaged
- Multiple components need replacement simultaneously
- You lack proper tools or confidence
- The door is unusually heavy (wooden or oversized)
Professional installation typically costs $150–$350, which may be worthwhile for peace of mind and warranty coverage.
FAQ Section
Q1: How long do garage door springs last?
A: Torsion springs typically last 10,000–20,000 cycles (about 7–12 years with normal use), while extension springs last 7,000–10,000 cycles. Frequency of use, climate, and maintenance affect lifespan.
Q2: Can I replace just one spring if I have a dual-spring system?
A: It’s strongly recommended to replace both springs simultaneously. If one has failed, the other is likely near the end of its life. Replacing both ensures balanced operation and prevents premature failure.
Q3: What happens if I wind the spring too much?
A: Over-winding creates excessive tension, which can cause the spring to break prematurely, damage other components, or make the door difficult to close. Always follow manufacturer specifications precisely.
Q4: How do I know what size spring to buy?
A: Measure the wire diameter, inside diameter, and length of your old spring. Also note the number of turns and door weight. Many springs have identification tags with this information. When in doubt, consult a professional or supplier.
Q5: Is it legal to replace garage door springs myself?
A: Yes, there are no laws prohibiting DIY spring replacement. However, some local building codes may require licensed professionals for certain installations. Check your local regulations if unsure.
Q6: Why does my garage door feel heavy after spring replacement?
A: This usually indicates insufficient tension. Try adding ¼ turn increments and testing again. If the problem persists, verify that you installed the correct spring specifications and that all components are properly aligned.
Conclusion
Learning how to change a spring on a garage door empowers you to tackle one of the most common home maintenance challenges. By following proper safety protocols, using the right tools, and understanding your specific system, you can complete this task successfully and save significant money. Remember, patience and precision are key—rushing can lead to dangerous mistakes.
If you found this guide helpful, please share it with friends or neighbors who might benefit. Your experience could help someone avoid costly repairs or dangerous situations. Have questions or tips of your own? Leave a comment below—we love hearing from our community!
Stay safe, work smart, and enjoy your smoothly operating garage door!
Leave a Reply