If you’ve just bought a new opener or replaced an old one, you’re probably wondering how to attach garage door opener to garage door correctly. The process might seem technical at first, but with the right steps, it’s completely manageable—even for beginners. This guide will walk you through everything safely and clearly.
What Does a Garage Door Opener Do?
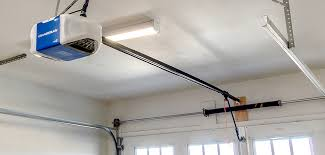
A garage door opener is a motorized device that automates the opening and closing of your garage door.
Read too: Tc1 Tricode Garage Door Opener Remote W/ Clip Chamberlain: Complete Guide
Key components:
- Motor unit
- Rail and trolley system
- Arm (connects opener to door)
- Wall control and remote
👉 Modern openers improve convenience and security, and many now support smart home integration.
For a deeper overview, you can explore Garage door opener.
What Tools Do You Need to Attach a Garage Door Opener?
Before starting, gather these tools:
- Adjustable wrench
- Socket set
- Drill with bits
- Screwdriver (Phillips and flathead)
- Ladder
- Measuring tape
- Level
Materials:
- Opener kit (includes rail, chain/belt, brackets)
- Header bracket
- Door bracket
- Mounting hardware
Can You Install a Garage Door Opener Yourself?
Yes—but it depends on your comfort level.
DIY is suitable if:
- You have basic mechanical skills
- The garage has proper ceiling support
- You follow instructions carefully
Hire a professional if:
- You’re unsure about alignment
- Electrical wiring is required
- The door is heavy or unbalanced
📊 Fact: Around 70% of homeowners successfully install openers themselves using manufacturer instructions.
How To Attach Garage Door Opener To Garage Door (Step-by-Step)
Follow these steps carefully for a safe and proper installation.
Step 1: Assemble the Opener Rail
- Connect rail sections as instructed
- Attach the chain or belt drive
- Ensure the trolley moves smoothly
👉 Typical rail length: 7–8 feet for standard doors.
Step 2: Install the Header Bracket
- Locate the center above the garage door
- Position bracket 2–3 inches above the door
- Secure using heavy-duty lag screws
👉 This bracket supports the opener’s pulling force.
Step 3: Mount the Opener Motor Unit
- Lift the motor unit to the ceiling
- Use angle iron or brackets for support
- Ensure it is level and aligned with the door
📏 Recommended ceiling clearance: at least 12 inches.
Step 4: Attach the Door Bracket
- Fix the bracket to the top section of the door
- Align it with the opener rail
👉 This is where the opener arm connects.
Step 5: Connect the Opener Arm
This is the most important step when learning how to attach garage door opener to garage door.
- Attach the curved arm to the door bracket
- Connect the straight arm to the trolley
- Join both arms using bolts
👉 Ensure a slight angle—not perfectly straight—for smooth operation.
Step 6: Install Safety Sensors
- Place sensors 6 inches above the floor
- Align them facing each other
- Secure tightly to prevent misalignment
⚠️ Sensors prevent the door from closing on objects or people.
Step 7: Connect Power and Test
- Plug in the opener
- Run a full open/close cycle
- Adjust limits and force settings
👉 The door should move smoothly without jerking.
Common Installation Mistakes to Avoid
Avoid these errors to ensure long-term performance:
- ❌ Misaligned opener rail
- ❌ Loose mounting brackets
- ❌ Incorrect arm angle
- ❌ Skipping sensor installation
- ❌ Ignoring door balance
Chain vs Belt Drive Openers (Comparison)
| Feature | Chain Drive | Belt Drive |
|---|---|---|
| Noise Level | Noisy | Quiet |
| Cost | Lower | Higher |
| Durability | Very durable | Smooth operation |
| Maintenance | Requires lubrication | Low maintenance |
👉 Belt drives are ideal for attached garages due to quieter operation.
How Long Does Installation Take?
- Beginners: 3–5 hours
- Experienced DIYers: 2–3 hours
- Professionals: 1–2 hours
👉 Take your time—accuracy matters more than speed.
Benefits of Proper Installation
✔ Smooth door operation
✔ Increased safety
✔ Reduced wear and tear
✔ Longer opener lifespan
✔ Better home security
When Should You Call a Professional?
Consider expert help if:
- The door is unbalanced or heavy
- The opener struggles during testing
- Structural mounting points are weak
- Electrical wiring is complicated
👉 Professional installation costs typically range from $150–$300.
Pro Tips for Best Results
- Lubricate moving parts after installation
- Check bolt tightness after first week
- Test safety sensors monthly
- Keep remote batteries fresh
📊 Insight: Proper installation can extend opener lifespan by up to 5 years.
FAQ: How To Attach Garage Door Opener To Garage Door
1. Can I attach an opener to any garage door?
Most standard sectional doors are compatible. Custom or one-piece doors may require special hardware.
2. Do I need to balance the door before installation?
Yes. An unbalanced door can strain the opener and cause failure.
3. How tight should the opener arm be?
Secure but not overly tight—allow slight movement for smooth operation.
4. What happens if the opener is misaligned?
The door may jam, move unevenly, or wear out parts faster.
5. Are safety sensors required?
Yes. Modern openers require them for safety compliance.
6. Can I install without drilling?
No. Secure mounting requires drilling into framing or ceiling supports.
Conclusion
Learning how to attach garage door opener to garage door is a practical DIY skill that can save money and improve your home’s convenience. By following the correct steps, using proper tools, and prioritizing safety, you can achieve a professional-quality installation.
Take it slow, double-check your alignment, and enjoy the benefits of a fully automated garage door.
👉 If this guide helped you, share it on social media so others can install their garage door opener with confidence too!
Leave a Reply